Table of Contents
Advertisement
Quick Links
Advertisement
Table of Contents

Related Manuals for Gorenje NRKI4181LW


Summary of Contents for Gorenje NRKI4181LW
- Page 1 Instructions for use Upright refrigerator-freezer...
-
Page 2: Table Of Contents
Upright refrigerator-freezer Thank you for your confi dence in buying our appliance and congratulations on the excellent choice. We hope it will successfully serve its purpose for many years. The appliance is intended solely for household use. Upright refrigerator - freezer (hereinafter: the appliance) consists of two parts: top part is refrigerator and bottom part is upright freezer. -
Page 3: Before Fi Rst Operation
Before fi rst operation • This appliance can be used by children aged from 8 years and above and persons with reduced physical, sensory or metal capabilities or lack of experience and knowledge if they have been given supervision or instruction concerning use of the appliance in a safe way and understand the hazards involved. -
Page 4: A Few Tips On How To Save Power With Your Refrigerator-Freezer Combo
• Warning: Do not use any mechanical accessories when thawing the refrigerator, except for those explicitly recommended by the manufacturer. • Warning: To prevent any pollution be careful not to damage the insulation or refrigeration tubes at the rear wall during the installation, cleaning and disposal of the appliance. -
Page 5: Description Of The Appliance
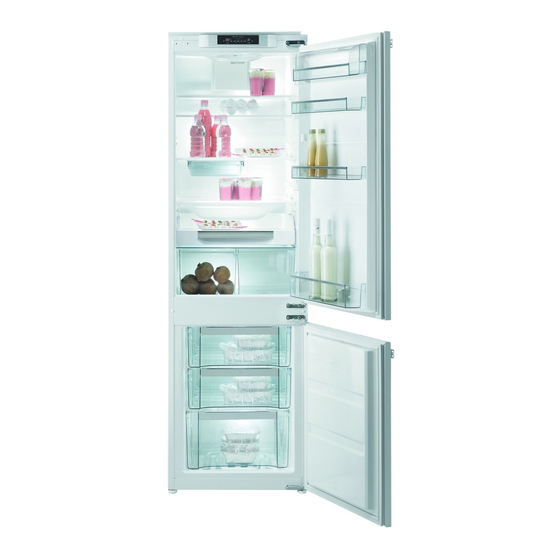
Description of the appliance Interior equipment of the appliance will typically vary according to the specifi c model. A Refrigerator 1 Fan 2 Interior light 3 Control panel 4 Horizontal bottle rack 5 Adjustable glass shelves 6 Pull-out glass shelf (adjustable height) 7 Removable snack tray 8 Foldable egg rack (closed - 6 eggs, open - 12 eggs) -
Page 6: Installation And Connections
Installation and connections Selecting the location • Place the appliance in dry and well aired room. The appliance operates best at temperature ranges indicated in the chart below. Relevant class of the appliance is indicated on the rating plate. Class Ambient temperature SN (subnormal) from + 10°C to + 32°C... - Page 7 Warning: when installing built-in appliances into a cupboard or cabinet in a side-by-side layout, the dew prevention installation kit should also be purchased and installed. For safety reasons, dew prevention kit may only be installed by an authorized service technician! Order code: 376078 (appliances higher than 1,700 mm) •...
-
Page 8: Changing The Direction Of Opening The Door
Changing the Direction of Opening the Door Freestanding appliance Necessary tools: ring spanner No.8, screwdriver, torque 25 Tilt the appliance so that the bottom hinge can be unscrewed and proceed with disassembling as shown in the Figure 3. Then fi x the assembly parts again in the opposite turn. Use the attached opposite hinge insert piece. -
Page 9: Appliance With Electronic Control
Appliance with electronic control CONTROL UNIT 1 CONTROL UNIT 2 No frost system appliance A Temperature setting and on/off knob B Signal light: on when the appliance is in operation C Fan boost key D Signal light: on when the fan boost is activated E Super freeze key F Signal light: on when super freeze is activated G Digital refrigerator temperature display indicates actual temperature in the appliance in the... - Page 10 Setting the refrigerator • Set the desired refrigerator temperature with the A knob. The temperature temperature can be set in the range from min. to max. • Recommended setting of the thermostat knob is on the eco position. • If the temperature of the room in which the appliance is installed is lower than 16°C or if there is less than 10 kg of food in the freezer, we recommend setting the thermostat knob to max.
- Page 11 Open refrigerator door If refrigerator door is open for more than one minute, an acoustic alarm (only with control alarm will be activated. The alarm is deactivated when the door unit 1) is closed. CONTROL UNIT 3 Appliance with a fan and the No Frost system A Freezer temperature key H Signal light: on when alarm is activated B Freezer temperature digital display:...
- Page 12 Adjusting the Refrigerator temperature range: from +1°C to +9° temperature from -16°C to -24°C + super Freezer temperature range: freeze • Adjust the freezer temperature with the A key and refrigerator temperature with the N key. • When one of the temperature adjustment keys is pressed, the display will start fl...
- Page 13 Intermittent acoustic signal - power failure alarm If the temperature in the refrigerator or freezer rises too high as a result of a power failure, an intermittent acoustic signal will be activated, signal light H will light up, and the highest actual temperature will be indicated on a fl...
-
Page 14: Control Panel - Appliance With Mechanical Regulation
Control panel - Appliance with mechanical regulation Model without fan Model with fan A Temperature setting and on/off knob B Fan on/off switch (only with some models) Turning the appliance Turn on: rotate the thermostat knob clockwise towards position 7. on/off... - Page 15 Turn off: rotate the knob back to position STOP (0). Setting the temperature • When the environment temperature is normal, a medium setting is recommended. You can set higher or lower temperature according to your wish by setting the thermostat knob. •...
-
Page 16: Refrigerator Accessories
Refrigerator accessories (Equipment depends on the model) Shelf • Shelves can be optionally placed on the guides inside the appliance. To remove the shelf, fi rst slide it out as far as the guide allows it, then slightly lift it up and pull it out. Quickly perishable food should be stored on the back i.e. - Page 17 • Fan fi xed under the ceiling or hidden behind the rear refrigerator panel or within the freezer compartment improves even distribution of temperature and decreases dew upon storage racks. Removable snack tray The tray is especially handy for cold cuts, cheese, etc ... The drawer is pulled out by lifting the front part slightly and then pulling out.
-
Page 18: Storage Of Food In The Refrigerator
Storage of food in the refrigerator Important precautions • Proper use of the appliance, adequately packed food, correct and hints temperature and hygienic precautions produce substantial impact on the quality of stored food. • Always respect the best before date, printed on the packaging. •... -
Page 19: Storing Food In The Freshzone Compartment
Storing food in the FreshZone compartment The FreshZone drawer allows storing a wide variety of fresh food to keep longer than in a conventional refrigerator. The food stays fresh longer, retaining the fl avour and nutrients. It lows down decay and loss of mass; therefore, fruit and vegetables remain fresh and natural longer. -
Page 20: Freezing And Storing Frozen Food
Freezing and storing frozen food Freezing process • Activate the freezer boost (super freeze) function 24 hours before freezing fresh food: - control unit 1: press the E key; - control unit 2: rotate the A dial to position ( - control unit 3: press the C key;... - Page 21 • For freezing smaller quantities of fresh food (1-2 kg), the engagement of the fast freeze function is not required. Important precautions • Freeze only such food which is suitable for freezing and sustain and hints for freezing low temperatures. Food should be of adequate quality and fresh food fresh.
-
Page 22: Defrosting The Appliance
Defrosting frozen food Partially thawed or defrosted foods should be used as soon as possible. Cold air preserves the food but it does not destroy microorganisms which rapidly activate themselves after defrosting and make foods perishable. Partial defrosting reduces the nutritional value of food, especially fruits, vegetables and readymade meals. -
Page 23: Cleaning The Appliance
Cleaning the appliance Prior any cleaning attempt disconnect the appliance from the mains (see the control chapter for ON/OFF function), and pull the power cord from the mains wall outlet. Special antibacterial protection in top layer of inner walls prevents multiplication of bacteria and maintains the interior clean and germ free. -
Page 24: Troubleshooting Guide
Troubleshooting guide Fault: Cause/Remedy The appliance does not • Check if there is power in the socket and if the appliance is operate after connection to the switched on. mains: Cooling system operates • Ambient temperature too high. continuously without •... - Page 25 Fault: Cause/Remedy Bulb replacement: • Before replacing the light bulb, disconnect the appliance form the power supply (pull the power cord from the wall socket). A – Use the screwdriver to press the locking hook (in arrow direction), and remove the cover. B –...
-
Page 26: Noise Level
THE MANUFACTURER RESERVES THE RIGHT TO ALTER THE SPECIFICATIONS WITH NO IMPACT TO THE FUNCTIONAL OPERATION OF THE APPLIANCE. Instructions for use of the appliance can also be found on our website at www.gorenje.com / < http://www.gorenje.com />... - Page 28 COMBI 54-2 en (10-14)
Need help?
Do you have a question about the NRKI4181LW and is the answer not in the manual?
Questions and answers