Advertisement
Available languages
Available languages
Quick Links
GCWB-18
WARNING
A child or adult can tip the cabinet and be killed or
seriously injured.
Failure to secure the cabinet as shown in these
instructions can result in death or serious injury to
children and adults.
Children should not play with or around the
cabinet at any time.
WARNING: This product can expose you to chemicals
including Di(2-ethylhexyl)phthalate (DEHP) which is known
to the State of California to cause cancer and birth defects
or other reproductive harm. For more information go to
www.P65Warnings.ca.gov
REGISTER THIS PRODUCT
For warranty and customer support, please register this
product at www.stack-on.com/product-registration
IMPORTANT:
Record the key number and serial number from the back of the cabinet.
Keep keys in a secure place away from children.
Do not store this document in the cabinet
Tools Required:
Phillips screwdriver
7/16" wrench
drill
3/16" drill bit
Scizzors
PARTS INCLUDED
4-POSITION BARREL REST
(QUANTITY 2)
SCOPE REST
(QUANTITY 4)
Portable Case
Instructions
Tip Over Hazard
Hardware included:
(22) 8-32 x 1/2 machine screw
(22) 8-32 nut
(12) 8 x 1/2 screw
5-POSITION BARREL REST
(QUANTITY 2)
PLASTIC PLUG
(QUANTITY 2)
PARTS INCLUDED
CENTER PARTITION
(QUANTITY 1)
FOAM PAD FOR BOTTOM
(QUANTITY 1)
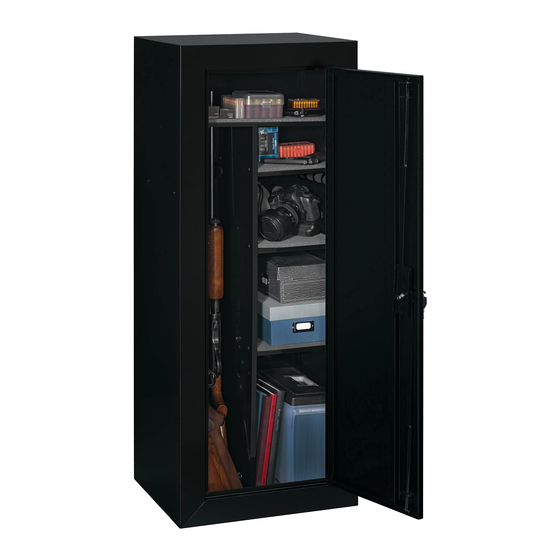
PLANNING YOUR CABINET CONFIGURATION
Before assembling your cabinet, review the following
storage options this cabinet provides. Choose the options
that best suit your storage needs.
You will need to assemble all internal components before
mounting the cabinet to the wall and floor.
TOP SHELF
(QUANTITY 1)
SHELF
(QUANTITY 4)
FOAM FOR TOP SHELF
(QUANTITY 1)
FOAM FOR SHELF
(QUANTITY 4)
The partition and the
top shelf create the
structure for the left
and right storage
compartments in this
cabinet. The space
behind the top shelf
provides clearance
for longer gun
barrels.
40141-2109
1
18
Advertisement

Related Manuals for Stack-On Sentinel GCWB-18


Summary of Contents for Stack-On Sentinel GCWB-18
- Page 1 CENTER PARTITION (QUANTITY 1) or other reproductive harm. For more information go to www.P65Warnings.ca.gov REGISTER THIS PRODUCT For warranty and customer support, please register this product at www.stack-on.com/product-registration FOAM FOR SHELF FOAM PAD FOR BOTTOM (QUANTITY 4) (QUANTITY 1) IMPORTANT: PLANNING YOUR CABINET CONFIGURATION Record the key number and serial number from the back of the cabinet.
- Page 2 INSTALLATION OF BARREL RESTS PLANNING YOUR CABINET CONFIGURATION THE BARREL RESTS MUST BE INSTALLED BEFORE MOUNTING THE CABINET TO A WALL AND FLOOR. Installation of Barrel Rests Install the 4-position barrel rests (A) to the back of the cabinet and the 5-position barrel rests (B) to the sides of the cabinet as shown in figure 2.
- Page 3 INSTALLATION OF SHELVES Top Shelf Assembly The top shelf has 2 sets of holes for attaching the center SHELVES MUST BE INSTALLED BEFORE MOUNTING partition. Use the set of holes that will allow the partition to THE CABINET TO A WALL AND FLOOR. be centered between the 2 holes.
- Page 4 Side By Side Shelf Assembly SECURING THE CABINET To assemble two shelves at the same height, assemble the shelves as shown. It is important to note that you will be Before you install the cabinet to a wall and the floor, install using the same screw to support both shelves through the the interior components as described in the assembly Center Partition.
- Page 5 If you lose your keys you will need this information as a reference for obtaining new keys. ORDERING A REPLACEMENT KEY Visit “www.Stack-On.com/key-replacement-form” and follow the online instructions for form submission and payment. When the Center Partition is used, cut the bottom foam as shown so it fits around the partition.
- Page 6 If Stack-On is properly notified during the one-year warranty period and, after inspection confirms there is a defect, Stack-On will, at its sole option, provide repair parts or exchange the product at no charge, or refund the purchase price of the product.
-
Page 7: Pièces Incluses
à la reproduction. Pour en CENTRALE (1) savoir plus, allez à www.P65Warnings.ca.gov ENREGISTREZ CE PRODUIT Pour la garantie et le support client, veuillez enregistrer ce produit sur www.stack-on.com/product-registration REVÊTEMENT EN REVÊTEMENT EN MOUSSE MOUSSE POUR POUR LE FOND (1) ÉTAGÈRE (4) - Page 8 PLANIFICATION DE CABINET DE CONFIGURATION POSE DES APPUIS À CANON IL FAUT POSER LES APPUIS À CANON AVANT DE FIXER L’ARMOIRE AU MUR ET PLANCHER. Installation des appuis à canon Installez l'appui à canon à 4 positions (A) à l'arrière de l'armoire et l'appui à...
- Page 9 POSE DES ÉTAGÈRES Pose de l’étagère du haut Le plateau supérieur a 2 jeux de trous pour fixer la cloison centrale. Utilisez l'ensemble des trous qui permettront à la LES ÉTAGÈRES DOIVENT ÊTRE POSÉES AVANT DE partition à être centré entre les 2 trous. Cela permettra FIXER L’ARMOIRE AU MUR ET PLANCHER.
- Page 10 Pose des étagères côte à-côte DIRECTIVES POUR L'ASSEMBLAGE DE L'ARMOIRE Pour assembler deux étagères à la même hauteur, monter les étagères comme illustré. Il est important de noter que Avant d'installer l'armoire à un mur et le sol, installer les vous allez utiliser la même vis pour soutenir les deux composants intérieurs tels que décrits dans les instructions tablettes à...
- Page 11 COMMANDER UNE CLÉ DE REPLACEMENT Visitez “www.Stack-On.com/key-replacement-form” et suivez les instructions en ligne pour la soumission et le paiement du formulaire. Lorsque la cloison centrale est utilisé, couper le coussin de mousse en bas, comme illustré.
- Page 12 Las Vegas, NV 89119 CustomerService@Stack-On.com Si Stack-On a été adéquatement avisée du problème au cours de la période de garantie d’un an et, qu’après inspection, elle confirme le problème, Stack-On fournira les pièces de réparation ou échangera le produit sans frais, ou remboursera le prix d’achat du produit.
-
Page 13: Partes Incluidas
Para obtener más información, vaya a www.P65Warnings.ca.gov REGISTRAR ESTE PRODUCTO Para la garantía y la asistencia al cliente, registre este producto en www.stack-on.com/product-registration COJÍN DE ESPUMA ESPUMA PARA PARA LA PARTE INFERIOR (1) EL ESTANTE (4) PLANIFICACIÓN DE SU GABINETE... - Page 14 INSTALACIÓN DE SUJETADORES PARA BARRILES PLANIFICACIÓN DE SU GABINETE LA PISTOLA SOPORTES BARRIL SE DEBE INSTALAR ANTES DE MONTAR LA CAJA EN LA PARED Y EL PISO. Instalación de sujetadores para barriles Instale los sujetadores de 4 posiciones para barriles (A) a la parte de de atrás del gabinete y los sujetadores de 5 posiciones para barriles (B) como se muestra en la figura Atornille manualmente los tornillos dentro de los hoyos...
- Page 15 INSTALACIÓN DE PLATAFORMAS Asamblea del Estante Superior La plataforma superior tiene 2 juegos de agujeros para la ESTANTES DEBEN ESTAR INSTALADOS ANTES DE fijación de la pared medianera. Utilice el juego de orificios MONTAR LA CAJA A LA PARED Y EL PISO. que permitan la partición que se centra entre los 2 agujeros.
-
Page 16: Selección De La Ubicación
Asemblea de Lado a Lado INSTRUCCIONES DE MONTADO DEL GABINETE Para ensamblar dos estantes a la misma altura, montar los estantes como se muestra. Es importante tener en cuenta Antes de instalar el gabinete a la pared y el piso, instale los componentes interiores como se describe en las que usted va a utilizar el mismo tornillo para apoyar tanto a instrucciones de montaje. - Page 17 PEDIR UNA LLAVE DE REPUESTO Visite “www.Stack-On.com/key-replacement-form” y siga las instrucciones en línea para el envío y pago de formularios. Cuando se utiliza la partición de Centro, cortar la espuma de la parte inferior como se muestra por lo que se ajusta alrededor de la partición.
- Page 18 CustomerService@Stack-On.com Si se notifica debidamente a Stack-On durante el período de garantía de un año y, después de la inspección se confirma que existe un defecto, Stack-On, a su exclusiva opción, proporcionará piezas de repuesto o cambiará el producto sin cargo, o reembolsará...
Need help?
Do you have a question about the Sentinel GCWB-18 and is the answer not in the manual?
Questions and answers