Table of Contents
Advertisement
Quick Links
Advertisement
Table of Contents

Related Manuals for X-Tronic 8080

Summary of Contents for X-Tronic 8080
- Page 1 X-TRONIC USA X-Tronic Model ® #8080 Instructions...
-
Page 3: Table Of Contents
Warranty ................... 13 Contact Information ..............14 Thank you for purchasing the XTRONIC #8080-XTS 4-in-1 Reworking/ Soldering Station and DC Power Supply / Volt Meter. This product is designed base upon market research needs of a 4 in 1 tool. These functions, Hot Air Rework, Soldering Iron, DC Power Supply and Voltmeter can be used independently or simultaneously. -
Page 4: Package Contents
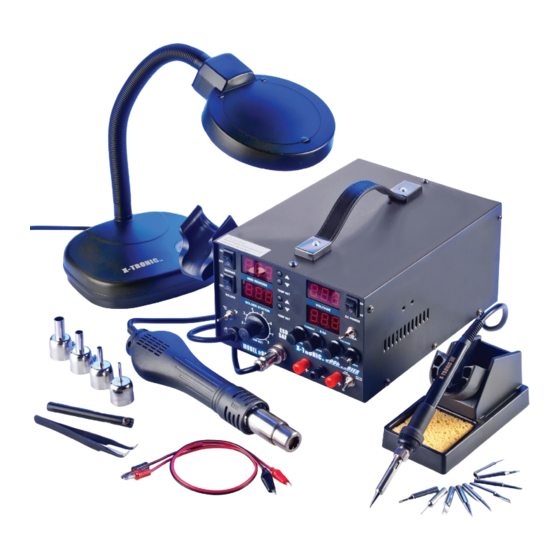
Package Contents 1 – X-Tronic #8080-XTS Rework/Soldering Station & Power Supply 1 – X-Tronic 70Watt Soldering Iron 1 – Soldering Iron Stand (w/Sponge) 1 – X-Tronic 500 Watt Hot Air Gun (w/ Holder) 1 – X-Tronic IC Popper 1 – X-Tronic Stainless Steel Pin Point Tweezers 1 –... -
Page 5: Product Specifications
Product Specifications Model #8080-XTS Input Voltage 110 VAC / 6A @ 50-60Hz Power Consumption ≤1000 Watts Dimensions 4.9 x 7.4 x 9.8 in / 124 x 187 x 249 mm Weight 16.7 lbs / 7.6 kg Working Environment 32°F ~ 122°F / 0°C ~ 50°C Storing Environment -68°F ~ 176°F / -20°C ~ 80°C... -
Page 6: Product Set-Up
Hot Air Rework / Soldering Station Product Set Up 1. Unpack all of the contents of the X-Tronic # 8080-XTS Kit. 2. Plug the soldering iron into the correct connector and secure it using the attached nut. 3. Attach the hot air gun holder to the side of the main unit using the 2 screws included. -
Page 7: User Interface
User Interface 1. Power Switch a) Hot Air b) Soldering Iron c) Power Supply 2. Display a) Hot Air b) Soldering Iron c) Voltage - d) Current 3. Hot Air Temp Adjustment 4. Soldering Iron Temp Adjustment 5. °C - °F Selection Switch 6. -
Page 8: Operating Guidelines
Operating Guidelines 1. Before turning on the unit, ensure that the hot air gun is in the holster and the soldering iron is connected properly. The hot air gun needs to be in this position EVERY TIME the unit is started. 2. -
Page 9: Dc Power Supply / Volt Meter Product Set-Up
3. Never point the hot air gun towards any flammable material or human skin. There is very hot air exiting the outlet that may cause serious burns or damage. 4. Do not use pliers or any other tool to manipulate hot air nozzles. 5. -
Page 10: Operating Guidelines
Operating Guidelines 1. Before turning on the unit, ensure that all input and output connection are correct and secure 2. Before using DC Power Supply or Volt Meter, ensure all selection switches are in correct positions 3. Use Adjustment knobs to desired output Voltage/Current 4. -
Page 11: Maintenance
Maintenance Unit 1. Keep the unit plugged into a GROUNDED outlet at all times during operation. 2. Keep the unit and all components free from dirt, debris, and liquid at all times. 3. Make sure the power cord is plugged in correctly and safely off the floor to prevent accidents. -
Page 12: Install/Remove Hot Air Attachment
Install/Remove Hot Air Attachment 1. Turn the power off to the unit and unplug it from the power source. 2. Allow the hot air gun and attachment to reach room temperature before proceeding. 3. Do not use excessive force when installing/removing hot air attachments. -
Page 13: Replacing Heating Elements
No/insufficient airflow • Ensure there are no blockages in the nozzle or hot air gun shaft • Adjust the air flow knob to a higher setting • Contact the manufacturer. Noisy unit • Ensure the unit is on a flat, level surface • Ensure all of the screws and brackets are secure... - Page 14 16. Replace the tip over the heating element. 17. Replace the outer metallic shaft of the soldering iron. 18. Replace the metallic nut and tighten. Hot Air Gun 1. Turn off the unit and unplug it from the power source. 2.
-
Page 15: Warranty
All X-Tronic Products come with 3-Year Guarantee, valid only in the 48 Contiguous United States. If you purchase this product and ship it to a destination outside of the 48 Contiguous United States this warranty ... - Page 16 Compliments please call or email us. Toll Free: 844-861-4762 Info@XTronicUSA.com Our Business Hours are: Monday - Thursday: 8am - 4pm CST Friday: 8am - Noon CST If you would like to shop for other X-Tronic International Products Please visit our website www.XTronicUSA.com...
Need help?
Do you have a question about the 8080 and is the answer not in the manual?
Questions and answers