Table of Contents
Advertisement
Quick Links
Advertisement
Table of Contents

Summary of Contents for Virbac Speed Reader
-
Page 2: Table Of Contents
Table of contents General information on the Speed Reader analyser ....2 Principle ..................2 Operating instructions ..............3 Symbols ..................4 Contents ..................4 Presentation of the reader ..............5 Description of icons ................. 6 Before the first use ................ -
Page 3: General Information On The Speed Reader Analyser
General information on the Speed Reader analyser The Speed Reader analyser is a rapid immunochromatography test reader that uses laser-induced fluorescence for dosing veterinary biomarkers in biological samples. Principle The sample to be analysed is tested with fluorophore nanoparticles coupled... -
Page 4: Operating Instructions
- Avoid applying intense pressure during the insertion of the tests in the loader or when handling the touchscreen. - In case of a major malfunction, immediately switch off the ON/OFF button located at the rear of the unit, unplug the Speed Reader analyser and contact technical support. -
Page 5: Symbols
Operation of this equipment in a residential area is likely to cause harmful interference in which case the user will be required to correct the interference at his own expense." “Changes or modifications not expressly approved by Virbac could void the user’s authority to operate the equipment.”... -
Page 6: Presentation Of The Reader
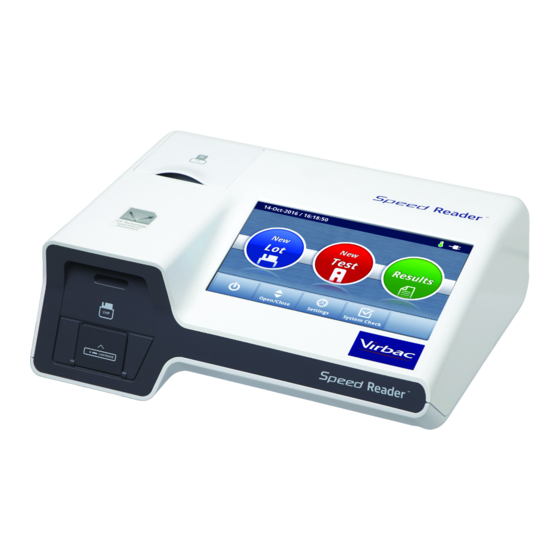
Presentation of the reader Thermal printer 7-inch touchscreen Temperature Test loader part sensor Calibration chip connector Power connector USB ports Power switch RJ-45 Network jack USB OTG port (inactive) (inactive) -
Page 7: Description Of Icons
Housing for AA/LR6 batteries and SD card Description of icons Icon Description Appears when the unit is plugged into the mains Icon is green if the temperature is between +15°C and +35°C, otherwise it’s orange Charge level of auxiliary batteries when device is not running on the mains... -
Page 8: Before The First Use
57 mm x 40 mm x 12 mm (Paper width X Maximum external diameter of the roll X Internal diameter of the coil) Each time the Speed Reader analyser is booted, the printer rolls out a thin band in order to verify the presence of paper... -
Page 9: Powering Up And Initialisation
A self-test procedure is performed each time it is switched on, in order to check that the reader’s main components are receiving power. Speed Reader analyser configuration Set the language, date, time and date format using the following screens: It is then recommended to carry out the first System Check immediately by pressing "Yes"... -
Page 10: System Check
System Check A Speed System Check control kit containing a control test cell and a control chip is provided with the unit for this purpose. The control chip is not a calibration chip, therefore it should not be saved in the reader. -
Page 11: Saving A New Batch Of Tests
At each reception of a new box of tests, you should save the batch’s calibration chip in the Speed Reader ’s memory in order to ensure an optimal result. When running a test, if the chip of the corresponding batch is not saved, you will be prompted to do so at the beginning of the test in order to move on to Step 2. -
Page 12: Saving A New Batch
“Yes” The Speed Reader analyser can store up to 5 batch calibrations per test in its memory. When the memory is full, the Speed Reader analyser will erase the oldest batch calibration curve at each new saving. Batches whose expiration date has passed appear in yellow on the reader. -
Page 13: Analysing A Sample
Analysing a sample Performing a new test o On the main screen, select “New test”. o The following screen appears. o Step 1: Introduce the blank tape of the test as far as it will go, then press “Next”. The reader then checks the type of test to be performed and the presence of the calibration of the corresponding batch in the device’s memory. - Page 14 o Step 2: Check the test, the batch number and the expiration date If necessary, you can add the name of the owner, the name of the animal, its identifier (chip number, tattoo...), its species and any comments (max. 25 characters). NB: You can edit the various fields throughout the testing procedure.
- Page 15 ATTENTION, when an incubation time is required, you must observe it and you cannot exceed it for more than 30 seconds in order to obtain a valid result. Always ensure you have performed this step properly before proceeding to the next step. Step 4: Remove completely the blank tape from the charger and put 2 drops of the reagent-sample mixture into the sample well, first ensuring that you eliminate the first 2 drops, so as to flush out the...
- Page 16 o At the end of the countdown, when the reaction time is finished, the result appears automatically on the screen. For T4, Cortisol and Progesterone tests, the result is displayed with 2 units o Select “Save” to validate the result, save it in the device’s memory and return to the main screen.
-
Page 17: Viewing Previous Results
Viewing previous results To view previous results, select “Results” in the main screen. The screen shows all stored results (7 results per page and up to 1,000 in memory). For T4, Cortisol and Progesterone tests, the result is displayed with 2 units To select one or more results, press the number of the test in the first column on the left of the table. -
Page 18: Searching For A Result
For more information, press the desired result: At this stage, you can only edit the comments field input during the analysis. Searching for a result It is possible to perform a search according to various criteria. The “Search” button lets you search for a result by test date, patient name, owner name, valency or species. -
Page 19: Deleting Results
Deleting results The “Delete” button lets you delete the selected results (only the administrator can delete results). Sending results The “Send” button lets you send all, or the selected, results to a USB key (only use the USB key provided with the reader). Results are saved in a .csv format which can be processed with an Excel type spreadsheet. -
Page 20: Printing The Results
Printing the results The unit features a thermal printer. It is possible to print the results of the tests and the results of the System Check. The “Print” button prints the selected result(s). The results can be automatically printed at the end of a test (refer to (“Other settings”) NB: regardless of the language selected, the printing is done in English The printing of multiple results will be sequential: one result after another. -
Page 21: Other Settings
Other settings Starting from the main screen, select “Settings”. The following screen appears: Connection This menu lets you enable or disable various connection modules: WiFi and Ethernet. These features are not active at the moment. Once they are active, an update will be made available with details for connecting the device. -
Page 22: Backup
’s memory will be overwritten by the results that are on the external medium (the USB key or the SD card). Once the operation is completed, the old results in the Speed Reader ’s memory are overwritten in a definite manner. -
Page 23: User Id
The administrator is also able to reset the reader in the Settings/About Speed Reader menu and to delete or restore results in the Settings/Backup menu. o To disconnect a user, return to the main menu and press “Log out”. -
Page 24: About Speed Reader
About Speed Reader This menu groups all the information about the software and the result of the last self-test performed. This information may be requested by technical support. To reset to factory settings, select “Reset”, then “OK”. This operation permanently deletes all the settings and the results previously recorded and... -
Page 25: System
System o Sound This feature lets you turn the sound alerts on or off at different times. o Enable or disable the various alarms with the “ON/OFF” buttons. o Save by pressing “Save”. o Printer Automatic printing of the result Select “ON”... - Page 26 o Save the date by pressing the “Set” button. o Set the time using the “+” and “-” buttons. o Save the time by pressing the “Set” button. o Choose the date format.
-
Page 27: Language
o Language Menu for selecting a language for the reader. o Select the desired language and confirm by pressing “Yes”. o Display o Select the desired brightness (between 1 and 5). o Activate or deactivate the sleep mode using the “ON” and “OFF” buttons. -
Page 28: Update
o Update This function lets you update the application so that you can benefit from the improvements made to the reader. An update can be performed in two ways: via the USB key or via the reader’s SD card. Once the application is downloaded, save the .exe file on the USB key or the SD card. -
Page 29: Powering Off The Reader
Powering off the reader o Return to the main screen. o Ensure that no test tape is inserted in the loader before turning off the reader. If the loader is closed, press the “Open/Close” button on the main screen in order to perform this check. o If necessary, make sure you close the test loader by pressing “Open/Close”. -
Page 30: Error Messages
Error messages Error Cause “Caution Error” No check band, try again with a new tape. “Barcode Error” Problem in identifying the tape. Check that the barcode is not damaged or contaminated. If the problem persists, contact technical assistance. “Mismatch Error” The calibration chip and the test do not match. -
Page 31: Technical Specifications
Technical specifications Name of the product Speed Reader Principle Immunological dosage through fluorescence-induced immunochromatography Dimensions 276mmx220mmx91mm (LxDxH) Weight 1.3 kg Power DC 12V/5A AC/DC Adapter Input: 100-240V ~ 50/60Hz, 1.8A Output: DC 12V/5A Batteries: non-rechargeable 1.5V x4 LR6/AA Screen Touchscreen, colour, LCD, 7-inch Battery Linear current (6V, 0.34A)
Need help?
Do you have a question about the Speed Reader and is the answer not in the manual?
Questions and answers