Katronic KATflow 200 Quick Start Manual
Hide thumbs
Also See for KATflow 200:
- Operating instructions manual (54 pages) ,
- Quick start manual (2 pages) ,
- Quick start manual (2 pages)
Advertisement
Quick Links
Katronic Technologies Ltd . I Telephone: +44 (0)2476 714 111 I Email: info@katronic.co.uk I Web: www.katronic.co.uk
measurement
Step 1: Selection of
Avoid installation of sensors in the vicinity of deformations and
●
pipe defects, near welding seams or where deposits could have
accumulated.
Select a measuring point with sufficient straight pipe to obtain
●
accurate measurements. Please consult the manual for the
recommended distances from sources of disturbance.
For a horizontal pipe, mount the sensors on the side of the pipe.
●
For a vertical pipe, mount the sensors at a location where the liquid
flows upwards. (Pic 1)
Mount the sensors in the direction of the flow. (Pic 2)
●
Clean the pipe at the measurement point. Remove loose paint and
●
rust with a wire brush or file.
Apply coupling paste to the face of the clamp-on sensors before
●
attaching them to the pipe.
Pic 1: Mounting points
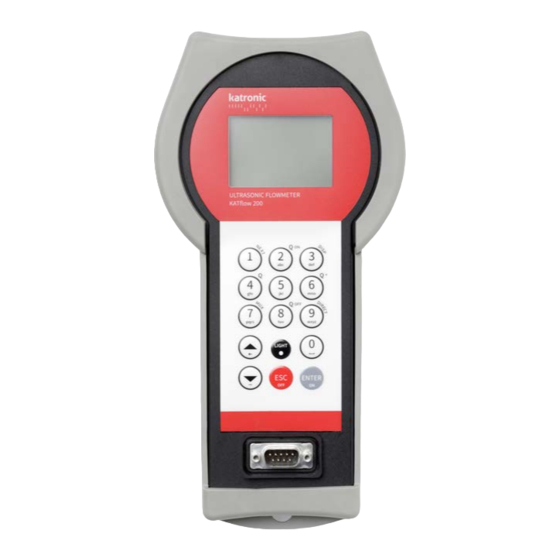
Step 2: Keyboard familiarisation
Step 2: Keyboard familiarisation
Step 3: Quick Start menu and Setup Wizard
The flow meter can be prepared for measurement with the Setup
Wizard as found in the Quick start menu.
Subject to change without prior notice. I Copyright © Katronic Technologies Ltd. 2014 I Issue: KF200QuickStartV40E0914
KATflow 200 Quick Start Manual
point & pipe preparation
Flow in pipe
Pic 2: Flow direction
Show NEXT (1) available item
●
Q
(2) = Start totalizer function
●
ON
Show next DISPlay (3)
●
Q
(8) = Stop totalizer function
●
OFF
DIRECT (9) access to trend plot
●
Move menu / selection item UP
●
Move menu / selection item DOWN
●
ESCape entry without saving Switch
●
device OFF (press > 2 sec.)
ENTER selection with saving
●
Switch device ON (press > 2 sec.)
Upon first power on and the boot
up sequence, the Main Menu is
displayed.
Use the UP and DOWN cursor keys
to select Quick start and confirm
by pressing ENTER.
1 / 2
Select Setup Wizard to set up the
flow meter for measurement. If
the sensors are recognised, the
serial number will be shown. If
not, they can be selected.
Select the main measurement unit
using the cursor keys and confirm
with ENTER. This unit will be
displayed in the middle of the
measurement screen. Selecting
OFF
deactivates
the
surement channel.
Select the pipe material using the
cursor keys and confirm with
ENTER.
Enter the outer pipe diameter
using the keypad and confirm
with ENTER. Use UP key as
backspace to correct for entry
errors. If "0" is entered and con-
firmed,
an
additional
appears that allows entry of the
circumference. Press ENTER to
circumference. Press ENTER to
confirm.
Enter pipe wall thickness using the
keypad and confirm with ENTER.
Use UP key as a back-space to
correct for entry errors.
Select fluid using cursor keys.
Confirm by pressing ENTER.
Enter the fluid temperature using
the keypad. Confirm by pressing
ENTER.
Use UP key as a backspace to
correct for entry errors.
Select pipe liner material using
cursor keys and confirm by pres-
sing ENTER. If a liner material is
chosen, an
additional screen
appears that allows entry of liner
thickness.
mea-
screen
Advertisement

Related Manuals for Katronic KATflow 200


Summary of Contents for Katronic KATflow 200
- Page 1 KATflow 200 Quick Start Manual Katronic Technologies Ltd . I Telephone: +44 (0)2476 714 111 I Email: info@katronic.co.uk I Web: www.katronic.co.uk measurement Select Setup Wizard to set up the Step 1: Selection of point & pipe preparation flow meter for measurement. If Avoid installation of sensors in the vicinity of deformations and ●...
- Page 2 KATflow 200 Quick Start Manual Katronic Technologies Ltd . I Telephone: +44 (0)2476 714 111 I Email: info@katronic.co.uk I Web: www.katronic.co.uk Step 3: Quick Start menu and Setup Wizard (continued) Select number of sound passes (sound paths) using cursor keys.
Need help?
Do you have a question about the KATflow 200 and is the answer not in the manual?
Questions and answers