Advertisement
Available languages
Available languages
Quick Links
Quick Read Forehead
User's Guide TH068, TH073
Please be sure to read all warnings, instructions and
notations before using this product. Please keep these
instructions as they contain important information.
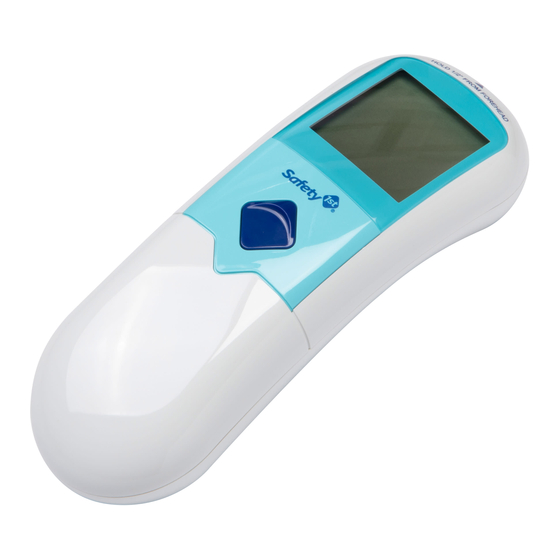
Basics of Your Thermometer
LCD Display
Temperature
Sensor Lens
ON/MEASURE
Button with Auto
Shut-Off
Measuring in Progress
Memory
Temperature
Unit of Measure (F/C)
No Fever
Fever
Low Battery
Care and Maintenance
Cleaning Temperature Sensor Lens:
• Clean very gently with a soft, alcohol-moistened cloth.
• Do not use an excessive amount of alcohol.
• Do not pour alcohol directly on sensor.
Cleaning Thermometer Body:
• Use a soft, dry cloth to clean thermometer body.
Notes:
• DO remove battery if stored for a long period of time.
• DO store thermometer in a dry place at room temperature.
• DO take special care not to scratch the sensor or display window.
• DO NOT use abrasive cleaning agents, thinners or benzene for cleaning.
• DO NOT expose thermometer to extreme temperatures, humidity or direct sunlight.
• DO NOT drop thermometer.
• DO NOT submerge any part of the product in water.
Normal Body Temperature
Temperature readings are different from person to person and also vary
depending upon the body location from which the temperature is measured.
Forehead temperatures tend to be comparable to oral temperatures and
approximately 1˚ lower than rectal temperatures for the same individual.
Temperature readings are affected by many factors including exercise, drinking hot
or cold beverages prior to taking a reading as well as technique.
"Normal" temperature refers to each individual's average temperature while healthy.
You may want to measure and record your child's temperature a few times when he
or she is well, so that you will know what is normal for your own child. On average,
temperature ranges are as follows:
TEMPERATURE
NORMAL
FEVER
METHOD
TEMPERATURE
RANGE
Forehead
97°F to 100.3°F
100.3°F +
normal forehead
temp range
WARNING
• This is NOT an ear thermometer. Take temperature measurements from the center of forehead. • Use caution when taking
temperature readings of bath water and food. This product is not intended to touch the person or item whose temperature
is being measured. • ALWAYS supervise your child when using the thermometer. NEVER allow your child to use it alone.
• NEVER allow children to play with this thermometer. It is not a toy. This is a sensitive electronic device and may be damaged
if not used properly under parental supervision. • DO NOT expose the thermometer to extreme temperatures, humidity, direct
sunlight or shock, and/or dust. • Keep battery out of child's reach. Swallowing a battery could be fatal. Battery should not be
charged or placed into extreme heat as they may explode. • Used batteries should be disposed of properly.
Other Battery Information:
We recommend alkaline batteries for longer battery life. DO NOT mix old and new batteries. DO NOT mix alkaline, standard
(carbon zinc) or rechargeable (nickel-cadmium) batteries. Non-rechargeable batteries are not to be recharged. Rechargeable
batteries are to be removed from the unit before being charged. Rechargeable batteries are only to be charged under adult
supervision. Only batteries of the same or equivalent type as recommended are to be used. Batteries are to be inserted with
the correct polarity. The supply terminals are not to be short-circuited. Check that all contact surfaces are clean and bright
before installing batteries.
How to Measure Temperature
1.
Turn Thermometer On
Press and release the ON/MEASURE button. Thermometer runs a brief
self-check, then beeps and displays the last reading with the memory icon
2.
Position Thermometer Near Forehead
Aim the temperature sensor lens at center of the forehead. Position lens approx. ½ inch from forehead. Do not touch forehead.
Hint: If a child is uncomfortable seeing the thermometer coming toward his face, try turning the thermometer upside-down.
Just be sure the lens is aimed directly at the forehead.
3.
Measure Temperature
Hold thermometer steady. Do not move thermometer while measuring temperature. Press and release the ON/MEASURE button.
The "Measuring in Progress" arrow displays
once when measurement is complete.
4.
Temp Readings with Fever/No Fever Icons
The "No Fever" icon
Thermometer gives additional beeps and the "Fever" icon
NOTE: High, prolonged fever requires medical attention, especially for young children. Please contact your physician. Fever chart
included.
No Fever
Fever
5.
Auto Shut-Off
Thermometer beeps and shuts off automatically after 20-30 seconds.
Wait 1 minute before taking another measurement, so that thermometer has time to re-acclimate to the room's temperature.
Troubleshooting
When a malfunction or incorrect temperature measurement occurs, an error message will appear.
Display
Meaning
Recommended Action
• Measured temperature is below this thermometer's
• Ensure thermometer is being positioned correctly (See How to Measure Temperature).
range. See Technical Specifications section for
• Ensure
Measurement Temperature Range.
• Consistent
Maintenance).
• Measured temperature is above this thermometer's
• Ensure thermometer is being positioned correctly (See How to Measure Temperature).
range. See Technical Specifications section for
• Allow thermometer to reach room temperature, then re-take temperature
Measurement Temperature Range.
measurement.
• Thermometer may have been stored in a cold or hot
environment.
• Allow thermometer to reach room temperature, then try again.
• This thermometer cannot function if the
environment's temperature is outside the permissible
range. See Operation Environment for range.
Make sure the thermometer has been at room temperature for 30 minutes before use.
, and thermometer beeps
displays when temp is in normal range.
displays when fever temp is detected.
Display
Recommended Action
icon does not appear. If it does, replace batteries.
• Batteries are low. Replace them. (See Battery Information section).
readings may indicate that the sensor is dirty (see Care and
• For best accuracy, wait one minute between temperature measurements so that
thermometer has time to re-acclimate to the room's temperature.
• Do not return this product to the place of purchase. If any parts are missing, email
consumer@djgusa.com, call Consumer Relations at (800) 544-1108, or fax at
(800) 207-8182. You can also visit our website at www.safety1st.com. Have ready the
model number (TH068, TH073) and date code (manufacture date located on package).
• Install new batteries and re-try function before calling Consumer Relations on electronics.
How to Switch Between
Fahrenheit & Celsius
Low Battery Warning:
• When the
• Use a Phillips head
when powering up the thermometer, the batteries are
screwdriver to loosen battery
low but may still work for a very short time.
cover screw. Remove cover.
• When the
• While thermometer is ON,
the batteries are exhausted and need to be replaced.
gently press and release the
°C/°F button.
To Replace Batteries:
Press °C/°F button
1 Use a Phillips head screwdriver
• Place the battery cover
to loosen battery cover screw.
on the thermometer and
Remove cover.
tighten the screw to secure
2 Remove old batteries
it in place.
3 Insert two AAA (or equivalent)
batteries, correctly positioned
with positive "+" and negative "-"
as shown in illustration.
4 Place the battery cover on the
thermometer and tighten the screw
to secure it in place.
ASTM laboratory accuracy requirements in the display range of 37 to 39 °C (98 to 102
°F) for IR thermometers is +/- 0.2 °C (+/- 0.4 °F), whereas for electronic thermometers,
the requirement per ASTM Standard E 1112-86 is +/- 0.1 °C (+/- 0.2 °F).
.
Measurement Temperature Range: 71.6°F to 104.0°F
Measurement Accuracy:
Operation Environment:
Storage Environment:
Test Protocol:
1 Place the thermometer into heat controlled chamber for at least 2 hours.
2 After 2 hours, press and release MEASURE button, all segments are displayed for
1 second.
3 Press and hold MEASURE button, make sure arrow icon appears, then place the
device into the black body for one second.
4 Release the MEASURE button after one second, the device will beep once and
measurement will be shown on the display.
Dorel Juvenile Group, Inc. warrants to the original purchaser that this product
(Thermometer), is free from material and workmanship defects when used under normal
conditions for a period of one (1) year from the date of purchase. Should the product
contain defects in material or workmanship Dorel Juvenile Group, Inc., will repair or
replace the product, at our option, free of charge. Purchaser will be responsible for
all costs associated with packaging and shipping the product to Dorel Juvenile Group
Consumer Relations Department at the address noted on the front of this document and
all other freight or insurance costs associated with the return. Dorel Juvenile Group will
bear the cost of shipping the repaired or replaced product to the purchaser. Product
should be returned in its original package accompanied by a proof of purchase, either a
sales receipt or other proof that the product is within the warranty period. This warranty
is void if the owner repairs or modifies the product or the product has been damaged as
a result of misuse.
This warranty excludes any liability other than that expressly stated previously, including
but not limited to, any incidental or inconsequential damages.
SOME STATES DO NOT ALLOW THE EXCLUSION OR LIMITATION OF INCIDENTAL OR
CONSEQUENTIAL DAMAGES, SO THE ABOVE LIMITATION OR EXCLUSION MAY NOT
APPLY TO YOU.
THIS WARRANTY GIVES YOU SPECIFIC LEGAL RIGHTS, AND YOU MAY ALSO HAVE
OTHER RIGHTS THAT MAY VARY FROM STATE TO STATE.
©2014 Dorel Juvenile.
www.djgusa.com (800) 544-1108
www.safety1st.com
Made in CHINA.
Styles and colors may vary.
Distributed by Dorel Juvenile Group, Inc.,
2525 State St., Columbus, IN 47201-7494
Dorel Distribution Canada, 873 Hodge, St. Laurent, QC H4N 2B1
01/23/14
How to Replace the Batteries
icon appears on the display screen
icon appears with the
message
Battery Cover
Screw
AAA Batteries (2)
Technical Specifications
+/- 0.4°F Temps 96.8°F to 102.2°F
+/- 0.5°F All Other Temps
60.8°F to 104.0°F
Humidity up to 85% (non condensing)
-4°F to 122°F
Humidity up to 85% (non condensing)
One (1) Year Limited Warranty
4358-6388
Advertisement

Related Manuals for Safety 1st TH068


Summary of Contents for Safety 1st TH068
- Page 1 (800) 207-8182. You can also visit our website at www.safety1st.com. Have ready the Distributed by Dorel Juvenile Group, Inc., environment. model number (TH068, TH073) and date code (manufacture date located on package). • Allow thermometer to reach room temperature, then try again. 2525 State St., Columbus, IN 47201-7494 •...
- Page 2 Styles and colors may vary. Los estilos y los colores pueden variar. • Es posible que el termómetro haya estado guardado nuestro sitio web en www.safety1st.com. Tenga a mano el número de modelo (TH068, Distributed by (distribuido por) Dorel Juvenile Group, Inc., en un lugar frío o caluroso.
Need help?
Do you have a question about the TH068 and is the answer not in the manual?
Questions and answers
I changed my batteries in my thermometer & red light stays on no reading.
The red light may stay on and no reading may appear on the Safety 1st thermometer TH068 after changing the batteries due to the following reasons:
1. Low Batteries – Even after replacement, if the batteries are low, the thermometer may not function properly. Ensure the batteries are new and correctly installed.
2. Incorrect Battery Installation – Verify that the batteries are inserted with the correct polarity (+ and -).
3. Sensor Issues – A dirty sensor may prevent accurate readings. Clean the sensor as per the maintenance instructions.
4. Temperature Acclimation – The thermometer may need time to acclimate to room temperature before functioning correctly.
5. Positioning Issue – Ensure the thermometer is being used correctly according to the instructions.
If the problem persists, refer to the maintenance section or contact customer support.
This answer is automatically generated