Table of Contents
Advertisement
Advertisement
Table of Contents

Related Manuals for Zumimall MUBVIEW BELL-J7

Summary of Contents for Zumimall MUBVIEW BELL-J7
- Page 2 24 hours. In addition, your advice or suggestions will be much appreciated and welcomed. Register via link below to get 3 Years Warranty Extension. http://bit.ly/zuReg Product Service Email: Support@mubview.com Distributor: distributor@zumimall.com More About Us Web: www.zumimall.com Facebook: www.facebook.com/zumimalloffice Amazon Store: www.amazon.com/zumimall...
- Page 3 Zumimall believes that craftsmanship creates top quality and technology changes life. With high-quality products and first-class service, Zumimall won the love and trust of millions of customers as soon as it went public. Over the years, Zumimall has served 45 continents of America, covering 80% of the population.
-
Page 4: Table Of Contents
INDEX PAGE 1. What’s in the Box ------------------------ P1 2. Meet the Doorbell -----------------------P2 3. Meet the Chime ------------------------ P3 4. Download and Install App ----------------P4 5. Account Registration -------------------- P5 6. Add Camera to App -------------------- P5 6.1 Preparations for Connection ------------ P5 6.2 Connect Camera to App -------------- P6 7. -
Page 5: What's In The Box
1. What’s in the Box Doorbell * 1 DingDong *1 Quick User Guide *1 USB Cable *1 Screws Set/Screwdriver *1 3M Tape *2 NOTE: Micro SD card and power adapter are not included. -
Page 6: Meet The Doorbell
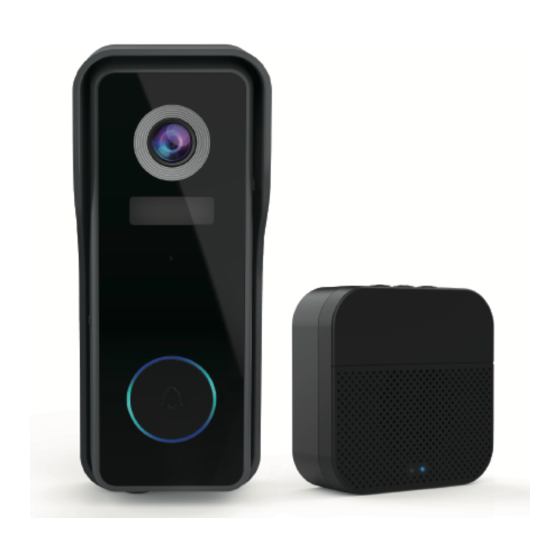
2. Meet the Doorbell ON/Off Switch Camera PIR Motion Sensor Microphone Doorbell Button LED Indicator Reset Button Memory Card Slot Speaker Li-ion Battery Built-in Charging Indicator Micro USB Port (for battery charging) Security Screw Doorbell comes with a 4,500mAh rechargeable Li-ion battery. -
Page 7: Meet The Chime
3. Meet the Chime Settings Volume Control Select Ringtone Blue indicator Red indicator AA Batteries Please mind the battery polarities while installing the batteries. -
Page 8: Download And Install App
Android ZUMIMALL NOTE: Please turn on both of the following permissions. ① Allow ZUMIMALL App to access mobile cellular data and wireless LAN, otherwise it will fail to connect the camera. ② Allow ZUMIMALL App to receive pushed messages, otherwise, the phone will not receive alarms when motion is detected. -
Page 9: Account Registration
5. Account Registration New user needs to sign up ZUMIMALL App with email address. Click 'Sign up' to create a New Account and follow the steps to complete registration. 5:51 5:51 5:51 < < Sign Up Sign Up Welcome United States Account 2365894254@qq.com... -
Page 10: Connect Camera To App
6.2 Connect Camera to App 5:48 5:48 5:49 < Select Device Home Add Battery Camera All Devices Living room Bedroom Battery Camera Smart Smart Video Doorbell Doorbell Power Plug Camera Baby Camera Hold the device power button to start Floodlight Add Device the device. - Page 11 5:50 5:50 < < Connect Network Scan QR Code 02:06 Make sure the device in an energized state Make sure the device is connected to the router Scan the QR code below with the device Make sure the device and the phone are on the same network at a distance of 5-8 inches.
-
Page 12: Charge Your Doorbell
7. Charge your doorbell Prior to the doorbell installation, please charge up your doorbell for about 8-10 hours till the charging LED turns BLUE from RED. LED STATUS INDICATION Solid red Battery charging Solid blue Fully charged Compatible charger (not provided): USB compatible mobile phone charger (DC 5V 1A~2A). -
Page 13: Set Up Doorbell
8. Set up Doorbell Switch on power for your doorbell, and you will see the LED indicator flashes red (once per second). Start setting up your doorbell following the in-app instructions. LED Indicator ON/Off Switch Tips · Please operate the setup near your Wi-Fi router. ·... -
Page 14: Pair With Your Indoor Chime
9. Pair With Your Indoor Chime Click the SETTING button on the chime, and the chime will be in pairing mode for 20 seconds, with its red LED flashing. Settings Press the doorbell button to send a pairing signal, and your chime will sound to react, together with its blue LED flashing. - Page 15 Chime settings. Ringtone selection. Click to change ringtone (4 ringtones available). Volume control button. Click to control volume: level 1: 110 dB; level 2: 100 dB level 3: 90 dB; level 4: 80 dB Settings. Click to enter/quit pairing mode; Press &...
-
Page 16: Install Your Doorbell
10. Install Your doorbell Select location for your doorbell. Select a location. It is suggested to mount the doorbell at least 4 feet (120 cm) above the ground for optimal angle of view and best motion detection performance. (OPTIONAL) Install at an angle. You can purchase the following angled brackets so as to point your doorbell to a specific view angle. - Page 17 Standard installation.
-
Page 18: Tamper Alarm
11. Tamper Alarm Anti-theft Tamper Alarm. You can also enable the anti-theft alarm in doorbell settings. Tamper Alarm Trigger Tamper Alarm On With tamper alarm on, your doorbell detects disassembly by the trigger on its back, and then a 30-second siren alarm will be triggered. Meantime, video recording get started, and alarm notification will be pushed to the owner’s APP account. -
Page 19: Product Specifications
12. Product Specifications Video Doorbell Model No.:Bell J7 Camera 2.0MP Full-HD Camera Effective pixels 1920(H) x 1080(V) IR LED High power dot-array IR LED x 1 View angle 145° Motion detect range 100° (Max 5m) Motion sensitivity 5 level sensitivity settable Alarm trigger Call button, motion detect, anti-theft alarm Wi-Fi...
Need help?
Do you have a question about the MUBVIEW BELL-J7 and is the answer not in the manual?
Questions and answers