Table of Contents
Advertisement
DZ550
Series
OWNER'S GUIDE
SMART XL 2-BASKET AIR FRYER
SharkNinja Operating LLC
US: Needham, MA 02494
1-877-646-5288
ninjakitchen.com
Illustrations may differ from actual product. We are constantly striving to improve our products,
therefore the specifications contained herein are subject to change without notice.
FOODI and NINJA are registered trademarks of SharkNinja Operating LLC.
DUALZONE, MATCH COOK, and SMART FINISH are trademarks of SharkNinja Operating LLC.
This product may be covered by one or more U.S. patents. See sharkninja.com/patents for more
information.
© 2022 SharkNinja Operating LLC
ninjakitchen.com
DZ550Series_IB_MP_Mv9
@ninjakitchen
Advertisement
Table of Contents

Related Manuals for Ninja SMART XL DZ550 Series


Summary of Contents for Ninja SMART XL DZ550 Series
- Page 1 Illustrations may differ from actual product. We are constantly striving to improve our products, therefore the specifications contained herein are subject to change without notice. FOODI and NINJA are registered trademarks of SharkNinja Operating LLC. DUALZONE, MATCH COOK, and SMART FINISH are trademarks of SharkNinja Operating LLC.
-
Page 2: Table Of Contents
Before First Use ............5 Using the Ninja Foodi Smart Thermometer .......6 REGISTER YOUR PURCHASE Cooking in Your 2-Basket Air Fryer . -
Page 3: Important Safeguards
IMPORTANT SAFEGUARDS HOUSEHOLD USE ONLY. READ ALL INSTRUCTIONS. When using electrical appliance, basic safety precautions should always This appliance has a polarized plug (one To disconnect, press the power button to blade is wider than the other). To reduce the turn off the unit, then unplug from socket be followed, including the following: risk of electric shock, this plug is intended to... -
Page 4: Air Fryer
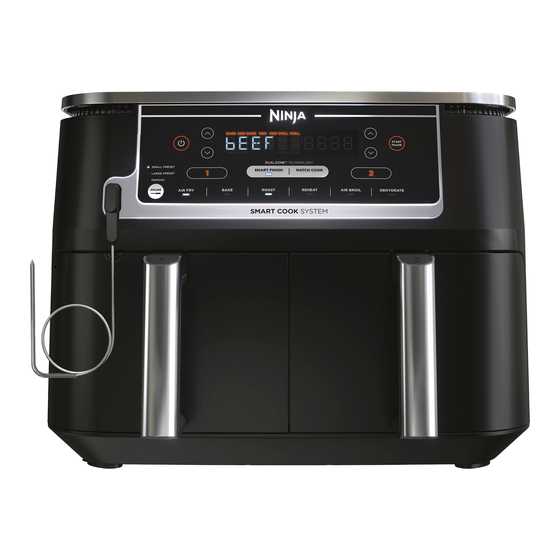
GETTING TO KNOW YOUR NINJA® FOODI® PARTS SMART XL 2-BASKET AIR FRYER Air Intake Vent Control Panel Air Outlet (located on back) When setting time, the digital display shows HH:MM. FUNCTIONS larger amount of the same food, or cook different... -
Page 5: Using The Ninja Foodi Smart Thermometer
USING THE NINJA® FOODI® SMART THERMOMETER Before plugging thermometer into the unit, make Using Match Cook with the Foodi Smart Thermometer: NOTE: Reference USDA guidelines for food- sure the jack is free of any residue, knots or kinks 1 Press Zone 1 and select desired cooking function. Use the left-hand arrows to select desired cook safe temperature recommendations. -
Page 6: Cooking In Your 2-Basket Air Fryer
COOKING IN YOUR 2-BASKET AIR FRYER REFERENCE QUICK START GUIDE FOR RECIPES AND COOKING CHARTS COOKING WITH DUALZONE™ MATCH COOK COOKING WITH TWO ZONES 4 Press SMART FINISH, then press the START/ TECHNOLOGY (without Foodi Smart Thermometer) When Smart Finish or Match Cook are not PAUSE button to begin cooking in the zone To cook a larger amount of the same food, or selected, technology is integrated into the design... -
Page 7: Cooking In A Single Zone
COOKING IN YOUR 2-BASKET AIR FRYER – CONT. COOKING IN A SINGLE ZONE Bake Roast 5 Use the right arrows to set the time To turn on the unit, plug the power cord into a wall Install crisper plate in the basket (optional), then Install crisper plate in the basket (optional), then in 1-minute increments. -
Page 8: Air Broil
COOKING IN YOUR 2-BASKET AIR FRYER – CONT. Air Broil (Not available on all models.) Dehydrate Reheat 4 Use the right arrows to set the time in Install crisper plate in the basket (optional), then Place a single layer of ingredients in the NOTE: AIR BROIL cannot be used in both 1-minute increments up to 30 minutes. -
Page 9: Pausing Time In A Single Zone
COOKING IN YOUR 2-BASKET AIR FRYER – CONT. CLEANING YOUR 2-BASKET AIR FRYER PAUSING BOTH ZONES ENDING THE COOK TIME IN ONE ZONE (WHILE The unit should be cleaned thoroughly after every use. AT THE SAME TIME USING BOTH ZONES) Unplug the unit from the wall outlet before cleaning. -
Page 10: Troubleshooting Guide
TROUBLESHOOTING GUIDE • How do I adjust the temperature or time while using a single zone? ONE (1) YEAR LIMITED WARRANTY When a single zone is running the time or temperature can be adjusted at any time by pressing the up/down arrows.
Need help?
Do you have a question about the SMART XL DZ550 Series and is the answer not in the manual?
Questions and answers