
Related Manuals for Sinocare TRUE METRIX GO


Summary of Contents for Sinocare TRUE METRIX GO
-
Page 1: Table Of Contents
目录 一、适用范围、规格型号、配套试纸、检测方法和原理 1.1 适用范围 1.2 规格型号 1.3 配套试纸 1.4 检测方法和原理 二、仪器主要结构及其各配件组成结构和示意图 2.1 主要结构组成 2.2 血糖仪及各配件组成示意图 2.2.1 真睿TRUE METRIX GO示意图 2.2.2 采血笔示意图 三、显示说明 四、使用操作 4.1 安装电池 4.2 仪器设置 4.3 测试 4.4 结果查询 五、检查系统 5.1 自动自测:... - Page 2 5.2 质控液测试: 5.2.1 何时需要进行质控液测试 5.2.2 质控检查步骤 六、保存和保养 七、保修 八、使用注意事项 九、故障 十、血糖测试系统测量性能 十一、产品性能参数 十二、配件清单 十三、符号的解释 十四、电磁兼容性声明 14.1 指南和制造商的声明–电磁发射 14.2 指南和制造商的声明–电磁抗扰度 14.3 指南和制造商的声明–电磁抗扰度 14.4 便携式及移动式射频通信设备和设备 或系统之间的推荐隔离距离...
-
Page 3: 一、适用范围、规格型号、配套试纸、检测方法和原理
一、适用范围、规格型号、配套试纸、检测方法和原理 1.1 适用范围 本产品与配套血糖试条配合使用,用于全血血样中葡萄糖测试, 可用于医疗机构血糖测试、糖尿病患者或其他人群进行自我血糖监 测。本产品只用于血糖水平的监测,不适用于糖尿病的最终诊断。 1.2 规格型号 真睿TRUE METRIX GO 1.3 配套试纸 TRUE METRIX血糖试纸(如需购买血糖试纸,请联系三诺或其授 权经销商取得) 1.4 检测方法和原理 血糖试纸的反应区固定有特殊化学物质,血样中的葡萄糖与之接 触后发生化学反应产生微电流,血糖仪检测微电流并转换成血糖浓 度结果显示出来。血糖值显示为血浆血糖值。 二、仪器主要结构及其各配件组成结构和示意图 2.1 主要结构组成 主机:血糖仪由电路板、按键、液晶显示屏、外壳组成。 配件:采血笔(经医疗器械备案的合格产品)、电池、拓展坞( 选配)、数据线(选配)。 注:拓展坞(选配)仅适用于真睿TRUE METRIX、真睿TRUE METRIX AIR,数据线(选配)仅适用于真睿TRUE METRIX GO。... -
Page 4: 血糖仪及各配件组成示意图
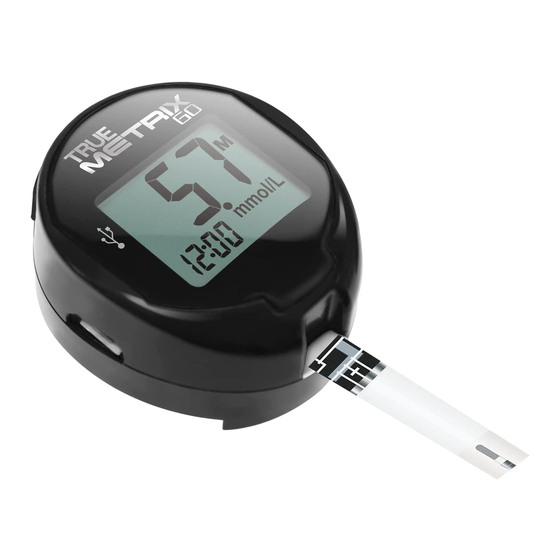
2.2血糖仪及各配件组成示意图 2.2.1 真睿TRUE METRIX GO示意图 ①屏幕 ②试纸插口 ③设置键 ④电池盖 ⑤标签 ⑥Micro-USB接口 (用于连接数据线后与PC进行数据传输,数据线为选配件)⑦ 瓶盖 锁槽 2.2.2 采血笔示意图 注意: 血糖仪只能与“配套试纸”中注明的血糖试纸配合使用,请勿与 其他公司产品或本公司其他型号产品混用。... -
Page 5: 三、显示说明
三、显示说明 全屏显示各符号说明: ① 时间,日期,质控符号,平均值符号(7天,14天,30天) ② 测试结果 ③ 测试值为储存结果符号 ④ 电池符号 ⑤ 单位符号 ⑥ 滴血符号 等待加样 测试中 血糖测试结果 质控液测试结果 (示例) (示例) - Page 6 设置年 设置日期 设置时间 7天平均值 14天平均值 30天平均值 血糖查询结果 无效的血细胞 (示例) 压积 超过仪器测试 未检测出样本 温度范围 或加样错误 使用过的试纸 仪器错误...
-
Page 7: 四、使用操作
测试中移除试纸 试纸错误 或测试中连接迷 你USB接口 仪器错误 仪器错误 电池电量低 屏幕损坏 测试结果高于 测试结果低于 33.3mmol/L 1.1mmol/L 四、使用操作 4.1 安装电池 电池不可充电。数据线仅用于仪器连接电脑传输数据,请 不要使用该数据线连接任何充电设备进行充电。如果处理不当电池 存在爆炸风险。请勿将电池投入火中。请勿拆卸电池或重复充电。 请勿随意丢弃,请遵循当地法规要求处理废旧电池。... -
Page 8: 仪器设置
本仪器由1颗3V的CR2032锂电池(不可充电)供电。屏幕显示电 池电量低时请更换电池。 1. 握住试纸瓶,逆时针旋转1/4从试纸瓶上取下仪器。 2. 拉出仪器背后的电池盖。 3. 取出电池盖中的电池。 4. 使新电池正面朝上,装入新电池。将电池盖装入仪器。 5. 按设置键开机。如果仪器不能正常开机,打开电池盖检查电 池是否正负端装反。装上电池盖并重复步骤5。如果仪器仍然不能正 常开机,请拨打客服电话。 4.2 仪器设置 注:没有安装在试纸瓶盖上仪器也能正常工作。 安装仪器: 1.将试纸瓶盖面向左边。 试纸插口 2. 使试纸插口面向自己, 将仪器底部安装在试纸瓶盖上。 试纸瓶盖 3. 握住试纸瓶,顺时针旋转1/4。 如果安装正确,试纸插口与试纸 瓶盖应在一条垂直线上。 取下仪器: 1.握住试纸瓶,逆时针旋转1/4。 2.从试纸瓶上取下仪器。... - Page 9 设置时间/日期 仪器出厂时已经预设默认的时间和日期。第一次使用仪器之前 或更换电池之后,请检查时间日期,如有必要,请按以下步骤更新 时间和日期: 1. 关机状态下按住设置键直到出现全屏显示并且屏幕开始闪烁。 松开设置键。仪器进入设置模式。 2. 时间显示且小时开始闪烁。按动设置键调整小时。 3. 调整至正确小时后,数字闪烁9次,然后跳至分钟设置。 4. 重复步骤2~4设置分钟,月,日,年。 如果在设置过程中,仪器关机,请按照步骤1开始重新操作。 每次按下设置键仅增加1位数字。一旦数字达到最大限值,屏幕 回到最小数字。按下设置键调整数字,当数字调整完成后松开设置 键。 当发生以下动作时,仪器自动开机: -试纸插入试纸口; -按下设置键 当发生以下动作时,仪器自动关机: -移除试纸; -按下设置键3秒钟; -2分钟之内没有任何动作 4.3 测试 根据采血笔说明书安装好采血笔及采血针。 1. 检查血糖试纸瓶上的失效日期和开瓶日期。如已超过失效日 期或开瓶日期后4个月(以先到期的为准),请放弃使用,并使用新 的血糖试纸进行测试。 2. 使用前,将血糖仪与血糖试纸置于室温环境10分钟。 3. 使用温水和肥皂清洗采血部位,并风干。...
- Page 10 4. 从试纸瓶中取出1根试纸,立即盖紧瓶盖。取出试纸后应立即 使用。 5. 将血糖试纸插入血糖仪上的试纸插口,血糖仪开机。 6. 等待滴血符号显示。在测试完成之前保持试纸插入仪器的状态。 在试纸插入仪器之前请勿在试纸上滴加血样。 7. 使用采血笔采血。在向试纸加样前使血样形成血滴。为了促 进血滴形成,可放低手指并轻轻按摩。 8. 保持血糖试纸插入血糖仪的状态,使血糖试纸加样端边缘接 触血样,血样被吸入试纸。 9. 当血糖仪发出短促的“哔”提示音且屏幕显示3条横线时,将 试纸从血样中移开。 10. 血糖仪显示测试结果,记录测试结果。 11. 移除试纸和采血针丢弃至指定容器内。仪器关机。测试结果 自动储存。 使用过的试纸和采血针请按照医用废弃物处理。 注: -如果试纸在空气中暴露时间过长,仪器显示错误提示。移除并 丢弃该试纸,使用新的试纸重新测试。 -请勿在试纸加样区之外滴加血样。 -在测试结果显示之前移除试纸,仪器显示错误提示。该测试结 果不储存于仪器-内。使用新的试纸重新测试。请勿在测试结果显示 之前移除试纸。 -静脉血请由专门的医护人员进行血样采集。 与实验室测试结果对比 当该仪器与实验室测试结果对比时,使用仪器测试必须在实验 室测试30分钟之内完成。...
-
Page 11: 结果查询
4.4 结果查询 查询平均值 (7天, 14天, 30天) 1. 仪器关机状态下,短按并松开设置键。 2. 屏幕依次显示7天平均值,14天平均值,30天平均值。 如果2 分钟内没有任何操作,仪器自动关机。如果没有平均值,仪器显示3 条横线。 查询测试结果 本仪器可储存500个血糖测试结果。当第501个血糖测试结果被 存入,最早储存的血糖测试结果会被自动覆盖。 1. 在仪器显示平均值界面状态下,再次按下并松开设置键。 2. 屏幕显示最近的血糖测试值及储存结果符号。血糖测试结果 与储存结果符号、时间、日期一同显示。 3. 再次按下并松开设置键浏览测试结果。 注:仪器仅储存1个质控液测试结果。质控液测试结果与质控液 符号一同显示。 五、检查系统 日常质控作为血糖测试系统运行状态的检测手段,有以下两种 质控测试方法让您了解您的测试系统是否正常工作及使用者测试步 骤是否正确。定期进行系统检查,可以确保仪器提供准确的检测结 果。 5.1 自动自测: 注:自动自测不能代替质控液测试。 1. 插入试纸。 2. 仪器出现全屏显示。检查全屏显示是否有缺漏部分。 3. 滴血符号闪烁。仪器准备开始测试。 如果显示错误提示,请勿使用仪器进行测试,并查看故障章节。... -
Page 12: 质控液测试
5.2 质控液测试: 5.2.1 何时需要进行质控液测试 -第一次使用仪器时; -检验您的测量步骤是否正确时; -使用一瓶新血糖试纸时; -长期未使用血糖试纸进行测试时; -测试结果异常时; -血糖试纸存放环境温湿度超出正常储存条件时; -您想检测仪器或血糖试纸是否正常工作时; -怀疑仪器损坏时(如仪器跌落、压碎、受潮时); 重要信息:该产品共有3个浓度的配套质控液,请使用至少2个 浓度的质控液来测试系统是否正常工作。 试纸瓶贴上的质控范围并非建议血糖值,仅用于质控液测试 结果参考。请勿服用质控液。 5.2.2 质控检查步骤 仅使用TRUE METRIX质控液进行质控测试。 1.检查血糖质控液瓶和血糖试纸瓶上的失效日期。如质控液已超 过失效日期或开瓶日期后3个月(以先到的日期为准),请放弃使用, 并使用新的血糖质控液进行测试。如试纸已超过失效日期或开瓶日 期后4个月(以先到的日期为准),请放弃使用,并使用新的试纸进 行测试。 2.使用前,将血糖仪、血糖试纸与血糖质控液置于室温环境10 分钟。如果是首次打开血糖质控液瓶,请在瓶标签上注明开瓶日期。 3.洗手并风干。 4.轻轻倒转血糖质控液瓶几分钟。请勿摇晃。从瓶中取出血糖试 纸,立即盖好瓶盖。取出试纸后应立即使用。... -
Page 13: 六、保存和保养
5.将血糖试纸插入血糖仪,启动血糖仪。在测试完成之前保持试 纸插入仪器的状态。在试纸插入仪器之前请勿在试纸上滴加质控液。 6.打开质控液瓶盖,挤出一滴血糖质控液到一小块未用过的铝箔 或清洁的塑料薄膜上,丢弃。 7.使血糖试纸的加样端接触血糖质控液滴。血糖试纸吸入血糖质 控液。 8.当血糖仪开始测试,将血糖试纸从血糖质控液滴移开。 9.测试完成后,测试结果与质控液符号一同在屏幕上显示。 10.当血糖仪显示出结果,将其与血糖试纸瓶标签上的质控范围 进行对照。如果质控液测试结果在质控范围内,该仪器可用于测试 血样。如果质控液测试结果不在质控范围内,使用新的试纸再次进 行质控液测试。如果质控液测试结果仍然不在质控范围内,请勿使 用该仪器及试纸进行测试。请致电售后服务机构。 11.结果显示后,将血糖试纸从血糖仪移除并按照医用废弃物处 理。仪器自动关机。重新盖紧血糖质控液瓶。 六、保存和保养 1. 血糖仪保存应避免灰尘,液体,防止剧烈振荡和碰撞。 2. 如仪器表面粘有异物,需要马上进行清洁。保持仪器关机且 无试纸插入状态,使用棉签或干净无毛布沾75%的酒精或中性清洁 剂进行擦拭。擦拭完成后让仪器自然风干。 3. 如长时间不使用仪器,使用棉签或干净无毛布沾75%的酒精 或中性清洁剂进行擦拭。擦拭完成后让仪器自然风干,卸下电池后 再保存。 4. 请勿在测试中清洁仪器。 5. 切勿让污垢、尘埃、血渍或液体经插口或缝隙进入仪器内。... -
Page 14: 七、保修
七、保修 只有本公司或本公司的代理机构才能检查或提供任何零部件。 在正常使用情况下,如产品出现故障,本公司承诺十年包换。 请认真填写保修卡,并将需要返回的部分,返回本公司。 如仪器故障需返回本公司,请将仪器用布或棉签蘸取少量的 75%酒精擦拭清洁后再寄回本公司。 八、使用注意事项 1. 请按照厂商规定的方法使用本仪器,否则会对仪器造成损害 或造成不准确的测试结果。 2. 本产品仅用于体外检测指尖毛细血样本。 3. 请勿在木糖吸收实验后进行测试。 4. 本仪器的测试结果只能作为血糖监测用,不能作为糖尿病诊 断的依据。参考治疗医生和糖尿病专家的意见,不能仅根据检测的 结果而违背他们的指导。当您使用本仪器得出同症状不相符的测试 结果后,应立刻到医院检查。 5. 不适用于重症患者或新生儿。 6. 测试期间,仪器可能会与血液接触。因此使用过的仪器有携 带感染物的风险。当本仪器在医疗场所使用时,医护人员请遵循你 单位对卫生设备相应的感染控制步骤,如戴手套或其他个人防护。 九、故障 1.试纸插入后,不能开启仪器 原因 解决方法 试纸插入时正反颠倒或上下颠倒 移除试纸。重新正确插入试纸。 试纸未完全插入 移除试纸。重新正确插入试纸。 试纸故障 使用新试纸进行测试。... - Page 15 原因 解决方法 电池电力不足 更换新电池 电池安装不正确 重新安装电池,使+电极端面朝上 仪器故障 请与客服联系 2. 加入样本后,仪器不能开始测试 原因 解决方法 换用新试纸,吸入足够的样本 样本量不足 量,重新测试 使用新试纸进行测试。在插入 插入试纸后2分钟后加样 试纸后2分钟内滴加血样。 使用新试纸进行测试。如果仍然 试纸故障 无法开始测试,请与客服联系。 仪器故障 请与客服联系 3. 错误提示 屏幕显示 原因 解决方法 使用新试纸对指尖 毛细血血样进行测 无效的血细 试。如果仍然显示 胞压积 错误提示,请与客 服联系。...
- Page 16 屏幕显示 原因 解决方法 将仪器和试纸在 5°C-40°C环境下 超过仪器测试 平衡10分钟直至 温度范围 达到测试温度范 围。 未检测出样本 使用新试纸按照说 或加样错误 明书重新进行测试。 使用新试纸进行测 使用过的试纸, 试。如果仍然显示 试纸暴露在空 错误提示,请与客 气中时间过长 服联系。 仪器错误 请与客服联系...
- Page 17 屏幕显示 原因 解决方法 使用新试纸进行 测试。如果仍然 试纸错误 显示错误提示, 请与客服联系 拔掉USB线。使用新 测试中移除试 试纸进行测试。确认 纸或测试中连 试纸移除前仪器显示 接迷你USB接 测试结果。如果仍然 口 显示错误提示,请与 客服联系 仪器错误 请与客服联系 仪器错误 请与客服联系...
- Page 18 屏幕显示 原因 解决方法 电池电量低 更换新电池 请勿使用该仪器进 屏幕损坏 行测试。请与客服 联系 使用新试纸进行测 试。如果测试结果 测试结果高于 仍然显示Hi, 请马 33.3mmol/L 上联系您的健康顾 问或医生。 使用新试纸进行测 试。如果测试结果 测试结果低于 仍然显示Lo, 请马 1.1mmol/L 上联系您的健康顾 问或医生。...
-
Page 19: 十、血糖测试系统测量性能
十、血糖测试系统测量性能 此血糖测试系统准确度、测量重复性标准参考国家标准 GB/T19634-2005《体外诊断检验系统自测用血糖监测系统通用技 术条件》和国际标准ISO 15197:2013《In vitro diagnostic test systems —Requirements for blood-glucose monitoring systems for self-testing in managing diabetes mellitus》。 系统的准确度要求:≥95%的测试结果的偏差应符合表1的要求; 系统的测量重复性要求:测试结果应符合表2的要求。 表1:准确度要求 测试范围 允许偏差 1.1mmol/L~5.55mmol/L 不超过±0.83mmolL(±15mg/dL) (20mg/dL~100mg/dL) 5.55mmol/L~33.3mmol/L 不超过±15% (100mg/dL~600mg/dL) 表2:测量重复性要求 测试范围 精密度 1.1mmol/L~5.55mmol/L SD<0.34mmol/L(6 mg/dL) (20mg/dL~100mg/dL) 5.55mmol/L~33.3mmol/L CV<6% (100mg/dL~600mg/dL)... -
Page 20: 十一、产品性能参数
十一、产品性能参数 测试范围:1.1mmol/L-33.3 mmol/L 用血量:约0.5μL 检测样本: 新鲜指尖毛细血全血、质控液 血糖测试时间:4~7秒 结果显示:血浆血糖值 测试原理:电化学 电源:1个3V锂电池#CR2032(不可充电),最大额定电流: 10mA 电池寿命:约1000次测试或1年 生产日期:见标签 使用期限:10年(按每天监测7次血糖的使用频率确定) 本产品使用期限是按照每天监测7次血糖的使用频率确定的, 在使用过程中,用户应当按照产品说明书的要求对产品进行维护、 保养。在维护、保养后,经确认仍能保持基本安全性和有效性的产 品,可以正常使用。 软件发布版本: V01 记忆容量: 500 个血糖测试值 尺寸: 40mm×36mm×22mm 测试环境: 湿度:10~80%RH(不结露) 温度:5℃~40℃ 血细胞压积: 20~70% 储运条件: 10~93%RH(不结露),-20℃~55℃ 海拔: 最高可至3108 米... -
Page 21: 十二、配件清单
十二、配件清单 采血笔:1支,经医疗器械备案的合格产品,具体使用及更换 方法见采血笔说明书。 电池:1个3V锂电池#CR2032(不可充电),其安装、更换及 注意事项内容详见本说明书“4.1安装电池”内容。 数据线(选配) 十三、符号的解释 体外诊断医疗器械 参考使用说明 序列编号 避免日晒 电子电气产品有害物质 避免雨淋 限制使用标志 易碎,小心轻放 生产企业 注意,参考随附文件 生物危害 十四、电磁兼容性声明 本仪器符合EMC标准GB/T 18268.1-2010及GB/T 18268.26-2010 的发射和抗扰度要求。 注意: (1)在干燥的环境中,尤其是存在人造材料(人造织物,地 毯等)的干燥环境中使用本设备时,可能会引起损坏性的静电放电, 导致产生错误的结论。 (2)便携式和移动式射频通信设备可能影响本仪器的性能。... -
Page 22: 指南和制造商的声明-电磁发射
(3)禁止在强辐射源(例如非屏蔽的射频源)旁使用本设备, 否则可能会干扰设备正常工作。 (4)用户有责任确保设备的电磁兼容环境,使设备能正常工 作。建议在设备使用之前评估电磁环境。 14.1 指南和制造商的声明–电磁发射 指南和制造商的声明—电磁发射 本仪器预期使用在下列规定的电磁环境下,购买者或使用者应该保证 它在这种电磁环境下使用。 发射试验 符合性 电磁环境-指南 本仪器仅为其内部功能而使用 满足1组B类 射频能量。因此,它的射频发 辐射发射GB4824 设备限值 射很低,并且对附近的电子设 备产生干扰的可能性很小。... -
Page 23: 指南和制造商的声明-电磁抗扰度
14.2 指南和制造商的声明–电磁抗扰度 指南和制造商的声明—电磁抗扰度 本仪器预期使用在下列规定的电磁环境下,购买者或使用者应该保证 它在这种电磁环境下使用。 抗扰度试验 试验电平 符合电平 电磁环境-指南 空气放电: 空气放电: 地面应该是木质、混 ±2kV;±4 kV; ±2kV;±4 kV; 凝土或瓷砖,如果地 静电放电 ±8 kV ±8 kV 面用合成材料覆盖, (ESD) 相对湿度应该至少 GB/T 17626.2 接触放电: 接触放电: 30%。 ±2 kV;±4 kV ±2 kV;±4 kV 工频磁场应具有在商 额定工频磁场 业或医院环境中典型 3A/m,50Hz 3A/m,50Hz GB/T 17626.8 场所的工频磁场水平... -
Page 24: 指南和制造商的声明-电磁抗扰度
14.3 指南和制造商的声明–电磁抗扰度 指南和制造商的声明—电磁发射 本仪器预期使用在下列规定的电磁环境下,购买者或使用者应该保证它在这 种电磁环境下使用。 抗扰度试验 试验电平 符合电平 电磁环境 - 指南 便携式和移动式射频通信设备不应比推 荐的隔离距离更靠近血糖仪 的任何部分 使用。该距离由与发射机频率相应的公 式计算。 推荐的隔离距离 辐射电磁场 d=1.2 80MHz~800MHz GB/T17626.3 d=2.3 800MHz~2.0GHz 式中: —根据发射机制造商提供的发射机最 3 V/m 3 V/m 大额定输出功率,单位为瓦特(W); 80MHz 80MHz ~2.0 GHz ~2.0 GHz d—推荐的隔离距离,以米(m)为单位。 固定式射频发射机的场强通过对电磁场 所的勘测a来确定,在每个频率范围b都 应比符合电平低。 在标记下列符号的设备附近可能出现干扰... -
Page 25: 便携式及移动式射频通信设备和设备或系统之间的推荐隔离距离
14.4 便携式及移动式射频通信设备和设备或系统之间的推荐隔离距离 便携式及移动式射频通信设备和本仪器之间的推荐隔离距离 本仪器预期在射频辐射骚扰受控的电磁环境中使用。依据通信 设备最大额定输出功率,购买者或用户可通过下面推荐的维持 便携式及移动式射频通信设备(发射机)和本仪器之间最小距 离来防止电磁干扰。 发射机的 对应发射机不同频率的隔离距离/m 最大额定 输出 80MH~800MHz 800MHz~2.0GHz d=1.2 d=2.3 功率W 0.12 0.23 0.01 0.38 0.73 对于上表未列出的发射机最大额定输出功率,推荐隔离距离d ,以米(m) 为单位,可用相应发射机频率栏中的公式来确定,这里P是由发射机制造 商提供的发射机最大额定输出功率,以瓦特(W)为单位。 注1:在80MHz和800MHz频率点上, 采用较高频范围的公式。 注2:这些指南可能不适合所有的情况,电磁传播受建筑物、物体及人体 的吸收和反射的影响。... - Page 26 中国2型糖尿病血糖控制目标 (《中国2型糖尿病防治指南》2017年版) 状态 目标范围 4.4~7.0mmol/L 空腹 (79 mg/dL~126 mg/dL) 妊娠期糖尿病患者(GDM)妊娠期血糖控制目标 (妊娠合并糖尿病诊治指南(2014)) 状态 范围 餐前 ≤5.3mmol/L(≤95mg/dL) 正常血糖范围 (《全国临床检验操作规程》第四版) 状态 正常范围 3.9~6.1 mmol/L 空腹 (70 mg/dL~110 mg/dL)
- Page 27 产品中有害物质的名称及含量 有害物质 部件名称 铅(Pb) 汞(Hg) 镉(Cd) 及其化合物 及其化合物 及其化合物 ○ ○ ○ 印刷电路板 ○ ○ ○ 五金件 × ○ ○ 电子元器件 ○ ○ ○ 壳体 六价铬(Cr(VI)) 多溴联苯 多溴二苯醚 化合物 (PBB) (PBDE) ○ ○ ○ 印刷电路板 ○ ○ ○ 五金件 ○ ○...
- Page 28 产品中有害物质的名称及含量 有害物质 部件名称 铅(Pb) 汞(Hg) 镉(Cd) 及其化合物 及其化合物 及其化合物 *电源线或 ○ ○ ○ 电源适配器 ○ ○ ○ *电池 ○ ○ ○ *血糖试条 ○ ○ ○ *采血笔 ○ ○ ○ 包装及印刷件 六价铬(Cr(VI)) 多溴联苯 多溴二苯醚 化合物 (PBB) (PBDE) *电源线或 ○ ○ ○ 电源适配器...
- Page 29 Contents 1. Intended use、Model、Applicable strip、Test Principle 1.1 Intended use 1.2 Model 1.3 Applicable test strip 1.4 Test Principle 2. Structure and Diagram of Meter and Accessories 2.1 Main structure composition 2.2 Diagram of Meter and Accessories 2.2.1 Meter 2.2.2 Lancing device 3.Display 4.Operation 4.1 Changing Battery...
- Page 30 5.2 Control Test 5.2.1 When to perform control test 5.2.2 How to Test Control Solution 6.Preservation and Maintenance 7.Warranty 8.Matters need attention 9.Troubleshooting 10.Performance 11.Specification 12.Accessory lis 13.Explanation of symbols 14.EMC Statement...
-
Page 31: Intended Use、Model、Applicable Strip、Test Principle
This System is not for use in diagnosis or screening of diabetes mellitus. 1.2 Model 真睿TRUE METRIX GO 1.3 Applicable test strip TRUE METRIX blood glucose test strip 1.4 Test Principle The Test Strip is a plastic strip containing chemicals and electrodes. -
Page 32: Structure And Diagram Of Meter And Accessories
(optional), USB cable (optional). Note: Docking station (optional) only apply to 真睿TRUE METRIX、真睿TRUE METRIX AIR. USB cable (optional) only apply to 真睿TRUE METRIX GO. 2.2 Diagram of Meter and Accessories 2.2.1 Meter ① Display ⑤... -
Page 33: Lancing Device
2.2.2 Lancing device adjustable comfort tip button spring cover Lancing Device Please refer to lancing device instruction of use for more information. Note: Blood glucose meter can only be used with matched strip. Do not use with other product. 3. Display Full screen display ①... - Page 34 Waiting for During testing apply sample Blood glucose Control solution test result test result (example) (example) Setting year Setting date 7-day average Setting time test result 14-day average 30-day average test result test result Blood glucose 30-day average test result in test result memory (sample)
- Page 35 Sample not Temperature detected or error Too cold/ Sample Drop on Too hot Top of Test Strip Sample not Used test strip; detected or Test strip outside Sample Drop on of vial too long Top of Test Strip Test strip removed during Test strip Error test or Micro USB...
-
Page 36: Operation
4. Operation 4.1 Changing Battery Do not recharge battery. USB cable is only for data transmission. Do not use USB cable to recharge. Battery may explode if mishandled. Do not dispose of battery in fire. Do not take apart or attempt to recharge battery. Dispose according to local regulations. -
Page 37: Meter Set Up
4.2 Meter set up To Attach/Remove Meter to Test Strip Vial The meter may also be used for testing without attach- ing to the vial. To attach: 1.Set test strip vial on flat surface with vial lip facing to the left.。 2. - Page 38 Set Time/Date The meter comes with pre-set time and date. Before using the meter for the first time or after a battery change, check time and date and update as needed. 1. Start with the meter off. Press and hold the Set Button until the full Display appears and begins to blink.
-
Page 39: Blood Glucose Testing
• the Set Button is pressed and held for 3 seconds, or • after 2 minutes of non-use. 4.3 Blood Glucose Testing Refer to lancing device Instructions for Use for detailed instructions. 1. Check dates on test strip vial being used. Do not use if either 4 months after first opening or after date printed next to on label, whichever comes first. -
Page 40: Meter Memory
10. After testing is finished, result appears in the meter Display. 11. Remove test strip from meter and discard into an appropriate waste container. Meter turns off. Result is stored in the Memory. Note: -If test strip has been out of the vial too long before testing, an error message appears. -
Page 41: Quality Control Testing
View Results Meter Memory stores 500 results which are displayed from most recent to oldest. Once Memory is full, the oldest result is replaced with the newest result. 1. After meter displays the Averages, press and release Set Button again. 2. -
Page 42: Control Test
3. Drop Symbol begins to blink. Meter may be used for testing. If an error message appears, the meter will not perform a test. See Troubleshooting or contact for assistance. 5.2 Control Test 5.2.1 When to perform control test: -before using the meter for the first time, -for practice to ensure your testing technique is good, -when opening a new vial of test strips, -occasionally as a vial of test strips is used,... -
Page 43: How To Test Control Solution
5.2.2 How to Test Control Solution Use ONLY TRUE METRIX Control Solution for Control Test. 1. Check dates on control solution label and test strip vial label. Do not use control solution or test strips if either Use By Dates have passed. (control solution - 3 months after opening or date next to on label, whichever comes first, test strips - 4 months after opening or date next to symbol, whichever comes first.) Discard expired products and use new products. -
Page 44: Preservation And Maintenance
9. Remove test strip from drop when meter beeps and begins testing. 10. After testing is finished, result appears in the meter Display with the Control Symbol. Compare result to Control Test range printed on test strip vial label for level of control solution you are using. If result is in range, system can be used for testing blood. -
Page 45: Warranty
5. Never put Meter in liquids or allow any liquids to enter the Test Port. 7. Warranty Sinocare Inc. warrants this meter to be free of defects in materials and workmanship for 10 years from the date of purchase. If during this 10 year period, the meter does not work properly, Sinocare will replace it with a new meter or equivalent product free of charge. -
Page 46: Troubleshooting
4. NEVER change a treatment plan without consulting a doctor or healthcare professional. Do not use for the diagno- sis of or screening for diabetes mellitus or for measuring blood glucose in newborns. If test result do not match the way you feel, repeat the test. - Page 47 1. After inserting test strip, meter does not turn on. Reason Action Test strip inserted upside Remove test strip. Re-insert down or backwards correctly into the meter. Remove test strip. Re-insert Test strip not fully inserted test strip fully into meter Remove test strip from meter.
- Page 48 3. Messages Display Reason Action Repeat with new test strip, using capillary whole blood from the finger, forearm or venous whole blood Invalid Hematocrit collected only in a sodium heparin blood collection tube. If error persists, contact for assistance. Move meter and test strips to area between 5°C-40°C;...
- Page 49 Display Reason Action Meter error Contact for assistance. Retest with new test strip. If error persists, contact for assistance. Test strip Error or If you have symptoms Very High Blood such as fatigue, excess urination, thirst or Glucose Result blurry vision, follow a (higher than 33.3 mmol/L) doctor or healthcare professional's advice...
- Page 50 Display Reason Action Meter error Contact for assistance. Low or dead Replace battery battery WARNING! Retest with new test strip. If result is still“Hi” Broken Display (High)contact doctor or healthcare professional immediately. WARNING! Repeat with new test Out of range - strip.
-
Page 51: Performance
Display Reason Action WARNING! Retest WARNING! with new test strip. If result is still “Lo” Out of range - (Low) contact doctor Low results < or healthcare professional 1.1 mmol/L immediately. 10. Performance Accuracy and repeatability criteria for this product is refer to national standard GB/T19634-2005 In vitro diagnostic test systems -General technical requirements for blood-glu- cose monitoring systems for self-testing and International... -
Page 52: Specification
Table 2:Repeatability Requirement Test Range Precision 1.10mmol/L~5.55mmol/L SD<0.34mmol/L(6 mg/dL) (20mg/dL~100mg/dL) 5.55mmol/L~33.30mmol/L CV<6% (100mg/dL~600mg/dL) 11. Specification Result Range: 1.1 - 33.3 mmol/L Sample Size: 0.5 microliter (0.5 μL) Sample: Fresh capillary whole blood or control solution Test Time: Results in as fast as 4 seconds Result Value: Plasma values Assay Method: Electrochemical Power Supply: One 3V lithium battery #CR2032 (non-re-... -
Page 53: Accessory Lis
12. Accessory list Lancing device: 1 pcs, product which already get registra- tion certificate. Operation method please refer to lancing device instruction of use. Battery: One 3V lithium battery #CR2032 (non-recharge- able). Details please check “4.1 Changing Battery” USB cable: Optional 13. - Page 54 (3) Do not use this meter near substantial radiation source, otherwise may effect performance of this meter. (4) User should make sure the meter can work normally during electromagnetic compatibility environment. 14.1 Guidance and manufacturer’s declaration-electromagnetic emission Guidance and manufacturer’s declaration- electromagnetic emission The equipment is intended for sue in the electromagnetic environment specified below.
- Page 55 14.2 Guidance and manufacturer’s declaration- electromagnetic immunity Guidance and manufacturer’s declaration- electromagnetic immunity The equipment is intended for sue in the electromagnetic environment specified below. The customer or the user of the equipment should assure that it is used in such an environment. Immunity Compliance Electromagnetic...
- Page 56 14.3 Guidance and manufacturer’s declaration- electromagnetic immunity Guidance and manufacturer’s declaration- electromagnetic immunity The equipment is intended for sue in the electromagnetic environment specified below. The customer or the user of the equipment should assure that it is used in such an environment. Immunity Compliance Test level...
- Page 57 14.4 Recommended separation distances between portable and mobile RF communications equipment and the equipment Recommended separation distances between portable and mobile RF communications equipment and the equipment The equipment is intended for use in an electromagnetic environment in which radiated RF disturbances are controlled. The customer or the user of the equipment can help prevent electromagnetic interference by maintaining a minimum distance between portable and mobile RF communications equipment and the equipment as recommended below, according to...
- Page 58 China type 2 diabetes blood glucose control range (《China type 2 diabetes prevention guideline》2017) State Range 4.4~7.0mmol/L Before meal (79 mg/dL~126 mg/dL) Gestational diabetes mellitus (GDM) glucose control range Gestational diabetes mellitus prevention guideline(2014)) State Range Preprandial plasma glucose ≤5.3mmol/L(≤95mg/dL) (before meal) Normal glucose range (National clinical laboratory operating procedures Fourth Edition )
- Page 59 Hazardous substance and content in product Hazardous substance Component Lead(Pb)and Mercury(Hg)and Cadmium(Cd)and its compound its compound its compound ○ ○ ○ PCB board ○ ○ ○ Hardware Electronic × ○ ○ components ○ ○ ○ Meter case Hexavalent Polybrominated polybrominated chromium and biphenyls diphenyl ethers...
- Page 60 Hazardous substance and content in product Hazardous substance Component Lead(Pb)and Mercury(Hg)and Cadmium(Cd)and its compound its compound its compound *power line or ○ ○ ○ power adapter ○ ○ ○ *battery ○ ○ ○ *test strips ○ ○ ○ * Lancing device Packaging and ○...
Need help?
Do you have a question about the TRUE METRIX GO and is the answer not in the manual?
Questions and answers