
Related Manuals for Klarstein MONACO 10021651


Summary of Contents for Klarstein MONACO 10021651
- Page 1 MONACO Luftbefeuchter Ultrasonic Humidifier Humidificateur d‘air Humidificador Umidificatore 10021651 10021652 www.klarstein.com...
-
Page 3: Table Of Contents
Sehr geehrter Kunde, wir gratulieren Ihnen zum Erwerb Ihres Gerätes. Lesen Sie die folgenden Hinweise sorgfältig durch und befolgen Sie diese, um möglichen Schäden vorzubeugen. Für Schäden, die durch Missachtung der Hinweise und unsachgemäßen Gebrauch entstehen, übernehmen wir keine Haftung. Scannen Sie den folgenden QR-Code, um Zugriff auf die aktuellste Bedienungsanleitung und weitere Informationen rund um das Produkt zu erhalten. -
Page 4: Sicherheitshinweise
SICHERHEITSHINWEISE • Kinder ab 8 Jahren, psychisch und körperlich eingeschränkte Menschen dürfen das Gerät nur benutzen, wenn sie vorher von einer für Sie verantwortlichen Aufsichtsperson ausführlich mit den Funktionen und den Sicherheitsvorkehrungen vertraut gemacht wurden. Achten Sie darauf, dass Kinder nicht mit dem Gerät spielen. Kinder ab 8 Jahren dürfen das Gerät nur unter Aufsicht reinigen. - Page 5 • Der Luftbefeuchter ist nur für den Innen- und Hausgebrauch bestimmt. Hinweis : Verwenden Sie den Luftbefeuchter nicht, wenn die Luft im Raum bereits ausreichend feucht ist (relative Luftfeuchtigkeit von mindestens 50%). Die ideale relative Luftfeuchtigkeit liegt zwischen 45% und 60%. Überschüssige Feuchtigkeit zeigt sich in Form von Kondenswasser auf kalten Oberflächen oder kalten Wänden im Raum.
-
Page 6: Geräteübersicht
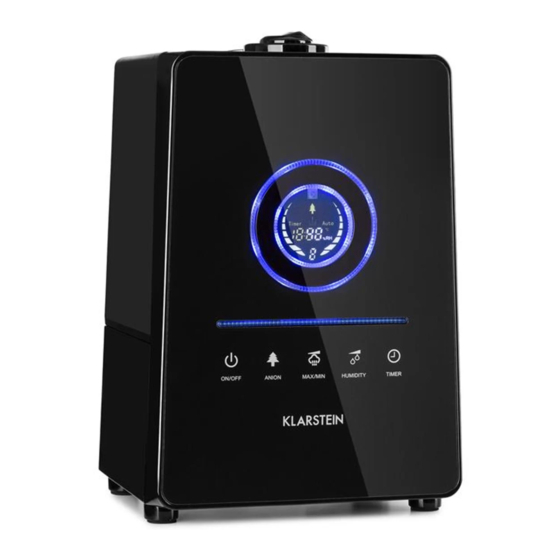
GERÄTEÜBERSICHT Ausgangs-Düsen oberer Wassertank-Griff Front-Bedienfeld Digitales Display Nachtlicht Steuertasten 6L-Wassertank Öffnung zum Befüllen des Wassertanks Wiederverwendbarer Staub & Mikrobenfilter 10 Wasser-Tank-Deckel 11 Komfort -Handgriff zum Nachfüllen/ zur Reinigung des Wassertanks 12 Unteres Gehäuse und Becken 13 Netzkabel 14 Wandler 15 Betriebsleuchte... -
Page 7: Fernbedienung
Bedienfeld Das Gerät kann über fünf Tasten unter dem Display gesteuert werden. LED-Display Tasten • ON / OFF - Schaltet den Luftbefeuchter an / aus • ION – Schaltet den Ionisator an / aus • + / - Regelt das Dampf-Volumen, die Feuchtigkeit oder den Timer •... -
Page 8: Led-Anzeige
Die Fernbedienung stellt die sechs Tasten auf dem Bedienfeld am Gerät dar. Wie Sie die Batterien der Fernbedienung einsetzen (Batterien sind nicht im Lieferumfang enthalten.) Drehen Sie die Fernbedienung auf die Seite. Drehen Sie die Fernbedienung auf die Seite. Drücken Sie auf die Batteriefachentriegelung an der Unterkante der Fernbedienung. -
Page 9: Gerätenutzung
GERÄTENUTZUNG Bevor Sie beginnen, entfernen Sie bitte das Gerät aus der Verpackung und lassen Sie ihn für mindestens 30 Minuten an die Raumtemperatur gewöhnen, vor allem, wenn das Gerät noch kalt von der Luft im Freien ist. Das Gerät wurde entwickelt, um bei Temperaturen zwischen 5-40 ℃... - Page 10 Warten Sie einige Sekunden, bis der Wassertank beginnt Wasser in das Becken zu entlassen. Sie werden ein Blubbern zu hören, da Luft in den Wassertank strömt. Schließen Sie das Netzkabel an die Steckdose an (BETREIBEN SIE DEN BEFEUCHTER NIEMALS OHNE WASSER IM TANK). Drücken Sie die ON / OFF-Taste, um den Befeuchter zu aktivieren.
- Page 11 Durch Drücken der Taste „Ion“ wird der Ionisator aktiviert und es beginnt der Ausstoß der gesunden Ionen. Es wird durch das Baum-Symbol (# 19) auf dem Display dargestellt. Durch Drücken der NIGHT-LIGHT-Taste schalten Sie das Nachtlicht aus. Drücken Sie erneut zum Einschalten.
-
Page 12: Reinigung Und Lagerung
REINIGUNG UND LAGERUNG Sie können viele Jahre störungsfreien Betrieb Ihres Luftbefeuchters gewährleisten, indem Sie ein paar einfache Wartungsverfahren befolgen. Wenn Ihr Wasser hart ist, als die Konzentration von Kalzium und anderen Mineralien darin hoch ist, wird sich weißer Staub auf den Oberflächen des Raumes absetzen. Eine weiße Substanz wird sich auch am Wasserbecken, am Wandler und an der Innenfläche des Wassertanks absetzen. - Page 13 Den Staub- und Mikrobakterien-Filter reinigen: Entfernen Sie den Filter aus dem Wassertank. Geben Sie etwas Essig in ein Glas. Weichen Sie die Filter im Essig für ca. 10 Minuten ein. Entfernen Sie den Filter aus dem Glas und schütteln Sie ihn ordentlich aus. Reinigen und spülen Sie den Filter wieder mit frischem Wasser.
-
Page 14: Fehlersuche Und Fehlerbehebung
FEHLERSUCHE UND FEHLERBEHEBUNG Problem Mögliche Ursachen Lösung Luftbefeuchter nicht Schließen Sie das Netzkabel Die Betriebsleuchte ist in die an eine elektrische Steckdose aus oder funktioniert Steckdose einge- an und drücken Sie die Power- nicht. steckt. Taste. Betriebs-LED leuchtet, Kein Wasser im Füllen Sie den Wassertank mit es wird aber kein Nebel Wassertank. - Page 15 Vibrationen im Wassertank, weil Füllen Sie den Wassertank. der Wasserstand zu niedrig ist. Merkwürdige Betriebsgeräusche Die Maschine steht Stellen Sie das Gerät auf eine auf einer stabile, ebene Oberfläche instabilen Fläche. Es gibt Lücken zwischen dem Entfernen Sie die Düsen und Sprühnebel kommt aus Gehäuse um die reinigen Sie sie mit einem...
-
Page 16: Hinweise Zur Entsorgung
HINWEISE ZUR ENTSORGUNG Wenn es in Ihrem Land eine gesetzliche Regelung zur Entsorgung von elektrischen und elektronischen Geräten gibt, weist dieses Symbol auf dem Produkt oder auf der Verpackung darauf hin, dass dieses Produkt nicht im Hausmüll entsorgt werden darf. Stattdessen muss es zu einer Sammelstelle für das Recycling von elektrischen und elektronischen Geräten gebracht werden. -
Page 17: Technical Data
Dear Customer, Congratulations on purchasing this device. Please read the following instructions carefully and follow them to prevent possible damages. We assume no liability for damage caused by disregard of the instructions and improper use. Scan the QR code to get access to the latest user manual and more product information. -
Page 18: Safety Instructions
SAFETY INSTRUCTIONS • Children over 8 years of age, mentally and physically handicapped persons may only use the device if they have been familiarized in detail with the functions and safety precautions by a supervisor responsible for them. Do not allow children to play with the device. Children from 8 years of age may only clean the device under supervision. -
Page 19: Product Description
PRODUCT DESCRIPTION Output jets Top water tank handle Front Panel Digital display Night-light Control buttons BL (1.6 gal) water tank Water tank opening for filling Permanent reusable while dust & anti-microbial filter 10 Water tank lid and seal 11 Handle for convenience when refilling /caring water tank 12 Lower body and basin 13 Power cord 14 Transducer... -
Page 20: Remote Control
Control panel The device can be controlled by five Buttons located on the front of the control panel under the display. LED-Display buttons ON/OFF Switches the humidifier on/off ION Switches ions on/off +/- Sets mist volume, humidity or timer to different levels SETUP Choose to setup mist volume, humidity or timer NIGHT-LIGHT Switches the night-light on/off REMOTE CONTROL... -
Page 21: Led Display
The unit is equipped with a very useful remote control. How to insert the remote control batteries (The batteries are not included in the scope of delivery.) Flip the remote on its side. Press the battery release on the bottom edge of the remote. Grasp the battery socket and pull the battery out. -
Page 22: Operating Instructions
OPERATING INSTRUCTIONS Before getting started. please remove the SPS-807 from its box and allow it to become accustomed to the room temperature for at least 30 minutes especially if the machine is cold from the outside air. The SPS-807 is designed to operate at temperatures between 5-40℃... - Page 23 Wait a few seconds until the water tank lid starts to release water into the basin. You will hear a bubbling sound as the air enters the water tank. Plug the power cord into the electrical outlet (NEVER SWITCH ON THE HUMIDIFIER WITHOUT WATER lN THE BASIN).
- Page 24 screen. Pressing the NIGHT-LIGHT Button will switch oft the night-light. Press again to switch on. Pressing the SETUP Button twice to set the timer (when the LED display starts to blink the word „Timer“)The timer function determines how many hours the humidifier will operate.
-
Page 25: Troubleshooting
TROUBLESHOOTING Problem Possible cause Solution The operation light is off Air humidifier is not Connect the power cord to an or does not work. plugged into the electrical socket and press the electrical socket. power button. Operation LED is lit, but No water in water Fill the water tank with water. -
Page 26: Cleaning And Storage
CLEANING AND STORAGE You can ensure many years of trouble free operation of your SPS—807 humidifier by following a few simple maintenance procedures. If your water is hard. containing high concentrations of calcium and other minerals, then over a period of time white dust will start to deposit on the various surfaces in the room. - Page 27 How to clean the white dust & anti-microbial filter • Remove the filter from the water lank. • Put some white vinegar into a glass. Soak the filter in the vinegar for about 10 minutes • Remove the filter from the glass and shake it several times. •...
- Page 28 The intensity of the mist Mineral Clean the converter. is too low. concentration in the basin is too high. Water in the tank is Clean the water tank and fill it dirty because the with clean water. water has been in the tank too long.
-
Page 29: Disposal Considerations
DISPOSAL CONSIDERATIONS If there is a legal regulation for the disposal of electrical and electronic devices in your country, this symbol on the product or on the packaging indicates that this product must not be disposed of with household waste. Instead, it must be taken to a collection point for the recycling of electrical and electronic equipment. -
Page 30: Données Techniques
Chère cliente, cher client, Toutes nos félicitations pour l’acquisition de ce nouvel appareil. Veuillez lire attentivement et respecter les instructions de ce mode d’emploi afin d’éviter d’éventuels dommages. Nous ne saurions être tenus pour responsables des dommages dus au non-respect des consignes et à la mauvaise utilisation de l’appareil. -
Page 31: Consignes De Sécurité
CONSIGNES DE SÉCURITÉ • Les enfants à partir de 8 ans ainsi que les personnes dont les capacités physiques, mentales ou sensorielles sont réduites peuvent utiliser l’appareil à condition d’avoir assimilé au préalable les consignes d’utilisation et de sécurité de l’appareil transmises par une personne responsable de leur sécurité. -
Page 32: Aperçu De L'appareil
APERÇU DE L‘APPAREIL Buse de sortie Poignée du réservoir d’eau supérieur Zone de commande avant Affichage digital Lumière de nuit Touches de commande Réservoir d’eau 6L Ouverture pour le remplissage du réservoir d’eau Filtre à poussière et microbes réutilisable 10 Couvercle du réservoir d’eau 11 Poignée confort pour le remplissage/ nettoyage du réservoir d’eau 12 Boîtier et bassin inférieurs... -
Page 33: Télécommande
Zone de commande L’appareil peut être commandé grâce à cinq touches placées sous l’écran digital. Touches affichage LED ON / OFF – Allume/éteint l’humidificateur d’air ION – Allume/éteint l’ionisateur + / - Ajuste le volume de vapeur, l’humidité ou le timer SETUP –... -
Page 34: Affichage Led
La télécommande représente les six touches de la zone de commande sur l’appareil. Vous pouvez activer la télécommande en retirant le film protecteur au bas de l’appareil. Comment mettre en place les piles de votre télécommande : (Les piles ne sont pas incluses.) Tourner la télécommande sur le coté. -
Page 35: Utilisation De L'appareil
UTILISATION DE L’APPAREIL Avant d’utiliser l’appareil, sortir le SPS-807 de son emballage et le laisser s’adapter à la température de la pièce, notamment si l’appareil est encore froid de l’air extérieur. Le SPS-807 a été conçu pour être utilisé à des températures entre 5 et 40 °C et à... - Page 36 Patienter quelques secondes jusqu’à ce que le réservoir commence à libérer de l’eau dans le bassin. Vous entendrez un gargouillement lorsque de l’air entre dans le réservoir. Brancher l’appareil (NE JAMAIS UTILISER L’HUMIDIFICATEUR À VIDE). Appuyer sur la touche ON / OFF pour activer l’humidificateur. L’appareil fonctionne alors en mode manuel.
- Page 37 Appuyer sur la touche NIGHT-LIGHT pour éteindre la lumière de nuit. Appuyer à nouveau pour l’allumer. Appuyer deux fois sur la touche SETUP pour régler le timer (sur l’écran, le mot TIMER commence à clignoter). La fonction timer permet de déterminer combien d’heures l’humidificateur fonctionnera.
-
Page 38: Nettoyage Et Stockage
NETTOYAGE ET STOCKAGE Vous pourrez profiter de l’utilisation de votre humidificateur d’air durant de longues années, pour peu que vous suiviez quelques consignes d’entretien. Si votre eau est dure, en raison d’une forte concentration de calcaire et autres minéraux, une poudre blanche peut se déposer sur les parties supérieures de la pièce. - Page 39 Nettoyage du filtre à poussière et microbactéries : Retirer le filtre du réservoir. Verser un peu de vinaigre dans un verre. Faire tremper le filtre dans le vinaigre pendant environ 10 minutes. Retirer le filtre du verre et bien le secouer. Nettoyer et rincer à...
-
Page 40: Résolution De Problèmes
RÉSOLUTION DE PROBLÈMES Problème Causes possibles Solution Le témoin de Brancher le câble L’humidificateur fonctionnement d’alimentation sur une prise d’air n’est pas lumineux est éteint ou de courant et appuyer sur branché à la prise. ne fonctionne pas. la touche Power. L’écran de commande LED est allumé... - Page 41 Trop forte densité de minéraux dans Nettoyer le convertisseur. le bassin. L’intensité de la brume L’eau est trop sale diffusée est trop faible. Nettoyer le réservoir et ou est restée trop le remplir avec de l’eau longtemps dans le propre. réservoir.
-
Page 42: Informations Sur Le Recyclage
INFORMATIONS SUR LE RECYCLAGE S‘il existe une réglementation pour l‘élimination ou le recyclage des appareils électriques et électroniques dans votre pays, ce symbole sur le produit ou sur l‘emballage indique que cet appareil ne doit pas être jeté avec les ordures ménagères. -
Page 43: Dati Tecnici
Gentile Cliente, La ringraziamo per aver acquistato il dispositivo. La preghiamo di leggere attentamente le seguenti istruzioni per l’uso e di seguirle per evitare possibili danni. Non ci assumiamo alcuna responsabilità per danni scaturiti da una mancata osservazione delle avvertenze di sicurezza e da un uso improprio del dispositivo. -
Page 44: Avvertenze Di Sicurezza
AVVERTENZE DI SICUREZZA • I bambini di età pari o superiore a 8 anni, portatori di handicap mentali e fisici sono autorizzati a utilizzare il dispositivo solo se, con l‘aiuto di un supervisore, hanno familiarizzato in anticipo con le funzioni e le precauzioni di sicurezza. Assicurarsi che i bambini non giochino con il dispositivo. -
Page 45: Componenti
COMPONENTI Ugello Impugnatura superiore del contenitore dell’ acqua Pannello di controllo Display digitale Luce notturna Tasti di comando Contenitore dell’acqua da 6 litri Apertura per riempire il contenitore dell’acqua Filtro della polvere e dei microbi riutilizzabile 10 Coperchio del contenitore dell acqua 11 Impugnatura confortevole per riempire ricaricare/pulire il contenitore dell acqua 12 Alloggiamento inferiore e bacinella... -
Page 46: Telecomando
Pannello di controllo l dispositivo puo essere impostato tramite cinque tasti situati sotto il dispa. Tasti del display • ON/OFF – Accensione e spegnimento dell’umidificatore ION- Accensione e spegnimento dello ionizzatore • • +/- Regola la quantita di vapore, l umidita o il timer •... -
Page 47: Display
Il telecomando è composto da sei tasti situati sul pannello di controllo sul dispositivo. Per attivarlo togliere il cellofan nella parte inferiore del dispositivo. Come inserire le batterie (Le batterie non sono incluse nella fornitura.) Capovolgere il telecomando sul suo lato. Premi il rilascio della batteria sul bordo inferiore del telecomando. -
Page 48: Utilizzo Del Dispositivo
UTILIZZO DEL DISPOSITIVO Prima di iniziare togliere il PLC dalla confezione e farla abituare almeno per 30 minuti alla temperatura della stanza, soprattutto se il dispositivo è ancora freddo. Il PLC e stato sviluppato per azionarsi a temperature tra i 5 e i 40 gradi e ad una umidita relativa inferiore all 80%. - Page 49 Warten Sie einige Sekunden, bis der Wassertank beginnt Wasser in das Becken zu entlassen. Sie werden ein Blubbern zu hören, da Luft in den Wassertank strömt. Schließen Sie das Netzkabel an die Steckdose an (BETREIBEN SIE DEN BEFEUCHTER NIEMALS OHNE WASSER IM TANK). Drücken Sie die ON / OFF-Taste, um den Befeuchter zu aktivieren.
- Page 50 Premendo il tasto NIGHT-LIGHT si spegne la funzione luce notturna. Ripremere il tasto per riattivarla. Premere due volte il tasto Setup per impostare il timer (sul display inizia a lampeggiare la parola “Timer”. Questa funzione stabilisce quante ore l umidificatore deve restare in funzione. E possibile impostare il timer premendo +/- e regolare il tempo desiderato.
-
Page 51: Manutenzione E Pulizia
MANUTENZIONE E PULIZIA E’ possibile garantire un funzionamento ottimale dell’umidificatore per molti anni seguendo un paio di semplici istruzioni sulla sua manuntezione. Se l acqua è dura , poiché la concentrazione di calcio e di altri minerali è elevata, si deposita della polvere bianca sulla superficie della stanza. - Page 52 Pulizia del filtro della polvere e dei micro batteri: Togliere il filtro dal contenitore dell acqua. Mettere un po di aceto in un bicchiere. Bagnare il filtro nell aceto per circa 10 minuti. Togliere il filtro dal bicchiere e agitarlo con cura. Pulire e lavare il filtro di nuovo con acqua fresca Se si prevede di non utilizzare l umidificatore per un po di tempo, togliere il filtro dal contenitore dell acqua e lasciarlo ascigare bene.
-
Page 53: Risoluzione Dei Problem
RISOLUZIONE DEI PROBLEM Problema Causa possibile Soluzione L’umidificatore non La spia di alimenta- Collegare il cavo ad una è stato inserito zione è spenta o non presa elettrica e premere il nella presa della funziona. tasto Power. corrente. Il Led lampeggia ma Non c’e acqua nel Riempire il serbatoio d’ac- non viene emesso... - Page 54 Nella vaschetta è presente una Pulire il trasduttore. densità di minerali troppo elevata. L’intensità del vapore è troppo bassa. L’acqua è sporca o è stata tenuta Pulire il serbatoio e riempir- troppo a lungo nel lo con acqua pulita. serbatoio. Vibrazioni all’interno del serbatoio causate...
-
Page 55: Avviso Di Smaltimento
AVVISO DI SMALTIMENTO Se nel proprio paese si applicano le regolamentazioni inerenti lo smaltimento di dispositivi elettrici ed elettronici, questo simbolo sul prodotto o sulla confezione segnala che questi prodotti non possono essere smaltiti con i rifiuti normali e devono essere portati a un punto di raccolta di dispositivi elettrici ed elettronici. -
Page 57: Datos Técnicos
Estimado cliente: Le felicitamos por la adquisición de este producto. Lea atentamente las siguientes instrucciones y sígalas para evitar posibles daños. No asumimos ninguna responsabilidad por los daños causados por el incumplimiento de las instrucciones y el uso inadecuado. Escanee el siguiente código QR para obtener acceso a la última guía del usuario y más información sobre el producto. -
Page 58: Sindicaciones De Seguridad
SINDICACIONES DE SEGURIDAD • Los niños mayores de 8 años y las personas con discapacidad física o psíquica pueden utilizar el aparato si han sido previamente instruidos por su tutor o supervisor sobre el funcionamiento del mismo y conocen las funciones, así como las indicaciones de seguridad. No permita que los niños jueguen con el aparato. -
Page 59: Visión General Del Dispositivo
VISIÓN GENERAL DEL DISPOSITIVO Boquilla de salida Asa superior del depósito de agua Panel de control frontal Display digital Luz nocturna Botones de control Tanque de agua de 6 l Orificio para rellenar el depósito del agua Filtro antipolvo y antibacterias reutilizable 10 Tapa del depósito 11 Asa para rellenar o... -
Page 60: Mando A Distancia
Panel de control El aparato puede controlarse con los cinco botones situados bajo el display. Botones LED del display ON/OFF – encender/apagar el humidificador ION – enciende/apaga el ionizador +/- – regula el volumen de vapor, la humedad o el temporizador SETUP –... -
Page 61: Indicador Led
El mando a distancia se compone de seis botones que también están presentes en el panel de control. Puede activar el mando a distancia quitando el plástico de protección en el borde inferior del aparato. Cómo colocar las pilas en el mando (Las pilas no están incluidas.) Ponga el mando a distancia de lado. -
Page 62: Uso Del Aparato
USO DEL APARATO Antes de comenzar, desembale el aparato y déjelo a temperatura ambiente durante al menos 30 minutos, especialmente si el aparato está a una temperatura baja. El aparato ha sido diseñado para funcionar a una temperatura entre 5 y 40 °C y con una humedad relativa menor del 80 %. - Page 63 Espere unos segundos hasta que el depósito comience a filtrar el agua al recipiente. Podrá escuchar un burbujeo debido al aire que se mueve en el depósito. Enchufe el aparato (NO PONGA EN MARCHA EL APARATO CON EL DEPÓSITO DE AGUA VACÍO). Pulse el botón ON/OFF para activar el humidificador.
- Page 64 encenderla. Pulse dos veces en el botón Setup para ajustar el temporizador (en el display parpadeará la palabra “Timer”). La función del temporizador establece cuántas horas se mantendrá en funcionamiento el humidificador. Puede ajustar la hora con el botón +/-. Muchas personas programan el temporizador para 8-9 horas (durante el momento del sueño), pero puede programarlo en una franja de 1 a 12 horas.
-
Page 65: Limpieza Y Almacenamiento
LIMPIEZA Y ALMACENAMIENTO Puede contribuir a que las prestaciones del humidificador no se vean mermadas con el paso del tiempo realizando unos cuantos procedimientos de mantenimiento muy sencillos. Si la dureza del agua que utiliza es alta, ya que la concentración de calcio y otros minerales también lo es, podrá... - Page 66 Limpieza del filtro antipolvo y antibacterias: Retire el filtro del depósito de agua. Introduzca un poco de limpiador de vinagre o similar en un vaso y ponga el filtro en remojo durante 10 minutos. Retire el filtro del vaso y límpielo con cuidado. Limpie y aclare el filtro de nuevo con agua limpia.
-
Page 67: Detección Y Resolución De Problemas
DETECCIÓN Y RESOLUCIÓN DE PROBLEMAS Problem Mögliche Ursachen Lösung El LED de encendido El humidificador Enchufe el aparato y pulse está apagado o no no está enchufado. Power. funciona. El LED de encendido No hay agua en el está iluminado pero no Llene el depósito de agua. - Page 68 Vibraciones en el depósito causadas por una cantidad Llene el depósito. insuficiente de Sonidos extraños agua. durante el funcionamiento. El aparato está colocado en Coloque el aparato en una una superficie superficie plana y estable. irregular. Hay un hueco entre la parte El chorro de agua no Retire la boquilla y límpiela de la carcasa en...
-
Page 69: Fabricante E Importador (Reino Unido)
INDICACIONES SOBRE LA RETIRADA DEL APARATO Si en su país existe una disposición legal relativa a la eliminación de aparatos eléctricos y electrónicos, este símbolo estampado en el producto o en el embalaje advierte que no debe eliminarse como residuo doméstico. En lugar de ello, debe depositarse en un punto de recogida de reciclaje de aparatos eléctricos y electrónicos.
Need help?
Do you have a question about the MONACO 10021651 and is the answer not in the manual?
Questions and answers