Advertisement
Available languages
Available languages
BEFORE YOU START!!!
Please read the IMPORTANT SAFETY INFORMATION sheet
included in this package.
Step 1: Unpack
Remove the antenna and the hardware bag from package. Make sure the
following parts are in the package:
• Antenna
• Mounting pipe and foot
• Hardware bag
U-Bolt
Mast Clamp Insert
(2) Black Plastic Plugs
Matching Transformer
(4) 7/16" Washers
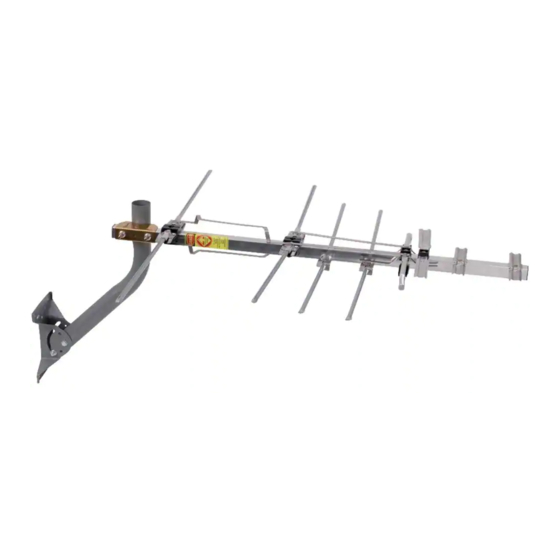
Step 2: Unfold the antenna's elements
Rear
ANT751
Outdoor Antenna
User's Guide
(2) 10/32" Hex nuts
(5) 1/4" Hex Nuts
(2) 5/8" Bolts
2 1/2" Screw
Starting from the rear of the antenna, unfold
the elements on both the top and bottom of the
antenna until they lock into place (as illustrated
below). Make sure the elements are flat and
parallel to each other when you've finished.
Advertisement
Table of Contents

Related Manuals for RCA ANT751


Summary of Contents for RCA ANT751
- Page 1 U-Bolt Mast Clamp Insert (2) Black Plastic Plugs Matching Transformer (4) 7/16” Washers Step 2: Unfold the antenna’s elements Rear ANT751 Outdoor Antenna User’s Guide (2) 10/32” Hex nuts (5) 1/4” Hex Nuts (2) 5/8” Bolts 2 1/2” Screw Starting from the rear of the antenna, unfold...
- Page 2 Step 3: Unfold the tetrapole Tetrapole Step 4: Attach the mast clamp insert U-bolt Mast clamp Mast clamp insert Step 5: Install the transformer and coaxial downlead Attach the transformer to the coaxial downlead (not included). Find the 10/32” hex nuts and washers in your hardware bag. Tetrapole Transformer stud...
- Page 3 Step 6: Insert end caps Step 7: Attach the mounting pipe to the foot 2 1/2” screw Hex nut on 5/8” bolt Make sure to place the leads of the matching transformer between the two washers on each post as shown here. Finally, tighten the hex nuts to secure the leads.
-
Page 4: Step 8: Mount The Foot And Pipe
Step 8: Mount the foot and pipe End of the pipe should be perpendicular to the ground (plumb) Step 9: Attach the antenna to the mast Secure the foot to its permanent location. Adjust the end of the pipe so that it is perpendicular to the ground. -
Page 5: 12 Month Limited Warranty
12 Month Limited Warranty Audiovox Electronics Corporation (the “Company”) warrants to the original retail purchaser of this product that should this product or any part thereof, under normal use and conditions, be proven defective in material or workmanship within 12 months from the date of original purchase, such defect(s) will be repaired or replaced (at the Company’s option) without charge for parts and repair labor. - Page 6 (2) tapones plásticos negros Transformador análogo (4) arandelas de 7/16 pulg. Paso 2: Desdoble los elementos de la antena Parte posterior ANT751 Antena exterior Guía del Usuario (2) tuercas hexagonales de (2) pernos de 5/8 pulg. Tornillo de 2-1/2 pulg.
- Page 7 Paso 3: Desdoble el tetrapolo Tetrapolo Paso 4: Fije el inserto de la abrazadera del mástil Perno en U Abrazadera del mástil Inserto de la abrazadera del mástil Paso 5: Instale el transformador y el conductor de conexión coaxial Fije el transformador al conductor de conexión coaxial (no suministrado). Encuentre las arandelas y tuercas hexagonales de 10/32 pulg.
- Page 8 Paso 6: Inserte las tapas de los extremos Paso 7: Fije el tubo de montaje al pie Tornillo de 2-1/2 pulg. Tuerca hexagonal en perno de 5/8 pulg. transformador análogo entre dos arandelas en cada poste según se muestra aquí. Por último, apriete las tuercas hexagonales para asegurar los conectores.
- Page 9 Paso 8: Monte el pie y el tubo El extremo del tubo debe quedar perpendicular al suelo (a plomo) Paso 9: Fije la antena al mástil Asegure el pie en su ubicación permanente. Ajuste el extremo del tubo de manera que quede perpendicular al suelo.
-
Page 10: Garantía Limitada De 12 Meses
U.S.A.: Audiovox Electronics Corporation, 150 Marcus Blvd., Hauppauge, NY 11788 CANADÁ: Audiovox Return Center, c/o Genco, 6685 Kennedy Road, Unit #3 Door 16, Mississauga Ontario L5T 3A5 © 2009 Audiovox Accessories Corporation, 111 Congressional Blvd., Suite 350, Carmel, IN 46032 ANT751 US IB 01...
Need help?
Do you have a question about the ANT751 and is the answer not in the manual?
Questions and answers