
Related Manuals for Onkyo MD-105X


Summary of Contents for Onkyo MD-105X
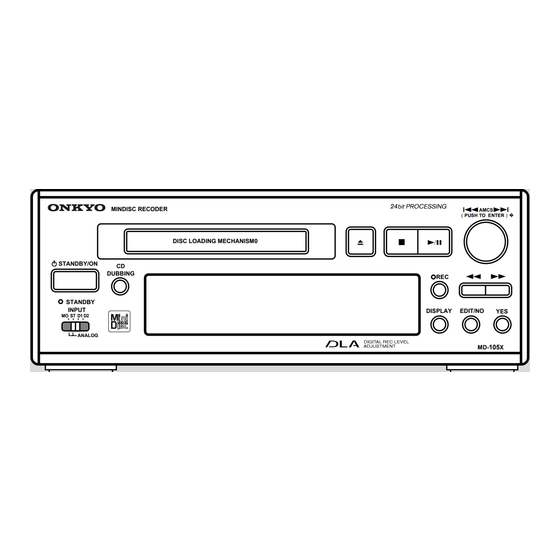
- Page 1 MiniDisc Recorder MD-105X Operating Instructions MINDISC RECODER STANDBY/ON DUBBING STANDBY INPUT ST D1 D2 ANALOG DISC LOADING MECHANISM0 DISPLAY English AMCS (PUSH TO ENTER) EDIT/NO...
-
Page 2: Before Using
Before using Thank you for purchasing ... Thank you for purchasing the ONKYO MD-105X MD Recorder. Please read this manual thoroughly before making connections and plugging in the unit. Following the instructions in this manual will enable you to obtain the optimum performance and listening enjoyment from your new MD-105X. -
Page 3: Important Safeguards
Important Safeguards Read Instructions – All the safety and operating instructions should be read before the appliance is operated. Retain Instructions – The safety and operating instructions should be retained for future reference. Heed Warnings – All warnings on the appliance and in the operating instructions should be adhered to. - Page 4 Precautions 1. Warranty Claim You can find the serial number on the rear panel of this unit. In case of warranty claim, please re- port this number. 2. Recording Copyright Recording of copyrighted material for other than personal use is illegal without permission of the copyright holder.
- Page 5 Precautions(continued) For U.S. model The laser is covered by a housing which prevents exposure d uring operation or maintenance. However, this product is classified as a Laser Prod- uct by CDRH (Center for Devices and Radiological Health) which is a department of the Food and Drug Administration.
- Page 6 Precautions(continued) For Canadian model CAUTION: THIS DIGITAL APPARATUS DOES NOT EXCEED THE CLASS B LIMITS FOR RADIO NOISE EMISSION FROM DIGITAL APPARATUS SET OUT IN THE RADIO INTERFERENCE REGULATIONS OF THE CANADIAN DEPARTMENT OF COMMUNICA- TIONS. For models having a power cord with a polarized plug: CAUTION: TO PREVENT ELECTRIC SHOCK,...
-
Page 7: Table Of Contents
Before Using Checking the supplied accessories ... Below Using the remote controller ... 8 Connections Connecting to the Onkyo Separate Collection series components ... 9 Connecting to the other components ... 10 Operations Normal play ... 14 Random play ... 18 Repeat play ... -
Page 8: Using The Remote Controller
(RC-409MD) 30° 30° RC-409MD Point the remote controller toward MD-105X’s remote control sensor. • Place the unit away from strong light such as direct sunlight or inverted flourescent light which can prevent proper operation of the remote contoroller. • Using another remote controller of the same... - Page 9 Using the remote controller(continued) Inserting the remote controller batteries Remove the battery compart- ment cover by pressing the tab and lifting up the cover. Insert two AA (R6 or UM-3)-size batteries into the battery com- partment. Carefully follow the polarity diagram (positive(+) and negative (–) symbols) inside the battery compartment.
-
Page 10: Connections
• CD-dubbing You can start recording from a CD player to your MD-105X by pressing the CD DUBBING button. • CD-synchro Recording When this function is enabled, you can immediately start recording to the MD by pressing the s button on the CD player. - Page 11 • Bundling an audio connection cable with the power cord or speaker cord may degrade the sound quality. • To use the unit with the other Onkyo Separate Collection series components, follow the connection diagram in the A-905X instruction manual to connect the unit to the system.
- Page 12 DO NOT OPEN z cable Amplifier 1 Connection with the Amplifier Connect the MD-105X to the MD (or TAPE) jacks of your amplifier. 2 Connection to the Digital Input Terminals (DIGITAL INPUT 1, 2) You can perform digital recording on the MD-...
- Page 13 Connecting to the other components (continued) Connecting the (z) controller If you are using other ONKYO components equipped with z connectors, you can control these components using the amplifier's remote cnotroller. Before connecting • The amplifier must be connected in the z system hookups for z control operation.
-
Page 14: Operations Normal Play
Operations Normal play MINDISC RECODER DISC LOADING MECHANISM0 STANDBY/ON DUBBING STANDBY INPUT ST D1 D2 ANALOG Press the STANDBY/ON button. (or the POWER button on the remote controller) The STANDBY indicator goes out. STANDBY/ON STANDBY DIGITAL IN Insert an MD. The MD recorder reads TOC (Table Of Contents) information on the MD to display the total number of tracks and... -
Page 15: Changing The Display Mode
Normal play (continued) MINDISC RECODER DISC LOADING MECHANISM0 STANDBY/ON DUBBING STANDBY INPUT ST D1 D2 ANALOG Changing the display mode When the MD recorder is stopped Pressing the DISPLAY button changes the display in the following sequence: Remote controller DISPLAY DISPLAY Total number of tracks on the MD and its total playing time... - Page 16 Normal play (continued) MINDISC RECODER DISC LOADING MECHANISM0 STANDBY/ON DUBBING STANDBY INPUT ST D1 D2 ANALOG Selecting the track to play using the number buttons Press the number button on the remote controller to select the track you want to play. (RC-409MD) >25 TRACK...
-
Page 17: Music Scan
Normal play (continued) MINDISC RECODER DISC LOADING MECHANISM0 STANDBY/ON DUBBING STANDBY INPUT ST D1 D2 ANALOG Music Scan The following operation is possible only when using the supplied remote controller (RC-409MD). Pressing the M.SCAN button plays the beginning (8 seconds) of each track on the disc in sequence whether the MD recorder is either playing or stopped. -
Page 18: Random Play
Random play MINDISC RECODER DISC LOADING MECHANISM0 STANDBY/ON DUBBING STANDBY INPUT ST D1 D2 ANALOG The following operation is possible only when using either of the following remote controllers: RC-409MD (supplied) RC-398S (supplied with the A-905X amplifier) When the MD recorder is stopped, press the RANDOM button (RC-409MD). -
Page 19: Repeat Play
Repeat play RC-409MD POWER PLAY MODE CONTINUE REPEAT >25 REMOTE CONTROLLER The following operation is possible using either of the following remote controllers only: RC-409MD (supplied) RC-398S (supplied with the A-905X amplifier) Repeatedly playing all tracks of an MD Press the REPEAT button on the remote controller just once. - Page 20 Repeat play (continued) To stop A-B Repeat • Press the A-B or REPEAT button when a section is in Repeat play. The A-B Repeat mode is now canceled. • Press the e button when a section is in Repeat play. The A-B Repeat mode is canceled and play of the current track stops.
-
Page 21: Memory Play
Memory play MINDISC RECODER DISC LOADING MECHANISM0 STANDBY/ON DUBBING STANDBY INPUT ST D1 D2 ANALOG • Using the Memory function, you can select your favorite tracks (up to 25 tracks) on an MD and arrange them in the desired order. When the MD recorder is stopped, press the MEMORY button (RC-409MD). - Page 22 Memory play (continued) Selecting a track using the remote controller (RC-409MD) >25 To select a track numbered 26 or above using RC-409MD Press the [>25] button first. Set a value for the 10th place and then the 1st place using the number buttons in this order.
-
Page 23: Cd-Dubbing
MDs. The CD dubbing mode setting is possible only when the MD recorder is stopped. • When your MD-105X is configured into a system with Onkyo Separate Collection series components (A-905X and C-705X), recording from the CD dubbing can be started simply pressing the CD DUBBING button on the MD- 105X. - Page 24 Fade Press the CD DUBBING button on the MD-105X The CD player automatically searches for the disc's peak level, while the MD-105X sets the optimum peak level and then enters the recording standby mode. The MD-105X starts digital recording the whole disc as soon as the disc's first track starts playing.
-
Page 25: Analog Recording
Analog recording STANDBY/ON STANDBY INPUT ST D1 D2 ANALOG INPUT In analog recording, audio connection cables are used for inputting signals from the recording source. Press the STANDBY/ON button. The STANDBY indicator goes out. STANDBY/ON STANDBY Load a recordable MD. MINDISC RECODER DISC LOADING MECHANISM0 STANDBY/ON... -
Page 26: Recording Level
Analog recording (continued) Press the o REC button. The MD recorder is now in the recording standby mode. • When your MD-105X is configured with C-705X and K-505X, start playing the CD or tape before pressing the REC button in step 4. - Page 27 Analog recording (continued) Since the interval between tracks is detected based on the sound level, some tracks may not be numbered correctly in the following cases: • Recorded condition of the cassette tape is bad (noise between tracks). • Low sound level in quiet music. •...
-
Page 28: Digital Recording
"D.In Unlock" will appear. Use the DIGITAL INPUT 1 digital input terminal if you connect the C-705X CD player to this MD recorder. 9 10... - Page 29 Digital recording (continued) Press the o REC button. The MD recorder is now in the recording standby mode. TRACK DIGITAL IN If "D. In Unlock" appears The digital input source is not connected properly. Check the connection for the digital input source. Using the AMCS knob, adjust the recording level.
- Page 30 Digital recording (continued) Press the n button and then start playing the recording source immediately. The MD recorder stops recording automatically when the remaining space on the MD is not enough to record the next track. TRACK TRACK DIGITAL IN To stop recording temporarily Press the n button (or the g button on the remote control).
-
Page 31: Signal Synchro Recording
Signal Synchro recording STANDBY/ON INPUT Even if your recording source is not Onkyo z-compatible, you can perform synchronized recording. Use the INPUT selector to select MO, ST, D1, or D2, according to the connected device. • You can perform signal synchro recording with both digital and analog recording sources. -
Page 32: System Operation
"Analog recording" or "Digital recording". For digital CD-synchro recording Connect the CD player’s (optical) digital output terminal to the MD-105X’s DIGITAL INPUT 1 terminal. Start playing the CD. The MD recorder starts recording as soon as the CD starts playing. - Page 33 System operation (continued) INPUT Synchro-recording from cassette deck to MD (Cassette Synchro recording) When your MD-105X is configured into a system with Onkyo Separate Collection series components (A-905X and K-505X), synchronized recording from the cassette deck to the MD recorder is possible.
- Page 34 ST D1 D2 ANALOG Synchro-recording from MD to cassette deck When the MD-105X is configured into a system with Onkyo Separate Collection series components (A-905X and K-505X), synchronized recording from the MD recorder to the cassette tape deck is possible.
-
Page 35: Timer Operation
(stereo) position. ANALOG IN Set the timer on your T-405X. Note Connect the AC power cord of your MD-105X to a normally live outlet. If you connect the power cord to the outlet on the rear of the A- AMCS (PUSH TO ENTER)... -
Page 36: Other Information For Recording
Storage period of backup data The recorded contents will be backed up in the MD-105X even if the MD recorder’s power cord is accidentally unplugged or if a power failure occurs before they are stored to the disc (when TOC is lit) or when they are being stored to the disc (when TOC is flashing). -
Page 37: Editing The Contents Of An Md
Editing the contents of an MD Erasing a track The following operation is possible when the unit is stopped or paused. Turn the AMCS knob until the track number you want to erase is displayed. AMCS PUSH TO ENTER TRACK DIGITAL IN Press the EDIT/NO button several times until "Erase?"... -
Page 38: Dividing A Track
Editing the contents of an MD (continued) Dividing a track The following operation is possible during the playback is ongoing or paused. Press the EDIT/NO button several times until "Divide?" appears in the display. EDIT/NO TRACK DIGITAL IN To stop dividing a track Press the EDIT/NO button until “Divide?”... -
Page 39: Combining Tracks
Editing the contents of an MD (continued) • When a track with a name is divided into two parts, the former part takes over the name and the latter part is left without a name. • When a track is divided, the tracks following that divided track are moved backward, each given a new number which is larger by one track than the previous track number. - Page 40 Editing the contents of an MD (continued) Press the YES button to combine the tracks you have selected. When the combining is completed, "Complete" appears in the display. DIGITAL IN • When tracks are combined, the tracks following those tracks are advanced, each given a new number which is smaller by one track than the previous track number.
- Page 41 Editing the contents of an MD (continued) Moving a track The following operation is possible when the unit is stopped or paused. Turn the AMCS knob until the track number you want to move is displayed. AMCS PUSH TO ENTER Press the EDIT/NO button several times until "Move?"...
-
Page 42: Naming A Track Or Disc
Naming a track or disc MINDISC RECODER DISC LOADING MECHANISM0 STANDBY/ON DUBBING STANDBY INPUT ST D1 D2 ANALOG To name a disc The MD recorder must be stopped. To name a track The MD recorder may be stopped, paused, playing, or recording. (The characters being entered are canceled if the track which is playing or being recorded changes.) Turn the AMCS knob until the track number which you want to... - Page 43 Naming a track or disc (Continued) Upper case letter (A, B, C...) Lower case letters (a, b, c...) Numbers and symbols (1, 2, 3...) Easy title ( ) • With the supplied remote controller (RC-409MD), press the DISPLAY button to change the character input mode. Enter a track name or disc name using the AMCS knob.
- Page 44 Naming a track or disc (Continued) Preset titles for easy titling In the Easy Titling mode, you can enter the following titles by simply choosing one. BALLAD Anthology BLUES Best of CLASSIC DANCE FUSION Collection JAZZ Favorite LIVE Happy POPS Heavy REGGAE Hit Song...
-
Page 45: Canceling The Last Editing
Canceling the last editing STANDBY/ON The UNDO function The UNDO function cancels the last editing you performed with the ALL ERASE, ERASE, DIVIDE, COMBINE, MOVE, or NAME ERASE function. To undo the last editing, press the STOP button and perform the following steps: Select "Undo?". -
Page 46: Other Information Message List
Cannot Rec An attempt was made to record onto a premastered (read-only) disc. D. In Unlock The digital equipment (CD player, DAT, etc.) has not been connected properly. Otherwise, the connected digital equipment is not operating properly. Disc Error The disc is abnormal (scratched or missing a TOC). -
Page 47: System Limitations
System limitations The recording system in your MiniDisc recorder is radically different from those used in cassette and DAT decks and is characterized by the limitations described below. Note, however, that these limitations are due to the inherent nature of the MD recording system itself and not to mechanical causes. -
Page 48: Rules For Digital Recording
Rules for digital recording Guide to the serial copy management system Since your MD unit uses the Serial Copy Management System (SCMS), MDs recorded through the digital input terminal cannot be used to make subsequent copies to other MDs through the digital output terminal. The following diagram shows a system for making copies through the digital or analog terminals. -
Page 49: Troubleshooting
ONKYO service station, informing them of your name, address, phone number, type of unit, and the details of the problem. - Page 50 Depending on the surrounding conditions you can remove the disc and leave the power on for at the longest one hour. The dew will evaporate and the recorder will work properly. If it doesn't work after several hours, please consult the nearest Onkyo authorized service center. Cause •...
-
Page 51: Precautions For Handling The Minidisc (Md)
Precautions for handling the MiniDisc (MD) The MD is housed in a cartridge, so you can handle it without worrying about dust and fingerprints. Even so, a dirty or warped cartridge may cause malfunction. Always remember the following precautions so you can enjoy high-quality sound for a long time. Do not touch the disc in the cartridge directly with your fingers. -
Page 52: Indexed To Parts And Controls
Indexed to parts and controls Front panel STANDBY/ON button [13] Ventilation holes STANDBY/ON STANDBY INPUT ST D1 D2 ANALOG STANDBY indicator [13] INPUT selector [23] Display Input setting indicator DISC TRACK ANALOG IN DIGITAL IN PLAY indicator indicator indicator PAUSE indicator Disc slot MINDISC RECODER DISC LOADING MECHANISM0... - Page 53 Indexed to parts and controls (continued) Remote controller POWER button [14] PLAY MODE buttons CONTINUE buttons [18] RANDOM buttons [18] MEMORY buttons [21] Number buttons [16, 22, 43] REPEAT button [19] MD operation buttons Stop button ( e) [14] Play button (s) [14] Pause button ( g) [14] Rec button (oREC) [26] Fast reverse button (d) [17, 43]...
- Page 54 Indexed to parts and controls (continued) MD operation buttons Stop button ( e) [14] Play button (s) [14] Pause button ( g) [14] Rec button (oREC) [26] Down button (q) [16,43] Up button (w) [16,43] Repeat button (REPEAT) [19] Clear button (CLEAR) [21,43] Scroll button (SCROLL) [15] Play Mode button (PLAY MODE) RC-398S...
- Page 55 MEMO...
-
Page 56: Specifications
Tel: 201-825-7950 Fax: 201-825-8150 E-mail: onkyo@onkyousa.com ONKYO EUROPE ELECTRONICS GmbH Industriestrasse 20, 82110 Germering, GERMANY Tel: 089 84 93 20 Fax: 089 84 93 226 E-mail: info@onkyo.de ONKYO CHINA LIMITED Units 2102-7, Metroplaza Tower I, 223 Hing Fong Road, Kwai Chung, N.T., HONG KONG Tel: 852 2429 3118 Fax: 852 2428 9039...
Need help?
Do you have a question about the MD-105X and is the answer not in the manual?
Questions and answers