Table of Contents
Advertisement
Quick Links
Advertisement
Chapters
Table of Contents
Troubleshooting

Summary of Contents for AutoXray EZ-READ
- Page 1 EZ-R SERS ANUAL EVISION...
-
Page 2: Safety Precautions And Warnings
Keep all children and visitors a safe distance from the work area. • Keep the EZ-Read dry, clean, and free from oil and grease. Use a mild detergent on a clean cloth to wipe the outside of the EZ-Read, when necessary. -
Page 3: Table Of Contents
View the Memory (Trouble) Codes - Ford ........22 Clear Ford Memory (Trouble) Codes ..........23 Troubleshooting What to do When the EZ-Read Displays a Fault/Trouble Code................24 What to do for a "Vehicle Is Not Responding" Message ....24 Screen Contrast Problems ..............25 How to Reset the EZ-Read ...............25... -
Page 4: Introduction
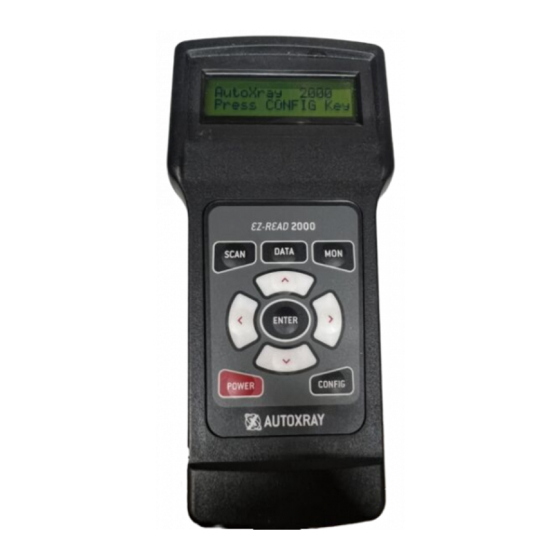
NTRODUCTION Thank You for buying the EZ-Read from AutoXray, the leading provider in cost effective automotive diagnostic Code Readers. Display Screen Battery Compartment MODE Keys ENTER UP / DOWN BACK / NEXT POWER (ON/OFF) Arrow Keys CONFIG Figure 1. EZ-Read •... - Page 5 Allow you to clear Trouble Codes (on equipped vehicles) • Reset your Check Engine Light AutoXray has made sure your new EZ-Read is computer safe. It WILL NOT accidentally deploy airbags, change transmission gears, affect ABS brake performance, or fire injectors and ignition systems.
- Page 6 NOTE in this font is used to identify information that will assist you while you are using the EZ-Read. text above and/or below the current screen. Use the p and q Arrows will be displayed at the right side of the screen to indicate...
-
Page 7: Setup / Operating Instructions
Connect the EZ-Read to Your Vehicle Install New Batteries The EZ-Read EZ-Read is powered by 4 AA batteries. Before the EZ-Read is used the first time, you need to install batteries in the unit. Make sure the batteries are put in according to the dia- gram on the bottom of the battery compartment. - Page 8 NSTRUCTIONS the battery date may result in damage to the unit. • As long as good batteries are in the EZ-Read, the vehicle engine configuration and data will remain in the EZ-Read’s memory, even after the unit is powered off.
- Page 9 Set the Display Units (SAE/Metric) The EZ-Read EZ-Read can be set up to display in SAE or Metric units. The default setting is SAE. Go to Section 4 if you do not need to change the display units.
- Page 10 ETUP PERATING NSTRUCTIONS Ford Connector Works with OBD-I 1983-1995 Ford vehicles with EEC-IV computers. Chrysler Connector Works with OBD-I 1983-1995 Chrysler vehicles with SCI connectors OBD-II Manufacturer Specific Connector (Blue) For 1994-1995 GM OBD-I vehicles with a 16 pin connector, as well as for future OBD-II functions to be released at a later date.
- Page 11 The EZ-Read EZ-Read communicates with the computer and sensors in your vehicle through a special connection cable. The EZ-Read cable is plugged into a connector on the top of the EZ-Read, and into a computer interface connection in your vehicle.
- Page 12 NOTE: Make sure the scanner cable and vehicle connectors are always properly seated during all test procedures. 4. Insert the EZ-Read cable connector into the top of the scanner. Page 12...
-
Page 13: Scan - Obd-Ii, Obd-I
(These codes can also be viewed later. See “View Trouble Codes-OBD-II” page 15.) 5. After the EZ-Read has read all the data from the vehicle, the Scan message will be displayed on the screen. If the... -
Page 14: Readiness Test - Obd-Ii
Press the Scan key to Scan New Data. Refer to “Scanning the Vehicle” on page 12. 1. Press POWER to display the EZ-Read scanner opening screen. Use the p and q arrow keys until 2. -
Page 15: Data - Obd-Ii, Gm Obd-I, Chrysler Obd-I View Trouble Codes - Obd-Ii, Gm, Chrysler Obd I
. Refer to “Scanning the key to Scan New Data Vehicle” on page 12. Viewing Trouble Codes 1. If the EZ-Read is not ON,press POWER to display the 2. [OBD-II] Use the p and q arrow keys opening screen. until... -
Page 16: Clear The Codes - Obd-Ii, Gm, Chrysler Obd-I
. Refer to “Scanning the key to Scan New Data Vehicle” on page 12. Clearing Trouble Codes 1. Make sure the EZ-Read EZ-Read cable is correctly connected to the EZ-Read and to the vehicle, the engine is OFF, and the vehicle ignition 2. -
Page 17: Scan The Koeo Data - Ford
KOEO D CAN THE Before You Start • Before scanning a vehicle, the EZ-Read scanner must be correctly configured for your vehicle. Refer to “Setup / Operating Instructions” on page 8 if you need to configure the scanner. Key ON, Engine OFF (KOEO) Scan... -
Page 18: Scan The Koer Data - Ford
KOER D CAN THE Before You Start • Before scanning a vehicle, the EZ-Read scanner must be correctly configured for your vehicle. Refer to “Setup / Operating Instructions” on page 7 if you need to configure the scanner. •... - Page 19 1. Run the engine until it is at normal operating temperature. 2. Make sure ALL electrical loads (blower fan, air conditioning, radio, etc.) are OFF. 3. Connect the EZ-Read scanner cable to the scanner and to the vehicle EEC-IV computer connector, then press POWER todisplay the EZ-Read scanner opening screen.
-
Page 20: Data - Ford
KOER D CAN THE • Vehicles equipped with a Brake ON/OFF Switch - Press and release the brake, when prompted. 7. If the vehicle is equipped with an automatic transmission, place the car into Drive and then back into Park, when prompted. 8. -
Page 21: View The Koeo Data - Ford
Scan New Data OFF (KOEO) Scan” on page 17. The EZ-Read scanner DOES NOT need to be connected to the vehicle to view the scanned data. The vehicle engine configuration and data will remain in the scanner’s memory until a vehicle is scanned again. -
Page 22: View The Memory (Trouble) Codes - Ford
Memory Codes are intermittent faults that are detected by the vehicles computer during normal operation, and are stored in memory. 1. Press POWER to display the EZ-Read scanner opening screen. Use the p and q arrow keys until 2. Press DATA to display the Data menu. -
Page 23: Clear Ford Memory (Trouble) Codes
(KOER) Scan” on page 18. Clearing Trouble Codes 1. Make sure the EZ-Read scanner cable is correctly connected to the scanner and to the vehicle. Turn the vehicle ignition key OFF for at least 10 seconds, turn the key ON, then press POWER. -
Page 24: Troubleshooting
ROUBLESHOOTING This section contains the following troubleshooting subjects: • What to do When the EZ-Read Displays a Fault/Trouble Code • What to do for a "Vehicle Is Not Responding" Message • Screen Contrast Problems • How to Reset the EZ-Read •... -
Page 25: Screen Contrast Problems
EZ-Read screen contrast, making the screen difficult to read. We apologize for the inconvenience. If you encounter this prob- lem, run your EZ-Read for approximately 2 hours to run off the high voltage causing the problem. (It will be necessary to press a key occasionally to override the EZ-Read EZ-Read power miser function.) -
Page 26: Ez-Read Screen Menu Trees
EZ-Read Screen Menu Trees POWER >AutoXray EZ-Read opening screen CONFIG >1-Config Unit Year Ford Year Chrysler Year OBD-II Generic GEO OBD-II Honda OBD-II Hyundai OBD-II Isuzu OBD-II Kia OBD-II Mazda OBD-II Mitsubishi OBD-II Nissan OBD-II Subaru OBD-II Suzuki OBD-II Toyota OBD-II >2-System Config... - Page 27 EZ-Read Screen Menu Trees (cont.) SCAN - OBD-II >ENTER to Scan, SCAN to Exit MON - OBD-II >1-Capture Mode 1-Contact AutoXray for Upgrade >2-Oxygen Tests 1-Contact AutoXray for Upgrade >3-Readiness Tests >4-Test Results 1-Contact AutoXray for Upgrade DATA-OBD-II >1-Operation Data >2-Freeze Frame Data...
-
Page 28: Upgrade, Update, Specifications
Upgrading the EZ-Read involves enabling features in your EZ- Read. If you have a GM, FORD, Chrysler, or OBD-II EZ-Read, you can add any of the other ver- sions to your EZ-Read for a nominal charge by simply calling AutoXray. One of our Customer Service Representatives will step you through the process (see our web site or contact AutoXray for current prices). -
Page 29: Registration Card
Registration Card Please complete the enclosed Registration Card and return it, or call 480.804.1673. It is the only way AutoXray can notify you of future upgrades / updates for your EZ-Read. You Must Register to receive these great added benefits Register By Mail Register online at www.autoxray.com... - Page 30 2. Use the p and q keys to display 1. Press CONFIG from the initial screen. on the screen, then 4-Download press ENTER. 3. Press ENTER to prepare the EZ-Read to receive the down- load. • When the screen displays a Downloading message, the EZ-Read is in Slave Mode waiting for the PC to begin communication.
-
Page 31: Technical Description Of Obd-Iand -Ii
OBD-I ECHNICAL ESCRIPTION OF OBD-I Original equipment automobile manufacturers (OEM) developed On-Board Diagnostics (OBD) in response to increased diagnostic requirements from the California Air Resource Board (CARB). The regulations that were developed by CARB and accepted by the Environmental Protection Agency (EPA) were designated OBD-I. Beginning in 1982 and by 1989 all new cars and light duty trucks sold in California had to have OBD-I. - Page 32 OBD-I ECHNICAL ESCRIPTION OF The Federal Clean Air Act Amendments of 1990 requires that all vehicles sold in the United States meet OBD-II requirements by the 1996 model year. The first OBD-II systems appeared on selected vehicle types in 1994. Some important OBD-II requirements are: Vehicle service information available to all technicians;...
-
Page 33: Product Warranty Policy
11. If a returned Product is found to be defective and such defect is covered by this warranty, AutoXray shall at its option and at no charge to the customer, repair or replace the Product. Following such repair or replacement, AutoXray shall return the Product at AutoXray's expense. - Page 34 Chrysler OBD-I Scanner - for 1983-1995 Chrysler SCI vehicles, and 1991-1995 Jeep vehicles. CCESSORIES PGRADES PC-Link Kit - enables your EZ-Read to interface directly with your PC and AutoXray through the Internet (Includes Serial Interface cable and CD-ROM software) Carrying Case - a rugged, impact-resistant, nylon carrying case...
-
Page 35: Additional Products / Accessories
DDITIONAL RODUCTS CCESSORIES XP240 Trade in - trade your old unit in for a new EZ-Read EZ-Read Internet Access Visit our Internet web site at www.autoxray.com for the latest products, accessories, upgrades, and available updates. Contact us by email at support@autoxray.com... - Page 36 OTES Page 36...
- Page 37 OTES Page 37...
-
Page 38: Safety Precautions And Warnings
Code Reader while driving the vehicle. Service Service must only be performed by AutoXray repair personnel. Service or repair by unqualified personnel may result in risk or injury, damage to the unit, and may void your warranty. Refer to the Product Warranty Policy section of this manual. -
Page 39: Table Of Contents
ABLE OF ONTENTS Safety Precautions and Warnings ..........38 Table of Contents .................39 Introduction ..................40 Setup / Operating Instructions ...........43 SCAN - OBD-II SCAN - OBD-II................47 MON - OBD-II Readiness Test................48 DATA - OBD-II View Trouble Codes - OBD-II ............49 Clear the Codes - OBD-II.............50 Troubleshooting What to do When the Code Reader Displays a Fault/Trouble Code ..............51... -
Page 40: Introduction
NTRODUCTION Thank You for buying the Code Reader from AutoXray, the leading provider in cost effective automotive diagnostic Code Readers. Display Screen Battery Compartment MODE Keys ENTER UP / DOWN BACK / NEXT POWER (ON/OFF) Arrow Keys CONFIG Figure 1. Code Reader •... - Page 41 Allow you to clear Trouble Codes (on equipped vehicles) • Reset your Check Engine Light AutoXray has made sure your new Code Reader is computer safe. It WILL NOT accidentally deploy airbags, change transmission gears, affect ABS brake performance, or fire injectors and ignition systems.
- Page 42 NTRODUCTION NOTE: the word NOTE in this font is used to identify information that will assist you while you are using the Code Reader. Arrows will be displayed at the right side of the screen to indicate text above p and q arrow keys to view the text and/or below the current screen.
-
Page 43: Setup / Operating Instructions
• Connect the Code Reader to Your Vehicle Install New Batteries The EZ-Read Code Reader is powered by 4 AA batteries. Before the Code Reader is used the first time, you need to install batteries in the unit. Make sure the batteries are put in according to the diagram on the bottom of the battery compartment. - Page 44 Continue with Section 3 to set the display units. Adjust the Display Contrast The contrast on your EZ-Read 1000/2000 can be adjust- ed for easier viewing under different lighting conditions. NOTE: Due to the differences in design not all products support this feature.
- Page 45 Set the Display Units (SAE/Metric) The EZ-Read Code Reader can be set up to display in SAE or Metric units. The default setting is SAE. Go to Section 4 if you do not need to change the display units.
- Page 46 Make sure the Code Reader cable and vehicle connectors are always properly seated during all test procedures. 4. Insert the EZ-Read cable connector into the top of the Code Reader. CONGRATULATIONS! The Code Reader is now set up, connected, and ready to test your vehicle.
-
Page 47: Scan - Obd-Ii
Operating Instructions” on page 43 if you need to configure the Code Reader. Scanning the Vehicle 1. Press POWER to display the EZ-Read Code Reader opening screen. 2. Turn the vehicle ignition key to ON or start the engine. 3. Press SCAN. -
Page 48: Readiness Test
EADINESS Before You Start • Your scanner must be connected, and the key in the ON position, before viewing OBD-II Readiness Test data. If MON is pressed, and the vehicle has not been scanned, the scanner will display Press the Scan key to . -
Page 49: View Trouble Codes - Obd-Ii
- OBD-II IEW THE ROUBLE ODES Before You Start • Your vehicle must be scanned before clearing trouble codes. If DATA is pressed, and the vehicle has not been scanned, the Code Reader will display Press the Scan key to Scan New Data. -
Page 50: Clear The Codes - Obd-Ii
. Refer to “Scanning the key to Scan New Data Vehicle” on page 47. Clearing Trouble Codes 1. Make sure the EZ-Read Code Reader cable is correctly connected to the Code Reader and to the vehicle, the engine is OFF, and the vehicle ignition key is ON, then press POWER, 2. -
Page 51: Troubleshooting
Code Reader Screen Menu Trees What to do When the Code Reader Displays a Fault/Trouble Code NOTE: AutoXray recommends obtaining a service manual or repair manual to assist in automotive diagnostics. Manuals are available at your local parts store, book store, or library. -
Page 52: Screen Contrast Problems
We apologize for the inconvenience. If you encounter this problem, run your Code Reader for approximately 2 hours to run off the high voltage causing the problem. (It will be necessary to press a key occasionally to override the EZ-Read Code Reader power miser function.) NOTE: After these batteries reach their rated voltage (1.5V) the... -
Page 53: Code Reader Screen Menu Trees
EADER CREEN REES POWER >AutoXray EZ-Read opening screen CONFIG >1-Config Unit Year Ford Year Chrysler Year OBD-II Generic GEO OBD-II Honda OBD-II Hyundai OBD-II Isuzu OBD-II Kia OBD-II Mazda OBD-II Mitsubishi OBD-II Nissan OBD-II Subaru OBD-II Suzuki OBD-II Toyota OBD-II >2-System Config... - Page 54 EADER CREEN REES SCAN - OBD-II >ENTER to Scan, SCAN to Exit MON - OBD-II >1-Capture Mode 1-Contact AutoXray for Upgrade >2-Oxygen Tests 1-Contact AutoXray for Upgrade >3-Readiness Tests >4-Test Results 1-Contact AutoXray for Upgrade DATA-OBD-II >1-Operation Data >2-Freeze Frame Data >3-Trouble Codes...
-
Page 55: Upgrade, Update, Specifications
Code Reader. If you have a GM, FORD, Chrysler, or OBD-II Code Reader, you can add any of the other versions to your Code Reader for a nominal charge by simply calling AutoXray. One of our Customer Service Representatives will step you through the process (see our web site or contact AutoXray for current prices). -
Page 56: Registration Card
Registration Card Please complete the enclosed Registration Card and return it, or call 480.804.1673. It is the only way AutoXray can notify you of future upgrades / updates for your Code Reader. You Must Register to receive these great added benefits Register By Mail Register online at www.autoxray.com... -
Page 57: Set The Time Units For Capture Mode
Press ENTER to display the initial screen. Set the Time Units for Capture Mode The EZ-Read Code Reader can be set up to capture a user defined length of time while in Capture Mode. The default setting is 1000 ms (1 sec) per frame. - Page 58 PGRADE PDATE PECIFICATIONS 3. Use the p and q arrow keys to select displayed, then press ENTER. 4. Use the t and u arrow keys to change 2-Capture Time then press ENTER. Capture Time the desired number between 500 and 5000 ms, then press ENTER to select the choice (or press the CONFIG Key to Cancel and return to the initial screen).
-
Page 59: Technical Description Of Obd-I And -Ii
OBD-I ECHNICAL ESCRIPTIONS OF Original equipment automobile manufacturers (OEM) developed On-Board Diagnostics (OBD) in response to increased diagnostic requirements from the California Air Resource Board (CARB). The regulations that were developed by CARB and accepted by the Environmental Protection Agency (EPA) were designated OBD-I. Beginning in 1982 and by 1989 all new cars and light duty trucks sold in California had to have OBD-I. - Page 60 DTC to be set. AutoXray warrants to its customers that, on the date the Products are delivered, they shall be free from defects in manufacture.
-
Page 61: Product Warranty Policy
11. If a returned Product is found to be defective and such defect is covered by this warranty, AutoXray shall at its option and at no charge to the customer, repair or replace the Product. Following such repair or replacement, AutoXray shall return the Product at AutoXray's expense. -
Page 62: Additional Products / Accessories
EZ-Read Ford OBD-I Upgrade - for Ford OBD-I support (EEC-IV vehicles model years '83-'95) EZ-Read Chrysler OBD-I Upgrade - for Chrysler OBD-I support (SCI vehicles '83-'95, excluding '87-'88) XP240 Trade in - trade your old unit in for a new EZ-Read Code Reader Internet Access Page 62... - Page 63 DDITIONAL RODUCTS AND CCESSORIES Visit our Internet web site at www.autoxray.com for the latest products, accessories, upgrades, and available updates. Contact us by email at support@autoxray.com Page 63...
- Page 64 Page 64...
Need help?
Do you have a question about the EZ-READ and is the answer not in the manual?
Questions and answers