Table of Contents
Advertisement
ULTRA-STITCH
Sewing Machine
Model: SM-1100white
INSTRUCTION MANUAL
Your satisfaction is guaranteed. If you are not completely satisfied with our
Ultra-Stitch Sewing Machine and the results it brings, we insist that you let us know.
We'll help make the Sewing Machine work for you, or we'll refund your money.
Advertisement
Table of Contents

Summary of Contents for Mueller ULTRA-STITCH SM-1100
- Page 1 ULTRA-STITCH Sewing Machine Model: SM-1100white INSTRUCTION MANUAL Your satisfaction is guaranteed. If you are not completely satisfied with our Ultra-Stitch Sewing Machine and the results it brings, we insist that you let us know. We’ll help make the Sewing Machine work for you, or we’ll refund your money.
-
Page 2: Table Of Contents
TABLE OF CONTENTS IMPORTANT SAFETY INSTRUCTIONS.......... 2 INTENDED USE................. 3 BEFORE FIRST USE................. 3 SEWING MACHINE BASICS............. 4 Parts....................4 Connecting the Foot pedal............6 Connecting the Power Supply............6 THREADING THE MACHINE............. 7 Winding the bobbin..............7 Inserting the bobbin..............8 Threading the upper thread............ -
Page 3: Important Safety Instructions
IMPORTANT SAFETY INSTRUCTIONS When using an electrical appliance, basic safety should always be followed, includ- ing the following: Read all instructions before using this sewing machine. DANGER - To reduce the risk of electric shock: • Before connecting the power adapter to a power socket, make sure that the voltage on its rating label corresponds to the voltage in the power socket to which you wish to connect it. -
Page 4: Intended Use
• Switch the sewing machine to OFF position (“O”) when making any adjustments in the needle area, such as threading the needle, changing the needle, threading the bobbin or changing the presser foot, etc. • Do not use the machine if it is wet. •... -
Page 5: Sewing Machine Basics
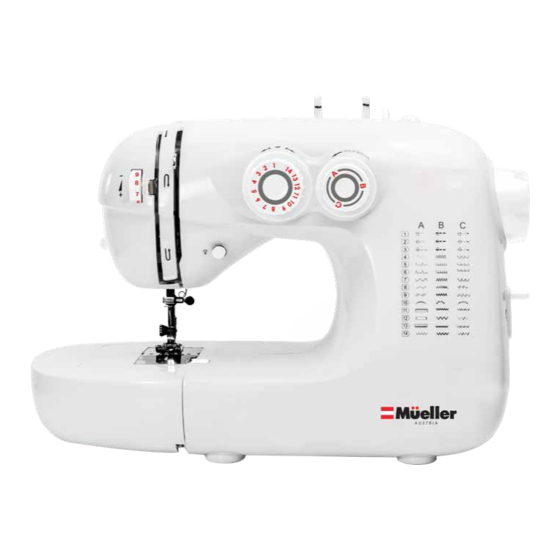
SEWING MACHINE BASICS PARTS 8.Thread hole 9.Needle clamp screw 1.Presser foot locking lever 10.Needle clamp 2.Presser set screw 11.Needle – size 14 (90) 3.Presser foot holder 12.Feed dog 4.Presser foot 5.Needle plate 6.Bobbin cover 7.Bobbin cover lock 22.Pattern 23.Pattern 21.Take-up lever selector dial selector dial -primary-... - Page 6 32.Spool holders 31.Bobbin winding spindle 30.Bobbin stopper 33.Presser foot lifter 29.Reverse sewing lever 28.Power switch 27.Foot pedal socket 26.Power socket Parts located in the removable accessories storage/extension table 34. Bobbin (x4) 35. Button sewing plate Pack of 6 needles – size 14 (90) 36.
-
Page 7: Connecting The Foot Pedal
Connecting the Foot pedal 1. Connect the Foot pedal (41) cord to the Foot pedal socket (27) on the sewing machine. 2. Place the Foot pedal on the floor unobstructed. Connecting the Power Supply • Turn OFF the power switch (28) - The symbol "O" on the switch indicates the "OFF"... -
Page 8: Threading The Machine
THREADING THE MACHINE Winding the bobbin 1. Place a spool of thread (not included) on one of the Spool hold- ers (32). 2. Draw the thread from the spool through the Thread guide (18). 3. Pass the thread through the hole in the Bobbin (34) from the inside to the outside. -
Page 9: Inserting The Bobbin
Inserting the bobbin 1. Turn the Hand wheel (23) coun- terclockwise (toward you) to raise the Needle (11) to the highest point. 2. Slide and hold the Bobbin cover lock (7) to the right to lift and remove the Bobbin cover (6). 3. - Page 10 2. Place the desired thread spool (not included) onto one of the Spool holders (32). Draw the thread from the spool through the Thread guide (18). 3. Push and hold the Thread clamp (17) to the left, pass the thread by the right side of the Thread clamp and then release the clamp.
-
Page 11: Using The Needle Threader
Using the needle threader 1. Insert the Needle threader (37) through the eye of the Needle (11) from the back of the needle to the front of the needle. 2. Pass the thread through the wire loop of the Needle threader. 3. -
Page 12: Adjusting The Thread Tension
3. With the Presser foot (4) raised, pull out approximately 4 inches (10 cm) of both threads and lay them to the back under the Presser foot. 4. Slide and hold the Bobbin cover lock (7) to the right to re-insert the Bobbin cover (6). - Page 13 1. Balanced tension: The ideal straight stitch has threads locked between two layers of fabric, as illustrated. 2. Upper thread tension is too loose: The needle thread (upper thread) will form loops on the wrong side (bottom side) of the fabric. Tighten the needle thread tension by rotating the dial to a higher number.
-
Page 14: Sewing
SEWING Selecting the stitch pattern This product includes 42 kinds of stitches you can use for different purpos- es. Rotate the Pattern selector dial – primary (22) (1 - 14) and the Pattern selector dial – secondary (23) (A, B, C) to choose the desired stitch pattern. CAUTION: Do not turn the Pattern selection dials when the needle is down into the fabric. -
Page 15: Basic Sewing
Basic sewing Press the LED light switch (15) to switch the light ON or OFF. For sewing sleeves, waistbands, pant legs, or socks, remove the Accessory storage (13) to fit the tubular garment around the sewing surface easily. 1. Raise the Presser foot lifter (33). 2. -
Page 16: Removing The Fabric And Cutting The Threads
Removing the fabric and cutting the threads 1. After sewing, rotate the Hand wheel (23) counterclockwise (toward you) to raise the Needle (11) to the highest point. Raise the Presser foot lifter (33). 2. Pick up the fabric and pull the threads towards the back, so there is at least 4 inches (10 cm) of loose thread. -
Page 17: Using The Seam Ripper
Using the seam ripper The Seam ripper (40) is used to cut the stitches in between fabrics that are sewn together. -Gently pull the sewn fabric seam apart, so the stitches are visible and slightly loosened, then glide the Seam ripper hook in between to cut the threads. -
Page 18: 4-Step Buttonhole Sewing Process
4-Step Buttonhole sewing process 1. Set the pattern to 11A, then sew at low speed to the marked length. 2. Change the pattern to 12A for sewing 5-6 stitches at low speed. 3. Change the pattern to 13A at low speed to the marked length. 4. -
Page 19: Zipper Sewing
secure the button. 6. Rotate the Hand Wheel (23) to raise the Needle to the highest point then raise the Presser foot lifter (33). 7. Pull out the fabric and cut the threads. NOTE: If you are having difficulties removing the fabric from underneath the Feed dog (12), push and hold the Thread clamp (17) to the left while pulling the fabric at the same time. -
Page 20: Replacing The Needle
NOTE: If you are having difficulties removing the fabric from underneath the Feed dog (12), push and hold the Thread clamp (17) to the left while pulling the fabric at the same time. Alternatively, you can rotate the Hand Wheel (23) counterclockwise (toward you) until you pull the thread and take out the fabric. -
Page 21: Removing Or Attaching The Presser Foot
3. Insert a new needle into the Needle clamp (10) with the flat side of its shank facing towards the back of the product. 4. Push the needle all the way into the Needle clamp (10) and tighten the Needle clamp screw (9) to secure the needle. CAUTION: Always make sure to turn the power switch OFF and disconnect the machine from the power supply before changing the needle. -
Page 22: Removing Or Attaching The Presser Foot Holder
Removing or attaching the Presser foot holder NOTE: Remove the Presser foot (4) before you remove the Presser foot holder (3). See section “Removing or attaching the Presser foot” for instruc- tions. WARNING: Turn OFF the power switch before detaching or attaching the Presser foot holder. -
Page 23: Cleaning And Maintenance
CLEANING AND MAINTENANCE WARNING: • Turn the power switch OFF and unplug the machine before cleaning. • During cleaning, do not immerse the electrical parts of the product in water or other liquids. • Never hold the product under running water. Cleaning the main unit Clean the outside of the machine with a soft, slightly damp cloth. -
Page 24: Troubleshooting
TROUBLESHOOTING Issue Potential cause Solution Make sure that the Power The machine is not adapter is connected, both to plugged in. the Power socket and the wall outlet. machine The Foot pedal is not Make sure that the Foot pedal is does not connected. - Page 25 Issue Potential cause Solution The bobbin thread is not Re-thread the bobbin thread and threaded properly or is not make sure to insert the bobbin The bobbin positioned properly in the into the bobbin case so that the bobbin holder. thread is running in the clockwise thread direction.
-
Page 26: Specifications
SPECIFICATIONS Rated voltage 12 V Current consumption 1.5 A Power consumption Input voltage 100-240 V~ 50/60 Hz... - Page 28 Your purchase comes with a 100% satisfaction guarantee from Müeller If you are not happy with the product for any reason, please contact us at support@muellerdirect.com or 888-632-9981 with your feedback or questions, and we will do our best to make things right for you! Müeller USA 168 Mason Way Unit #4A,...
Need help?
Do you have a question about the ULTRA-STITCH SM-1100 and is the answer not in the manual?
Questions and answers
How do I choose straight stitch for regular sewing
To choose the straight stitch setting on the Mueller ULTRA-STITCH SM-1100 sewing machine, rotate the Pattern selector dial – primary (1–14) and the Pattern selector dial – secondary (A, B, C) to select the desired straight stitch pattern.
This answer is automatically generated
Hola, quiero saber cómo se llama el porta bobina de la máquina de cocer por qué necesito comprarlo, la referencia es Ultra Stitch model SM -1100 white.
The name of the bobbin holder for the Mueller Ultra Stitch model SM-1100 is the "bobbin case."
This answer is automatically generated