Advertisement
A
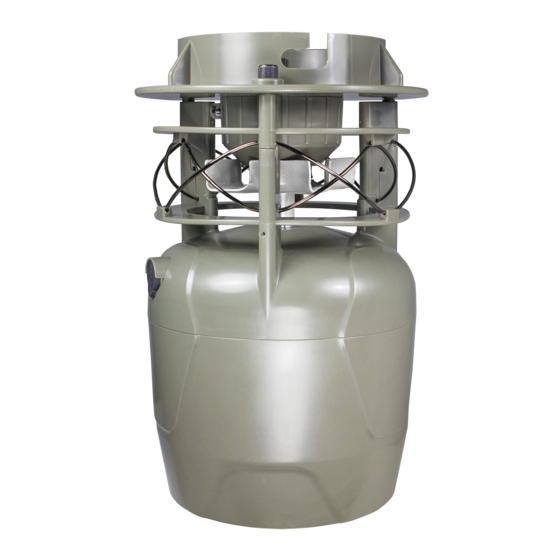
OPERATING ELECTRIC VARMINT GUARD
ATTENTION:
Always position safety switch to OFF position before
performing any maintenance or while setting up feeder
to avoid shock.
B
CONFIGURING AND TESTING FEEDER
SET CURRENT TIME: Press the PROGRAM button and SET CURRENT TIME will appear. Press UP or DOWN to set the
hour, then press RIGHT to go to the minutes. Press UP or DOWN to set the minutes. Press the BACK button to return
to the Main Menu , or press PROGRAM to proceed through the settings.
NOTE: The timer is capable up to 10 feed times, each 1-60 seconds each, and each can operate on any day of
the week where each day can be toggled ON/OFF.
SET CURRENT DAY: Press the PROGRAM button until the Set Current Day screen appears. Press LEFT or RIGHT to
select the current day. Press BACK to return to the Main Menu, or press PROGRAM to proceed through the settings.
SET EST. FEED REMAINING: Press the PROGRAM button until the Est. Feed Remaining screen appears. Press UP or
DOWN to select the amount of feed you have in the feeder. Press BACK to return to the Main Menu, or press
PROGRAM to proceed through the settings.
SET FEED TIME: Press the PROGRAM button until the desired Feed Timer appears at the top of the screen. Press the
DOWN button until the feed time is flashing. Press PROGRAM to enter edit mode. Press UP or DOWN to set the hour.
Press the RIGHT button to go over to the minutes. Press UP or DOWN to set the minutes. Press PROGRAM or BACK to
return to the Feed Timer. The factory settings include two feeder times 7am and 6pm, each for 6 seconds.
SET DAYS OF THE WEEK: After setting the feed time, press UP so the days of the week start flashing. Press PROGRAM
to enter edit mode. By default all days should be enabled. Press LEFT or RIGHT to highlight the desired day. Press
DOWN to disable the selected day. Press UP to re-enable the selected day. Once all desired days are selected, press
PROGRAM or BACK to return to the Feed Timer.
SET RUN DURATION: Press DOWN and LEFT until the RUN DURATION seconds are flashing. Press PROGRAM to enter
edit mode. Press UP or DOWN to set desired feed duration. Press PROGRAM or BACK to return to the Feed Timer.
7
7
SET MOTOR SPEED: Press UP or DOWN until the motor speed setting is flashing at the bottom of the screen. Press
PROGRAM to enter edit mode. Press RIGHT or LEFT to select the desired motor setting. Press PROGRAM or BACK to
return to the Feed Timer.
When the Feed Timer is blinking at the top of the screen, press PROGRAM or RIGHT to advance to the next feed
timer. Repeat for all required feed times.
TEST FEEDER: Press the BACK button to reach the Main Menu. Press the TEST button to enter the Test Mode. The
8
8
Test duration will appear (this will be the same as the duration as Feed Timer 1). Press UP or DOWN to set the Test
Duration. Press PROGRAM. Press RIGHT or LEFT to select desired motor speed. Press PROGRAM to perform test.
After a 5 second countdown, the test will commence.
STOP
READ THIS FIRST
BEFORE
PROCEEDING
MFG-13265_NXT Hunter QL_Manual-ENGLISH_11-25-20.indd 1
MFG-13265_NXT Hunter QL_Manual-ENGLISH_11-25-20.indd 1
Instructions for NXT Hunter Feeder Kit
THANK YOU for your purchase of a Moultrie NXT Feeder. Please read this sheet before operating the unit.
If you should have any questions about this product or any other Moultrie product, please contact us using the
information on the back of this sheet. Allow us to better serve you by activating your 1-year warranty online at
http://www.moultriefeeders.com/warranty
If mounting the Moultrie Quick Lock Feeder Kit to:
• a Moultrie 30 or 55-gallon barrel* or Moultrie 6.5-gallon bucket, refer to Section D.
• a Moultrie 30-Gallon Quick-Lock Hopper, refer to Section E.
• any other containers, please visit our website at www.moultriefeeders.com
Electric Varmint Guard
There are two wires, one is positive and the other is negative. When both
wires are touched, the circuit is completed, creating a shock.
To maintain Moultrie's standard in high battery efficiency, the guard is
inactive until it is first touched. Once touched, the guard is then armed.
The next time it is touched, it will deliver a shock.
Full Battery
Empty Battery
11/30/20 11:33 AM
11/30/20 11:33 AM
Advertisement
Table of Contents

Related Manuals for Moultrie MFG-13265

Summary of Contents for Moultrie MFG-13265
- Page 1 THANK YOU for your purchase of a Moultrie NXT Feeder. Please read this sheet before operating the unit. If you should have any questions about this product or any other Moultrie product, please contact us using the information on the back of this sheet. Allow us to better serve you by activating your 1-year warranty online at http://www.moultriefeeders.com/warranty...
- Page 2 Turn the metal drum upside down and slide the belly band ring around perimeter and make sure that belly band is snug against the bottom structure ring as shown (Moultrie barrel only). c. Slide the bolt through the belly band ring, spacer and lock washer as shown.
- Page 3 Phillips-head Bolt To install a Moultrie game camera or Feeder Power Panel (sold separately), thread included 1/4”-20 x 1” Phillips-head bolt upward through hole in Lid Stop lid handle and tighten bolt. Lid will hold up to 3 devices.
Need help?
Do you have a question about the MFG-13265 and is the answer not in the manual?
Questions and answers