Motorola APX 3000 User Manual
Hide thumbs
Also See for APX 3000:
- Quick reference manual (44 pages) ,
- Quick reference card (92 pages)

Related Manuals for Motorola APX 3000


Summary of Contents for Motorola APX 3000
- Page 1 APX 3000 USER GUIDE MARCH 2022 *68012007043* 68012007043-EM © 2022 Motorola Solutions, Inc. All rights reserved...
-
Page 2: Intellectual Property And Regulatory Notices
License Rights The purchase of Motorola Solutions products shall not be deemed to grant either directly or by implication, estoppel or otherwise, any license under the copyrights, patents or patent applications of Motorola Solutions, except for the normal non-exclusive, royalty-free license to use that arises by operation of law in the sale of a product. -
Page 3: Table Of Contents
68012007043-EM Contents Contents Intellectual Property and Regulatory Notices............2 List of Tables....................... 8 Software Version......................9 Chapter 1: Read Me First..................10 1.1 Notations Used in This Manual....................10 1.2 Radio Care..........................11 1.2.1 Cleaning Your Radio....................12 1.2.2 Cleaning the External Surface of the Radio.............12 1.2.3 Radio Service and Repair.................. - Page 4 68012007043-EM Contents 4.2 LED Indications........................27 4.2.1 Troubleshooting....................... 28 4.3 Status Icons‡......................... 28 4.4 Intelligent Lighting Indicators ‡....................29 4.5 Alert Tones† ......................... 30 4.6 Display Color Change On Channel..................31 Chapter 5: General Radio Operation..............33 5.1 Selecting a Zone†........................33 5.2 Selecting a Radio Channel†....................33 5.3 Mode Select Feature......................
- Page 5 68012007043-EM Contents 7.1.3.1 Classification of Regrouped Radios............42 7.1.3.2 Requesting a Reprogram (Trunking Only)..........42 7.2 Remote Monitor........................43 7.3 Scan Lists..........................43 7.3.1 Intelligent Priority Scan.................... 43 7.3.2 Viewing a Scan List....................43 7.3.3 Viewing and Changing the Priority Status..............44 7.4 Scan............................44 7.4.1 Turning Scan On or Off....................44 7.4.2 Deleting a Nuisance Channel†................
- Page 6 7.14.5 Changing the Current Site..................58 7.15 Mission Critical Wireless Bluetooth ® Wireless Technology †‡..........58 7.15.1 Pairing with Low Frequency-Motorola Proximity Pairing (LF-MPP) Feature..59 7.15.2 Responder Alert Sensors..................60 7.15.2.1 Holster Sensor..................60 7.15.2.2 Disabling the Sensor................60 7.16 ASTRO 25 (P25) Programming Over Project 25 (POP25)..........61 7.17 Voice Announcement †......................61...
- Page 7 Declaration of Compliance for the Use of Distress and Safety Frequencies....... 73 Technical Parameters for Interfacing External Data Sources............73 Limited Warranty.......................74 MOTOROLA SOLUTIONS COMMUNICATION PRODUCTS............. 74 I. WHAT THIS WARRANTY COVERS AND FOR HOW LONG:..........74 II. GENERAL PROVISIONS:....................... 75 III.
-
Page 8: List Of Tables
68012007043-EM List of Tables List of Tables Table 1: LED Indications ........................27 Table 2: Emergency Operation Scenarios .....................47 Table 3: VHF Marine Channel List ......................71... -
Page 9: Software Version
68012007043-EM Software Version Software Version All the features described in the following sections are supported by the software version R27.00.00 or later. Contact your system administrator for more details of all the supported features. -
Page 10: Chapter 1: Read Me First
68012007043-EM Chapter 1 : Read Me First Chapter 1 Read Me First This User Guide covers the basic operation of the radio. However, your dealer or system administrator may have customized your radio for your specific needs. Check with your dealer or system administrator for more information. -
Page 11: Radio Care
68012007043-EM Chapter 1 : Read Me First Radio Care Proper radio usage and care ensure efficient operation and long life of the product. CAUTION: Use the radio according to the following recommendations and warnings. • Your radio casing has a vent port for pressure equalization in the radio. Never poke this vent with objects such as needles, tweezers, or screwdrivers. -
Page 12: Cleaning Your Radio
Radio Service and Repair Proper repair and maintenance procedures ensure efficient operation and long life of this radio. A Motorola Solutions maintenance agreement provides expert service to keep the radio and all other communication equipment in perfect operating condition. A nationwide service organization is provided by Motorola Solutions to support maintenance services. -
Page 13: Battery Recycling And Disposal
Chapter 1 : Read Me First Battery Recycling and Disposal In the U.S. and Canada, Motorola Solutions participates in the nationwide Call2Recycle program for battery collection and recycling. Many retailers and dealers participate in this program. For the location of the drop-off facility closest to you, go to http://www.call2recycle.org/... -
Page 14: Chapter 2: Preparing Your Radio For Use
Chapter 2 Preparing Your Radio for Use APX 3000 is a small body radio meant to work together with other light-weight accessories such as Mission Critical Wireless Remote Control Unit (RCU), headset and pod to interact with you efficiently. IMPORTANT: •... -
Page 15: Attaching The Battery
NOTE: User is notified if radio detects non-Motorola Solutions battery upon powering up, charging, or removing from the charger. This feature is applicable for IMPRES and Non-IMPRES battery. A tone sounds when the radio is attached with the non-Motorola Solutions battery. -
Page 16: Installing Accessories With Gcai Connector
Home screen and the Codeplug Alias. You see a green spot when the switch is in the ON position. If the power-up test is successful, you see momentary MOTOROLA on the DRSM. NOTE: If the power-up test is unsuccessful, you see ER XX/YY (XX/YY is an alphanumeric code) on your DRSM screen. -
Page 17: Pairing Radio With Mission Critical Remote Control Unit (Rcu)
68012007043-EM Chapter 2 : Preparing Your Radio for Use 2 Verify that both your radio and pod are powered ON and in pairing mode. 3 Place the Bluetooth pairing spot on your Pod within one inch of the Bluetooth pairing spot on your radio. -
Page 18: Removing Your Radio From The Carry Holster
68012007043-EM Chapter 2 : Preparing Your Radio for Use Your radio is successfully secured to the carry holster. 2.11 Removing Your Radio from the Carry Holster Procedure: 1 Push the hook of the carry holster to release your radio top. 2 Pull your radio out from the carry holster. -
Page 19: Method To Tie The Radio And Flexible Antenna To The Body
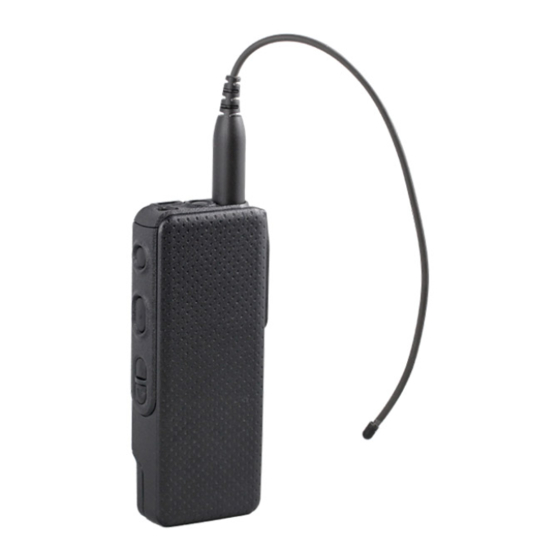
Method to Tie the Radio and Flexible Antenna to the Body Follow the procedures in this section to install and strap the flexible antenna of your radio. NOTE: When using this antenna, use only Motorola Solutions-approved batteries, wired surveillance, and wireless audio accessories. Using approved wired surveillance and wireless... -
Page 20: Installing And Strapping The Flexible Antenna
68012007043-EM Chapter 2 : Preparing Your Radio for Use 2.12.2 Installing and Strapping the Flexible Antenna Prerequisites: Ensure the radio is turned off before you install or detach the antenna. When and where to use: CAUTION: • Do not twist or coil the antenna because this results in antenna performance degradation. •... - Page 21 68012007043-EM Chapter 2 : Preparing Your Radio for Use The following table shows number of spacer segments for different antenna bands. Antenna Frequency Number of spacers provided Number of spacer seg- Band ments 700/800 MHz 3 Use surgical tape or straps to fasten the spacer to the body with the flat surface of the spacer on the human body.
-
Page 22: Chapter 3: Radio Controls
68012007043-EM Chapter 3 : Radio Controls Chapter 3 Radio Controls This chapter explains the buttons and functions to control the radio. Radio Parts and Controls... - Page 23 68012007043-EM Chapter 3 : Radio Controls Top Button Use this programmable button to access a preprogrammed function or enable or disable a feature. On/Off Switch Toggle this switch to turn the radio between on and off. Top Side (Select) Button Use this programmable button to access a preprogrammed function or enable or disable a feature.
-
Page 24: Programmable Features
68012007043-EM Chapter 3 : Radio Controls Programmable Features Your system administrator can program the programmable buttons as shortcuts to radio functions or preset channels/groups depending on the duration of a button press. Some functions can also be programmed to the radio switches. 3.2.1 Assignable Radio Functions Bluetooth On/Off... -
Page 25: Assignable Settings Or Utility Functions
68012007043-EM Chapter 3 : Radio Controls Rekey Request Notifies the dispatcher that a new encryption key is needed. Remote Monitor Enables the system administrator to remotely command a targeted radio. Reprogram Request (Trunking Only) Notifies the dispatcher that a new dynamic regrouping assignment is needed. Scan Short press –... -
Page 26: Chapter 4: Status Indicators
68012007043-EM Chapter 4 : Status Indicators Chapter 4 Status Indicators This section explains the status indicators of the radio. Battery Charge Status Your radio indicates the battery charge status through LED, sounds, and the fuel gauge icon on the display. Battery Protection is activated when the battery is low or operating in extremely low temperatures to extend radio communication. -
Page 27: Led Indications
68012007043-EM Chapter 4 : Status Indicators • The radio Voice Announcement announces the programmed Wrong Battery. • The battery icon blinks continuously. • A repetitive tone sounds. • Red LED blinks continuously. NOTE: The radio does not display any indication when the radio is connected to the charger, the radio and battery match, or when the radio certification type is configured as None in Customer Programming Software (CPS). -
Page 28: Troubleshooting
68012007043-EM Chapter 4 : Status Indicators 4.2.1 Troubleshooting Scenarios Solutions LED indicator on the radio The radio might be preprogrammed in lights off mode in the current is not functioning during channel. For covert operation, the LEDs can be preprogrammed to transmit and receive or any turn off with specific zones or channels. -
Page 29: Intelligent Lighting Indicators
68012007043-EM Chapter 4 : Status Indicators Icon Description Blinking dot Radio detects activity on channel designated as Priority-One. Steady dot Radio detects activity on channel designated as Priority-Two. Bluetooth is on and ready for Bluetooth connection. Steady Bluetooth is connected to the external Bluetooth device. Blinking Bluetooth device is disconnected. -
Page 30: Alert Tones
68012007043-EM Chapter 4 : Status Indicators Alert Tones† Your radio uses alert tones to inform you of the condition of your radio. The following table lists these tones and when they occur. You Hear Tone Name Heard Short, Low- Radio Self Test Fail When radio fails its power-up self test. -
Page 31: Display Color Change On Channel
68012007043-EM Chapter 4 : Status Indicators You Hear Tone Name Heard Console Acknowledge When status, emergency alarm, or reprogram request ACK is received. Received Individual When Call Alert or Private Call is received. Call Site Trunking When a SmartZone trunking system fails. Short, High- Low-Battery Chirp When battery is below preset threshold value. - Page 32 68012007043-EM Chapter 4 : Status Indicators The accessories backlight change to white for the following scenarios: • When changing to or powering up on invalid channels such as unprogrammed channels, receiver frequency error channel and blank channels For hard key zeroize, key loading, and scan list programming, the backlight follows the home channel backlight color.
-
Page 33: Chapter 5: General Radio Operation
68012007043-EM General Radio Operation Chapter 5 General Radio Operation This chapter explains the general operations of your radio. Selecting a Zone† When and where to use: A zone is a group of channels. Perform the following actions to select a zone. -
Page 34: Mode Select Feature
68012007043-EM Chapter 5 : General Radio Operation Mode Select Feature Mode Select allows a long press to save the current zone and channel of your radio to a programmable button. Once it saved, a short-press of the button jumps the transmission to the saved zone and channel. -
Page 35: Receiving And Responding To A Private Call (Trunking Only)
68012007043-EM Chapter 5 : General Radio Operation 3 Release the PTT button to listen. 5.4.2 Receiving and Responding to a Private Call (Trunking Only)†‡ A Private Call is a call from one individual radio to another. Other users in the current talkgroup cannot hear the one-to-one call between the two radios. -
Page 36: Making A Private Call (Trunking Only)
68012007043-EM Chapter 5 : General Radio Operation 2 Press the PTT button to make the call. The radio shows different indicators based on the system the radio is configured. • For ASTRO Conventional system, the LED lights up solid red. The display shows the talkgroup alias or ID. -
Page 37: Switching Between Repeater Or Direct Operation Button
68012007043-EM Chapter 5 : General Radio Operation Switching Between Repeater or Direct Operation Button The Repeater Operation increases the radio coverage area by connecting with other radios through a repeater. The transmit and receive frequencies are different. The Direct or “talkaround operation” allows you to bypass the repeater and connect directly to another radio. - Page 38 68012007043-EM Chapter 5 : General Radio Operation If you try to transmit on a receive-only channel, you hear an invalid tone until you release the PTT button.
-
Page 39: Chapter 6: Additional Performance Enhancement
Data (IV&D) bearer service. This bridges the communication between the radio and the Customer Enterprise Network. SecureNet SecureNet allows you to perform secured communications on an Analog or Motorola Data Communication (MDC) channel. The MDC Over-the-Air Rekeying (OTAR) feature allows you to perform OTAR activities on an MDC channel. -
Page 40: P25 Digital Vehicular Repeater System
P25 Digital Vehicular Repeater System Motorola Solutions offers an MSI Certified APX compatible, third party, P25 Digital Vehicular Repeater System (DVRS). This provides low-cost portable radio coverage in areas where only mobile radio coverage is available. -
Page 41: Chapter 7: Advanced Features
68012007043-EM Advanced Features Chapter 7 Advanced Features This chapter explains the operations of the features available in your radio. Advanced Call Features This chapter explains the operations of the call features available in your radio. 7.1.1 Selective Call (ASTRO Conventional Only)†‡ This feature allows you to receive a call from a specific individual with privacy. -
Page 42: Dynamic Regrouping (Trunking Only)
68012007043-EM Chapter 7 : Advanced Features assigned Priority Talkgroup.Priority Dispatch is not available during Emergency operations. Scan feature is suspended when Priority Dispatch is initiated. Prerequisites: Dispatch console that supports this feature must be preprogrammed to use this feature. Check with your dealer or system administrator for more information on dispatch console supporting this feature. -
Page 43: Remote Monitor
68012007043-EM Chapter 7 : Advanced Features Procedure: Press the preprogrammed Reprogram Request button to send reprogram request to the dispatcher. The display shows RPGM and PLS WAIT. If you hear five beeps, the dispatcher has acknowledged the reprogram request. The display shows ACK RCVD and the radio returns to the Home screen. -
Page 44: Viewing And Changing The Priority Status
68012007043-EM Chapter 7 : Advanced Features 7.3.3 Viewing and Changing the Priority Status Procedure: Press the Top Side (Select) button to change the priority status of the currently displayed channel or the scan list status icon of the currently displayed channel. The radio shows one of following priority status icons and scenarios: •... -
Page 45: Restoring A Nuisance Channel
68012007043-EM Chapter 7 : Advanced Features 7.4.3 Restoring a Nuisance Channel Procedure: To restore the deleted nuisance channel, perform one of the following actions: • Stop and restart a scan using the preprogrammed Scan button. • Mode change to another channel and back to the original channel. •... -
Page 46: Instant Recall
68012007043-EM Chapter 7 : Advanced Features 7.6.1 Instant Recall This feature allows you to save and playback the recent received calls. All saved calls are removed upon radio power cycle. 7.6.1.1 Saving and Playback Calls When and where to use: Use the preprogrammed button to save and playback the recorded calls. -
Page 47: Emergency Operation
68012007043-EM Chapter 7 : Advanced Features Emergency Operation†‡ The Emergency feature is used to indicate a critical situation. An emergency signal overrides any other communication over the selected channel. Your radio supports the following Emergency modes: • Emergency Alarm • Emergency Call •... -
Page 48: Emergency Keep-Alive
68012007043-EM Chapter 7 : Advanced Features 7.8.2 Emergency Keep-Alive This feature prevents the radio from being turned off when it is in Emergency mode. If this feature is enabled, you are required to exit Emergency mode before turning off your radio. 7.8.3 Exiting Emergency Operation If an Emergency operation is triggered on your radio, the dispatch console or radios configured as... -
Page 49: Sending An Emergency Alarm
68012007043-EM Chapter 7 : Advanced Features 7.8.5 Sending an Emergency Alarm When and where to use: This feature allows you to send a data transmission, which identifies the radio sending the emergency, to the dispatcher. NOTE: The default timer of Emergency button press to activate Emergency is 50 milliseconds. This timer is programmable from 50–6200 milliseconds by a qualified technician. -
Page 50: Sending An Emergency Alarm With Emergency Call
68012007043-EM Chapter 7 : Advanced Features Your radio microphone is automatically activated, allowing you to communicate with the group of radios without pressing the PTT button. This activated microphone state is also known as hot mic. The hot mic applies to the first voice transmission from your radio during the Emergency call. For subsequent transmissions in the same Emergency call, you must press the PTT button. -
Page 51: Sending An Emergency Alarm And Call With Hot Mic
68012007043-EM Chapter 7 : Advanced Features 7.8.9 Sending An Emergency Alarm and Call with Hot Mic This feature allows you to send an Emergency Alarm and Call with hot mic to a group of radios. When and where to use: Your radio must be programmed for this type of operation. When indirect PTT such as Hot Mic is activated, the audio transmission can be configured in CPS to route the audio to the radio internal microphone, wired RSM microphone, or Bluetooth wireless microphone. -
Page 52: Fall Alert (Man Down)
68012007043-EM Chapter 7 : Advanced Features Procedure: Once the tone begins to sound, if the orange button is released the tone continues to alarm on all radios within the talkgroup, until the PTT button is released. NOTE: Radio does not transmit evacuation tone if the radio is in secure mode. 7.10 Fall Alert (Man Down)†‡... -
Page 53: Testing Fall Alert
68012007043-EM Chapter 7 : Advanced Features 7.10.2 Testing Fall Alert Prerequisites: Ensure that Fall Alert feature is configured in your radio. Procedure: 1 Turn on the radio, and place it in a vertical position for at least 5 seconds. 2 Lay the radio down in a horizontal position. The radio plays an alert tone and the display shows MAN-DOWN. -
Page 54: Selecting Clear Transmissions
68012007043-EM Chapter 7 : Advanced Features 7.11.2 Selecting Clear Transmissions†‡ Procedure: Press the preprogrammed Secure/Clear button to the clear secure mode. • If the selected channel is preprogrammed for secure-only operation, when you press the PTT button, you hear an invalid mode tone and the display shows SEC TX. •... -
Page 55: Erasing Encryption Keys
7.11.3.5 MDC OTAR (Conventional Only) This feature allows you to view or define the Motorola Data Communications (MDC) Over-the- Air Rekeying (OTAR) features. It is applied only when operating in secure encrypted mode. In addition to Rekey Requests, OTAR transmissions include Delayed Acknowledgments, and Power-up Acknowledgments. -
Page 56: Infinite Ukek Retention
68012007043-EM Chapter 7 : Advanced Features 7.11.3.6 Infinite UKEK Retention This feature enables Unique Key Encryption Key (UKEK) to be permanently stored in the radio even when all the encryption keys are erased. Without this UKEK key, the radio cannot be rekeyed over the air. -
Page 57: Gps Performance Enhancement
68012007043-EM Chapter 7 : Advanced Features If adequate signals from multiple satellites are available, your GPS feature only provides an approximate location, usually within 10 meters from your actual location, but sometimes farther away. 7.13.1 GPS Performance Enhancement Sometimes, the GPS feature may be unable to complete a location calculation successfully. You then see a message indicating that your radio cannot connect to enough visible satellites. -
Page 58: Out-Of-Range Radio
When the radio finds a new site, it returns to the Home screen. 7.15 Mission Critical Wireless Bluetooth Wireless Technology †‡ ® This feature allows your radio to extend its functionality by connecting to external proprietary Motorola Solutions accessories. Use Motorola Solutions proprietary Mission Critical Wireless (MCW) devices... -
Page 59: Pairing With Low Frequency-Motorola Proximity Pairing (Lf-Mpp) Feature
Obstacles that can cause an obstruction in the line-of-sight include trees, buildings, mountains, cars, and others. For high degree of reliability, Motorola Solutions recommends to NOT separate the radio and the accessory. At the fringe areas of reception, both voice and tone quality will start to sound "garbled" or "broken". To correct this problem, simply position the accessory and radio closer to each other (within the 10 meter defined range) to re-establish clear audio reception. -
Page 60: Responder Alert Sensors
68012007043-EM Chapter 7 : Advanced Features The radio tries to establish connection with the device once paired. NOTE: If the connection fails within 6 seconds, you hear a decremental-pitched tone to indicate that the device is unpaired. The display shows <Device Type> UNPAIRED. Repeat this step to re-initiate the pairing process. -
Page 61: Astro 25 (P25) Programming Over Project 25 (Pop25)
68012007043-EM Chapter 7 : Advanced Features • If the timer expires without an event, a tone sounds, the radio switches the sensor to enabled state, and clears the sensor status from the display. • If the preprogrammed Sensor button is long-pressed, the OTA sensor notification is enabled. 7.15.2.2.2 Disabling the Sensor Permanently Procedure:... -
Page 62: Site Selectable Alerts (Astro 25 Trunking)
68012007043-EM Chapter 7 : Advanced Features 7.18 Site Selectable Alerts (ASTRO 25 Trunking) †‡ A Site Selectable Alert (SSA) is an Intelligent Lighting indicator with audio alert. The alert is sent to radios at sites to notify the users when special situations occur. Your radio supports up to 250 site aliases. -
Page 63: Turning Voice Mute On Or Off
68012007043-EM Chapter 7 : Advanced Features 2 Long press again to unlock the controls. If preprogrammed, the radio plays the associated Voice Announcement. 7.19.4 Turning Voice Mute On or Off†‡ This feature allows you to mute the voice transmission of the current zone and channel. When and where to use: Procedure: •... -
Page 64: Digital Ptt Id Support
68012007043-EM Chapter 7 : Advanced Features Analog Options Tone Private Line, Digital Private-Line, and carrier squelch is available (preprogrammed) per channel. Option Result Carrier squelch You hear all traffic on a channel. Tone Private Line or Digital Private-Line The radio responds only to your messages. Digital Options One or more of the following options may be preprogrammed in your radio. - Page 65 68012007043-EM Chapter 7 : Advanced Features Mode Description tions. You can override the transmit-inhibit state by quick-keying the radio (press PTT button twice within the preprogrammed time limit).
-
Page 66: Chapter 8: Accessories
68012007043-EM Chapter 8 : Accessories Chapter 8 Accessories Not all accessories are FCC certified to operate with all radio models and/or band splits. See the radio price pages for a list of FCC certified accessories or contact your sales representative for accessory compatibility. -
Page 67: Legal And Compliance Statements
Name: Motorola Solutions, Inc. Address: 2000 Progress Pkwy, Schaumburg, IL 60196-1078, U.S.A. Phone Number: 1-800-927-2744 Hereby declares that APX 3000 conforms to FCC Part 15, subpart B, section 15.107(a), 15.107(d), and section 15.109(a) Class B Digital Device As a personal computer peripheral, this device complies with Part 15 of the FCC Rules. Operation is... -
Page 68: Important Safety Information
Before using the radio, read the RF Energy Exposure and Product Safety Guide for Portable Two-Way Radios which contains important operating instructions for safe usage and RF energy awareness and control for Compliance with applicable standards and Regulations. For a list of Motorola Solutions-approved antennas, batteries, and other accessories, visit the following website: http://www.motorolasolutions.com Under Industry Canada regulations, this radio transmitter may only operate using an antenna of a type and maximum (or lesser) gain approved for the transmitter by Industry Canada. -
Page 69: Fcc Licensing Information
Applying for Canadian License The operation of your Motorola Solutions radio is subject to the Radio communications Act and must comply with rules and regulations of the Federal Government's department of Industry Canada. Industry Canada requires that all operators using Private Land Mobile frequencies obtain a radio license before operating their equipment. -
Page 70: Maritime Radio Use In The Vhf Frequency Range
68012007043-EM Maritime Radio Use in the VHF Frequency Range Maritime Radio Use in the VHF Frequency Range Special Channel Assignments Emergency Channel If you are in imminent and grave danger at sea and require emergency assistance, use VHF Channel 16 to send a distress call to nearby vessels and the United States Coast Guard. Transmit the following information, in this order: 1 “MAYDAY, MAYDAY, MAYDAY.”... - Page 71 68012007043-EM Maritime Radio Use in the VHF Frequency Range in the semiduplex mode on the two frequency channels specified in the table below. NOTE: Simplex channels 3, 21, 23, 61, 64, 81, 82, and 83 cannot be lawfully used by the general public in US waters.
- Page 72 68012007043-EM Maritime Radio Use in the VHF Frequency Range 156.075 160.675 156.125 160.725 156.175 160.775 156.225 160.825 156.275 160.875 156.325 160.925 67** 156.375 156.375 156.425 156.425 156.475 156.475 156.575 156.575 156.625 – 156.675 156.675 156.725 156.725 77** 156.875 – 156.925 161.525 156.975 161.575...
-
Page 73: Declaration Of Compliance For The Use Of Distress And Safety Frequencies
68012007043-EM Maritime Radio Use in the VHF Frequency Range Declaration of Compliance for the Use of Distress and Safety Frequencies The radio equipment does not employ a modulation other than the internationally adopted modulation for maritime use when it operates on the distress and safety frequencies specified in RSS-182 Section 7.3. -
Page 74: Limited Warranty
Product Accessories One (1) Year MOTOROLA SOLUTIONS, at its option, will at no charge either repair the Product (with new or reconditioned parts), replace it (with a new or reconditioned Product), or refund the purchase price of the Product during the warranty period provided it is returned in accordance with the terms of this warranty. -
Page 75: Ii. General Provisions
Repairs will be made only at the designated MOTOROLA SOLUTIONS repair depot. Local services are not included. MOTOROLA SOLUTIONS will pay for outbound shipping via MOTOROLA SOLUTIONS'S normal shipping methods. -
Page 76: Vi. Patent And Software Provisions
1 that MOTOROLA SOLUTIONS will be notified promptly in writing by such purchaser of any notice of such claim,... -
Page 77: Vii. Governing Law
You are also entitled to be compensated for any other reasonably foreseeable loss or damage from a failure in the goods or service. If you have any queries, please call Motorola Solutions Australia at 1800 457 439. You may also visit our website: https://www.motorolasolutions.com/en_xa/support.html... -
Page 78: Glossary
Automatic Registration Service ASTRO 25 Motorola Solutions standard for wireless digital trunked communications. ASTRO conventional Motorola Solutions standard for wireless analog or digital conventional communications. Autoscan A feature that allows the radio to automatically scan the members of a scan list. Bluetooth Bluetooth is an open wireless technology standard for exchanging data over short distances from fixed and mobile devices with high levels of security. - Page 79 68012007043-EM Glossary Channel A group of characteristics, such as transmit/receive frequency pairs, radio parameters, and encryption encoding. Control Channel In a trunking system, one of the channels that is used to provide a continuous, two-way/data- communications path between the central controller and all radios on the system. Conventional Typically refers to radio-to-radio communications, sometimes through a repeater.
- Page 80 It can also trigger Emergency Alarm the Post-Alert Timer is not cancelled. Mission Critical Wireless. Motorola Solutions Digital Communications. Monitor Check channel activity by pressing the Monitor button. If the channel is clear, you hear static. If the channel is in use, you hear conversation.
- Page 81 68012007043-EM Glossary Multi-System Talkgroup Scan List A scan list that can include both talkgroups (trunked) and channels (conventional). Network Access Code Network Access Code (NAC) operates on digital channels to reduce voice channel interference between adjacent systems and sites. NiMH Nickel-metal-hydride.
- Page 82 68012007043-EM Glossary Selective Switch Any digital P25 traffic having the correct Network Access Code and the correct talkgroup. Squelch Muting of audio circuits when received signal levels fall below a pre-determined value. With carrier squelch, all channel activity that exceeds the preset squelch level can be heard. Synchronous Serial Interface (SSI) DSP interface to peripherals that consists of a clock signal line, a frame synchronization signal line, and a data line.