Table of Contents
Advertisement
Available languages
Available languages
Quick Links
Advertisement
Table of Contents

Related Manuals for MultiSound TELEBEEPER

Summary of Contents for MultiSound TELEBEEPER
- Page 1 Mod. BEEPER 11 Mod. TELEBEEPER / BEEPER Manuale Utente...
-
Page 2: Table Of Contents
Regolazione tempo di intervento dalla segnalazione del cane in ferma ....pag. Ripristino impostazioni iniziali ...... pag. Regolazione sensibilità sensore di movimento ..........pag. Utilizzo del radiocomando ........ pag. Personalizzazione codice radiocomando ..pag. Codifica nuovo codice telebeeper ....pag. Specifiche tecniche........... pag. -
Page 3: Accensione / Spegnimento
Mod. BEEPER 11 ACCENSIONE / SPEGNIMENTO Per la messa in funzione, avvicinare il magnete in dotazione (M) al punto (R) contrassegnato sul coperchio del Beeper (Fig.1). Per confermare l’avvenuta accensione, vengono emessi alcuni suoni di conferma. Il numero di suoni è proporzionato al livello di carica della batteria. -
Page 4: Settaggio Impostazioni
Mod. BEEPER 11 SETTAGGIO IMPOSTAZIONI Per poter personalizzare le varie impostazioni del BEEPER svitare il tappo posto sul retro e agire sulle levette del commutatore a quattro posizioni come segue: Levetta 1-2-3-4 - Regolazione sensibilità sensore di movimento. Posizionando tutte le levette in posizione on è... -
Page 5: Impostazioni Programmi Attenuazione Del Volume
Mod. BEEPER 11 IMPOSTAZIONI PROGRAMMI ATTENUAZIONE DEL VOLUME: Portare in posizione on il pin numero 1 del commutatore a quattro posizioni esattamente come mostrato in Fig. 3 Con il Beeper spento premere il tasto bianco e mantenendolo premuto accendere il BEEPER. Trascorsi i suoni di accensione, viene emesso un tono diverso che segnala l’ingresso nella modifica impostazioni. -
Page 6: Regolazione Dell'intervallo Tra Un "Bip" E
Mod. BEEPER 11 IMPOSTAZIONI PROGRAMMI REGOLAZIONE DELL’ INTERVALLO TRA UN “BIP” E L’ ALTRO NELLA POSIZIONE “TRACCIA” nel caso in cui si abbia la necessità di seguire i movimenti del cane anche quando questo non è in ferma si può attivare la funzione di traccia. - Page 7 Mod. BEEPER 11 Fig. 4 Fig. 5 Tasto Bianco Intervallo Premuto Secondi N.B. Quando si cambia un parametro di funzionamento il BEEPER si spegne automaticamente dopo cinque secondi. Riaccenderlo per confermare le modifiche effettuate.
-
Page 8: Selezionare Tono Di Traccia
Mod. BEEPER 11 IMPOSTAZIONI PROGRAMMI SELEZIONE DEL TONO DI TRACCIA Il Beeper dispone di quattro toni di traccia differenti. Questo vi permetterà di associare un tono specifico ad ogni cane in modo da sapere sempre la sua posizione anche quando questo non è visibile. Per poter personalizzare il tono di traccia procedere come segue: Con il BEEPER acceso, attivare la funzione mettendo in posizione ON solo lo switch n°2 - Fig. -
Page 9: Regolazione Tempo Di Intervento Dalla
Mod. BEEPER 11 IMPOSTAZIONI PROGRAMMI REGOLAZIONE TEMPO INTERVENTO DALLA SEGNALAZIONE DEL CANE IN FERMA Questa funzione serve per regolare Fig. 8 il tempo che intercorre tra la ferma del cane e l’ emissione del primo “BIP”. Per poter modificare i tempi di intervento procedere come segue: Dopo aver rimosso il tappo di protezione, con il Beeper spento, portare le quattro levette... -
Page 10: Ripristino Impostazioni Iniziali
Mod. BEEPER 11 Premere il tasto bianco “T” per modificare i tempi di intervento del Beeper. ES. premendo due volte il tasto bianco “T” il tempo dalla ferma al primo “BIP” sarà di sei secondi. Premendo sei volte il tasto bianco “T” il tempo di intervallo tra la ferma del cane e il primo “BIP”... -
Page 11: Regolazione Sensibilità Sensore Di Movimento
Mod. BEEPER 11 IMPOSTAZIONI PROGRAMMI REGOLAZIONE SENSIBILITA’ SENSORE DI MOVIMENTO Il Beeper è dotato di un accelerometro che rileva in ogni momento il movimento e la ferma del cane. Le impostazioni di fabbrica sono le più adatte nella maggior parte dei casi. nel caso in cui, però, vi sia la necessità... -
Page 12: Utilizzo Del Radiocomando
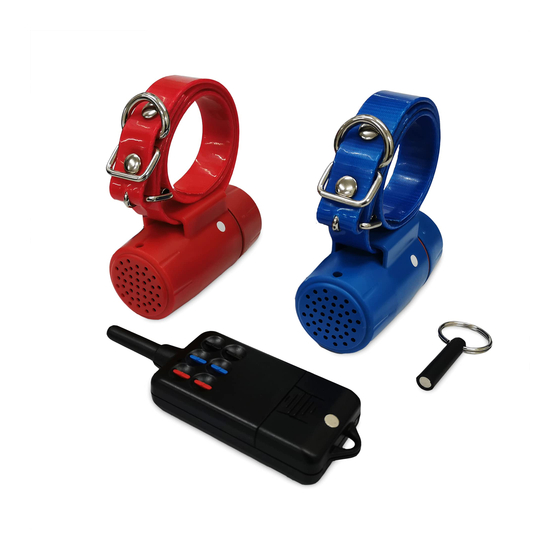
Mod. BEEPER 11 UTILIZZO DEL RADIOCOMANDO Questo telecomando può comandare un max di 3 collari, ognuno di colore diverso per distinguere i cani tra di loro. Funzione dei tasti superiori: nel caso il cane non sia in ferma e non si conosca la sua posizione, premendo il tasto ad esso assegnato sul telecomando il Beeper emetterà... -
Page 13: Personalizzazione Codice Radiocomando
Tutti i radiocomandi sono programmati con lo stesso codice, e abbinati come colore (es. il tasto rosso del radiocomando funziona solo con un Telebeeper rosso. Il tasto blu solo con un Telebeeper blu, e così via). Per personalizzare il codice del radiocomando procedere come segue: Rimuovere il coperchio C del vano pile. -
Page 14: Codifica Nuovo Codice Telebeeper
Premere il tasto bianco (T), al centro fino a quando il led inizia lampeggiare (Fig. 11). Rilasciare il tasto bianco e premere sul radiocomando il tasto della fila superiore corrispondente al colore del Telebeeper. Un suono di conferma segnalerà l’ apprendimento del nuovo codice. -
Page 15: Specifiche Tecniche
Mod. BEEPER 11 SPECIFICHE TECNICHE: • Completamente impermeabile • Accensione spegnimento con magnete • Quattro toni a bassa frequenza di identificazione della ferma del cane • Tono di segnalazione del livello della batteria all’accensione • Tono di segnalazione spegnimento • Tono di segnalazione batteria scarica •... - Page 16 Mod. BEEPER 11 User Handbook...
- Page 17 ........page adjustment of the sensitivity of the motion sensor ........page Use of the remote control ......page Customization of the remote control code page Setting of the new telebeeper code ..page technical Features ........page...
- Page 18 Mod. BEEPER 11 SWITCH ON/OFF to switch the device on, bring the supplied magnet (M) near the point (R) marked on the Beeper lid (Pic.1). Some confirmation tones are emitted to signal the switching on. The number of tones is proportional to the level of the bat- tery charge.
- Page 19 Mod. BEEPER 11 SET UP to set the different functions of the Beeper up, unscrew the lid on the back (pic.1) and operate the commutator small levers, using the four positions as follows: Levers 1-2-3-4 – Sensitivity of the motion sensor: in case it is necessary to adjust the sensitivity of the sensor to make it more or less sensitive to the movement of the dog.
- Page 20 Mod. BEEPER 11 PROGRAM SETTING VOLUME REDUCTION Set in the on position the lever number 1 of the four posi- tion commutator exactly as shown in Pic.3. While the Beeper is switched off, press the white button. then, keeping the button pressed, switch the BEEPER on. after the switch on tones, a different tone is emitted and it signals the entry into the new setting up session.
- Page 21 Mod. BEEPER 11 PROGRAM SETTING SETTING OF THE TIME IN BETWEEN ‘BEEPS’ IN THE ‘TRACK MODE’ in case it is necessary to follow the dog’s movements even when it is not pointing, you can activate the track mode. in this mode the BEEPER emits an intermittent tone which is different from the pointing condition tone.
- Page 22 Mod. BEEPER 11 Pic. 4 Pic. 5 White button Time Interval Pressed Seconds NB: When changing a parameter, the BEEPER switches off automatically after five seconds. Switch it on to confirm the new setting up.
- Page 23 Mod. BEEPER 11 PROGRAM SETTING TONE TRACK SELECTION the Beeper has got four different track tones. this enables you to connect a specific tone to every dog, so that you can always know its position even when it is not visible. to customize the track tone do as follows: Fig.
- Page 24 Mod. BEEPER 11 PROGRAM SETTING SETTING OF THE OPERATING TIME FROM THE BEGINNING OF THE POINTING CONDITION SIGNAL this function is used to adjust Pic. 8 the time interval between the beginning of the pointing con- dition and the first ‘Beep’. To modify the operating time, do as follows: While...
- Page 25 Mod. BEEPER 11 Pic. 9 GREEN LIGHT Interval seconds 1 Flash 5 seconds 2 Flash 6 seconds 3 Flash 7 seconds 4 Flash 8 seconds 5 Flash 9 seconds 6 Flash 10 seconds Press the white button t to modify the operating time of the Beeper.
- Page 26 Mod. BEEPER 11 PROGRAM SETTING ADJUSTMENT OF THE SENSITIVITY OF THE MOTION SENSOR the Beeper is equipped with an accelerometer which can detect the movement and the pointing condition of the dog at any time. the original setting is usually the best one. in case it is neces- sary to adjust the sensitivity of the sensor to make it more or less sensitive to the movement of the dog, do as follows: While the BEEPER is switched off, set the four small levers...
- Page 27 Mod. BEEPER 11 USE OF THE REMOTE CONTROL this remote control can operate up to 3 collars, each of a differ- ent colour to distinguish the dogs. Function of the upper buttons in case the dog is not pointing and you do not know its position, pressing the button on the remote control connected to the dog, the Beeper emits a tone.
- Page 28 Release one after the other the button 6 and, after 2-3 sec- onds, the button 5. now the remote control chooses a new random code. to trans- fer the new code of the remote control to the telebeeper, do as shown in the following page.
- Page 29 (pic.11) • Releasethe white button and press the button in the upper row on the remote control corresponding to the colour of the Telebeeper. A tone will confirm the registration of the new code. Pic. 11...
- Page 30 Mod. BEEPER 11 TECHNICAL FEATURES • Completely waterproof • Magnetic on/off switch • Four low frequency tones to identify the pointing dog • Battery level tone when switching on • Switch off tone • Flat battery tone • Tone confirming the introduction of new parameters •...
- Page 32 RIVENDITORE DI ZONA P.le Resistenza, 8 - 42015 Correggio (RE) - itaLY tel. e Fax 0522 694929 e-mail: ass.tecnica@multisound.it - www.multisound.it...
Need help?
Do you have a question about the TELEBEEPER and is the answer not in the manual?
Questions and answers