
Related Manuals for Lea 11099-40A3


Summary of Contents for Lea 11099-40A3
- Page 1 TRADUZIONE Tosaerba a benzina Petrol lawnmower 11099-40A3 / 12141-46A3 Istruzioni originali Original Operating Instructions...
-
Page 2: Elenco Dei Componenti
1. ELENCO DEI COMPONENTI LE11099-40A3 LE12141-46A3... -
Page 3: Caratteristiche Tecniche
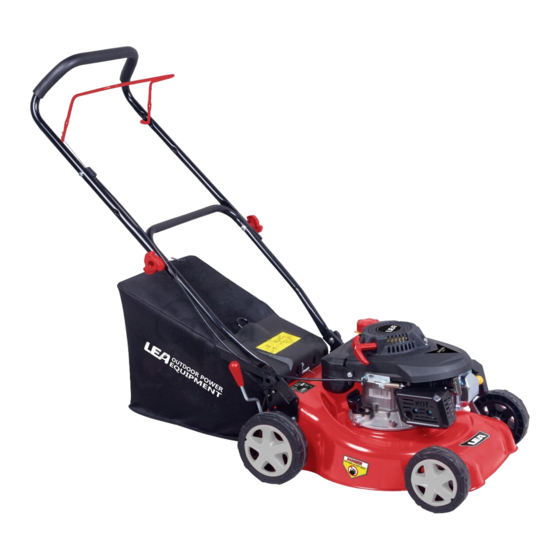
Manubrio Leva trazione Leva freno Leva alzaruote Impugnatura avviamento motore Serbatoio del carburante Asta rabbocco e livello olio Filtro dell'aria Candela di accensione Primer Sacco di raccolta erba Ruota 2. CARATTERISTICHE TECNICHE Tipo LE11099-40A3 LE12141-46A3 Tipo del motore Motore a 4 tempi DS325 DS475 Cilindrata... -
Page 4: Descrizione Dei Simboli
Emissioni - Il valore indicato dell’emissione di vibrazioni è stata misurata con un procedimento a campione ed è possibile utilizzarla in comparazione con altri dispositivi elettrici. - Il valore indicato dell’emissione di vibrazioni può essere anche utilizzato per stimare la quantità... - Page 5 Questo simbolo, su cui è riportato un punto esclamativo per la sicurezza, è indice di attenzione, avvertenza o pericolo. Ignorando tale avvertenza, sussisterà il rischio di incidenti per se stessi o per altre persone. Per limitare i rischi di infortuni, incendi o scosse elettriche, attenersi sempre alle raccomandazioni riportate.
-
Page 6: Avvertenze Di Sicurezza
Non utilizzare mai il tagliaerba con persone, specialmente bambini, nelle adiacenze Indossare occhiali di sicurezza quando si lavora con la macchina Rilasciando la leva freno motore la macchina si arresta completamente Tirando a sè la leva trazione, la macchina inizia a muoversi Tenere lontani mani e piedi Conforme agli standard di sicurezza applicabili. - Page 7 l’uso di utilizzare la macchina. L’età minima dell’utilizzatore può essere definita da norme locali. Non tagliate mai l’erba se nelle vicinanze ci sono delle persone, in particolare bambini, o animali. Tenete presente che l’utilizzatore è responsabile degli incidenti con altre persone o con cose di loro proprietà.
- Page 8 Non tagliate l’erba su pendii molto ripidi Siate particolarmente attenti quando girate il tosaerba o lo tirate verso di voi. Arrestate la lama quando dovete inclinare il tosaerba su superfici diverse dal tappeto erboso e quando questo deve essere portato da e verso la superficie da tosare. Non utilizzate mai il tosaerba se i dispositivi o le griglie di protezione sono danneggiati o senza tali dispositivi, per esempio deflettori para erba e/o dispositivi per raccogliere l’erba.
-
Page 9: Uso Corretto
serbatoio del carburante libera da erba, foglie o grasso fuoriuscito (olio). Controllate regolarmente che il dispositivo di raccolta non presenti segni di usura o di perdita della funzionalità. Per motivi di sicurezza è necessario sostituire i pezzi consumati o danneggiati. In caso fosse necessario svuotare il serbatoio, l’operazione va compiuta all’aria aperta. - Page 10 fig.2 3. Fissare i cavi al manico inferiore con i serracavi (Fig.4). fig.4 4. Sollevare il deflettore posteriore ed allineare i ganci del telaio del raccoglierba al suo supporto sulla macchina (Fig. 5&Fig.6). fig.5 fig.6 6.2 Regolazione dell'altezza di taglio Regolare l'altezza di taglio a seconda delle necessità...
- Page 11 e verso la parte posteriore per ridurre l'altezza di taglio. 2.Riportare la leva nella tacca di posizionamento per impostare l'altezza di taglio desiderata. Assicurarsi che la leva si adatti perfettamente e saldamente nel relativo supporto seghettato.Ostruzioni, quali erba, non devono ostacolare il suo movimento o posizionamento.(Fig.
-
Page 12: Funzionamento
6.4 Riempire con olio motore AVVERTENZA! Il prodotto è fornito sprovvisto di olio. Tuttavia, a causa del processo di fabbricazione, è possibile che sia presente una piccola quantità! Svitare e rimuovere il tappo del serbatoio dell'olio. Aggiungere gradualmente olio motore di qualità (SAE10W-30, 0,6 l). Lasciare che l'olio si assesti. - Page 13 Controllate che tutti i dispositivi di sicurezza siano in condizioni adeguate. – Fate scorrere la leva dell'acceleratore, qualora esista, avanti e indietro più volte per – verificare che si muova liberamente e in modo corretto. Pericolo di ferirsi! Prima di usare l’apparecchio, ispezionare il terreno e rimuovere eventuali oggetti che potrebbero venire lanciati dall’apparecchio.
- Page 14 • Premere il primer (X) con forza almeno 3/4 volte (se presente) (Fig. 11). • In genere l’adescamento del carburante non è necessario per riavviare un motore caldo. Fig.11 L’impugnatura per l'avviamento a strappo è collocata sul retro del motore. Fig.12 Fig.13 Fig.14...
-
Page 15: Manutenzione
Fig. 15 7.6 Arresto del tosaerba Per ridurre al minimo il rischio di incidenti, il motore del tosaerba è collegato a una leva di controllo dell'operatore. Questa leva, una volta rilasciata, ritorna automaticamente nella posizione iniziale e il motore si spegne automaticamente. Se sotto il telaio si accumula dell'erba, prima di rimuoverla spegnete il motore, togliete la candela di accensione e aspettate fino a quando il motore è... - Page 16 Parte Azione Prima/dopo 25 ore 50 ore / ogni uso semestre anno Candela controllo Candela pulizia Candela sostituzione quando è necessario Filtro dell'aria controllo Filtro dell'aria pulizia Filtro dell'aria sostituzione quando è necessario Filtro controllo carburante Filtro pulizia carburante Filtro sostituzione quando è...
- Page 17 sostituirla immediatamente. Lubrificare la lama dopo ogni utilizzo per prolungare la durata di vita della lama e dell'apparecchio. Applicare un leggero strato d'olio lungo il bordo della lama. Fig. 17 8.2 Olio motore Controllo Svitare e rimuovere il tappo del serbatoio dell'olio. Pulire l'asta di livello, riposizionare e serrare il tappo e rimuoverlo nuovamente.
- Page 18 8.4 Candela Controllare la candela periodicamente. Pulirla o sostituirla se necessario. Scollegare il connettore della candela. Allentare la candela con una chiave adatta e rimuoverla con attenzione. Verificare che la candela non sia usurata o danneggiata. Il colore dell'elettrodo dev'essere marrone chiaro.
-
Page 19: Anomalie E Soluzione Di Eventuali Problemi
9. ANOMALIE E SOLUZIONE DI EVENTUALI PROBLEMI Avvertenza: prima spegnete il motore e staccate il cavo di accensione e poi eseguite le ispezioni o le regolazioni Problema Cause probabili Soluzione 1.Il motore non si Carburante insufficiente Aggiungere carburante accende Candela bagnata Asciugare la candela Candela danneggiata Sostituire la candela... -
Page 20: Dichiarazione Ce Di Conformità
DICHIARAZIONE CE DI CONFORMITÀ Il sottoscritto DUNSCH EUROPE Srl. Via dell’Artigianato n. 10 , 29010 GRAGNANO TREBBIENSE, nella sua qualità di importatore, certifica che i dispositivi descritti di seguito Tosaerba a benzina Tipo: LE11099-40A3 LE12141-46A3 Potenza del motore 98 cm 140 cm Potenza del motore 1,3kW... -
Page 21: Component List
1. COMPONENT LIST LE11099-40A3 LE12141-46A3... -
Page 22: Technical Specifications
Handlebar Drive bar* Brake bar Adjust handle Recoil start Fuel tank Oil filler and dipstick Air filter Spark plug Primer bulb Grass collection bag Wheel 2. TECHNICAL SPECIFICATIONS Type LE11099-40A3 LE12141-46A3 Engine model 4 stroke, air cooled engine DS325 DS475 Engine displacement 98 cm 140 cm... -
Page 23: Description Of Symbols
Emissions -- The specified vibration emission value was measured by a standardized test methods and can compare with other power tools are used. -- The specified vibration emission value can also be necessary for the assessment of work breaks are used. -- The specified vibration emission value can vary during the actual use of the electric tool by specifying the value, depending on the way how to use the power tool. - Page 24 Read instruction handbook before operating the machine Before any use, refer to the corresponding paragraph in the present manual. Keep other people well away from the danger area. Do not mow excessively steep slopes. Beware of sharp blades, Do not put hands or feet near or under rotating parts Remove spark plug lead before maintenance.
-
Page 25: Safety Instructions
Wear hearing protection and eye protection when using the device. Release the engine stop lever, the machine comes to a complete stop. Close the self-drive control lever ,the machine began to walk. Keep hands and feet away. Conform to relevant safety standards. Filling with engine oil Guaranteed sound power level 96 dB(A) 4. - Page 26 equipment when barefoot or wearing open sandals. Thoroughly inspect the area where the equipment is to be used and remove all objects which can be thrown by the machine. WARNING — Petrol is highly flammable: — Store fuel in containers specifically designed for this purpose; —...
-
Page 27: Intended Use
Never pick up or carry a lawnmower while the engine is running. Stop the engine and disconnect the spark plug wire, make sure that all moving parts have come to a complete stop and, where a key is fitted remove the key: —... - Page 28 fig.1 Connect the upper handle and the lower handle with the rotary knob(fig.2). fig.2 fig.2 Fix the wires with the wire clips to the lower handle bar (Fig.3). fig.3 Open the deflector guard, hold it in position and align the hooks on the grass catcher with the support to hang it onto it (Fig.
- Page 29 fig.5 fig.6 6.2 Cutting height adjustment Adjust the cutting height according to the needs of your lawn. The cutting height depends on the kind of lawn and its actual height. When mowing high grass, start with the maximum cutting height and make a second cut with a lower cutting height. Move the lever towards the front of the machine to increase the cutting height and towards the rear to reduce the cutting height.
-
Page 30: Operation
Risk of device damage! The device is supplied without motor oil. ATTENTION! Before operating, you must fill it with motor oil. Unscrew the tank cap and remove it. (Fig. 8) – Pour in the fuel carefully. Avoid spilling ! – Screw the tank cap on firmly by hand. Fig.8 6.4 Filling with engine oil WARNING! This product is not supplied with oil. - Page 31 7.1 Start the unit Do not start the machine until it has been completely assembled. Before switching on the machine, always checking the oil. 7.2 Check before use! Danger of injury! Do not operate the device unless you did not find any faults. If a part has become defective, make sure to replace it before you use the DANGER! Check the safe condition of the device:...
- Page 32 Never cut off more than one-third of the total length of the grass for a healthy lawn. In the autumn, lawns should only be cut as long as there is growth. Slowly push the product forward. You may want to use the self- propelled function for assistance.
- Page 33 Fig.12 Fig. 13 Fig.14 Pull the brake bar towards the handle and hold it in position when starting the engine. Keep it squeezed during operation (Fig. 12). Pull the brake bar towards the handle and pull on the recoil starter handle to start the engine (Fig.13) Fit the recoil starter into the rope guide on the right hand side of the upper handle during operation (Fig.
-
Page 34: Maintenance
8. MAINTENANCE Good maintenance is essential for safe, economical and trouble-free operation. It will also help reduce air pollution. The purpose of the maintenance and adjustment schedule is to keep the machine in the best operating condition. Turn off the engine before performing any maintenance. If the engine must be run, make sure the area is well ventilated. - Page 35 Check all nuts and bolts periodically for tightness before operation. After prolonged use, especially in sandy soil conditions, the blade will become worn and lose some of the original shape. The cutting efficiency will be reduced and the blade should be replaced. Keep the blade sharp to ensure a good cutting performance.
- Page 36 Refit the oil drain screw and wipe of spilled oil. Refill the oil tank as described in section “PREPARATION - Filling with engine oil” 8.3 Empty fuel Hold a collection container beneath the fuel tank. Unscrew the tank cap and remove it. Take the machine to bottom up, and drain it.
-
Page 37: Troubleshooting
Fig.20 Fig.21 9. TROUBLESHOOTING Before performing any maintenance or cleaning work, always turn off the engine and wait until the cutter has come to a standstill Problem Probable causes Solution 1. Engine does not 1.1. Not enough fuel in fuel tank 1.1. -
Page 38: Ec Conformity Declaration
EC CONFORMITY DECLARATION The undersigned, hereby certifies that the units described below Gasoline Lawn Mower Model: LE11099-40A3 LE12141-46A3 Displacement: 98 cm 140 cm Power: 1,3kW 2,2kW Lot No.:2016011 Guaranteed sound power level: 96 dB (A)/ 96 dB (A) Conformity assessment procedure concerning directive 2000/14/EC: Annex VI is in compliance with the provisions of the following European directives: 2006/42/EC "Machinery"...
Need help?
Do you have a question about the 11099-40A3 and is the answer not in the manual?
Questions and answers