Advertisement
Available languages
Available languages
Quick Links
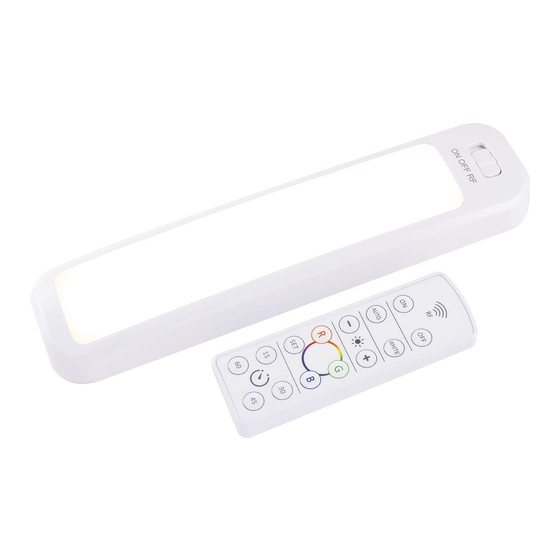
12" Color-Changing
LED Light Bar
BATTERY INSTALLATION AND REPLACEMENT:
Light Bar
Open the battery compartment on the back of the light by
sliding the back cover in the direction of the arrow. Insert 6 AA
batteries, noting polarity. Replace cover by sliding in opposite
direction.
Remote
NOTE: Remove battery isolation tab for first time use.
To replace exhausted battery, unscrew the battery cover on
the back of the remote. Insert 1 CR2032 battery, noting polarity.
Replace the cover and screw back in. Do not over
tighten screws.
REMOTE OPERATION:
NOTE: Move switch on light bar to "RF" for
remote control functions.
1. On the remote, press the "ON" button to
turn the lights on. The default setting is white.
2. Pressing the "FADE" button will
slowly cycle through the
spectrum of colors.
3. Press the "WHITE" button
to switch the lights back to
1
white.
4. Use the "+" and "-" buttons
2
to brighten or dim the lights.
5. The "R," "G" and "B" buttons
4
stand for red, green and
blue. These buttons allow
you to either select one
of these colors or blend
them to select the desired
6
color. Hold the "R," "G" or "B"
button for three seconds
to go directly to that color
or press and release the
button to move through
the spectrum one color at
a time.
6. The "SAVE" button allows you to quickly return to your favorite
color. Once the desired color is found, hold the "SAVE" button
until the light flashes. The color will now be easily selectable by
pressing the "SAVE" button.
7. The "15," "30," "45" and "60" buttons automatically turn
the lights off after the number of minutes indicated
on the button.
MANUAL OPERATION:
1. Move switch to ON position to turn the light on. The only
color option in manual operation is white.
2. Move switch to OFF position to turn the light off.
MOUNTING INSTRUCTIONS:
NOTE: Mounting template is provided under the product.
To mount light: Remove back cover and mount in desired
location using screws and the included mounting template or
use double-sided tape for screwless mounting. Do not over
tighten screws. Reattach light to mounted back cover. Anchors
are included for installing screws in the sheetrock.
NOTE: Back cover may remain mounted when changing
batteries.
Functional range may be adversely affected by one or more of
the following factors: weather, radio frequency interference,
low transmitter battery or obstructions between the
transmitter and receiver.
If the remote control is not working, make sure the light bar is
RF
set to RF on the slide switch. You can also try moving the light
bar to ensure there is no interference i the original location.
ON
OFF
3
FADE
WHITE
-
+
G
R
5
B
SAVE
15
30
7
60
45
FCC STATEMENT:
SUPPLIERS DECLARATION OF CONFORMITY | MODEL #: 41617 | Jasco Products Co.,
10 E. Memorial Rd, Oklahoma City, OK 73114, www.byjasco.com
This device complies with Part 15 of the FCC rules. Operation is subject to the following
two conditions: (1) this device may not cause harmful interference, and (2) this device
must accept any interference received, including interference that may cause
undesired operation.
FCC NOTE: The manufacturer is not responsible for any radio or TV interference caused
by unauthorized modifications to this equipment. Such modifications could void the
user's authority to operate the equipment.
NOTE: This equipment has been tested and found to comply with the limits for a
Class B digital device, pursuant to Part 15 of the FCC Rules. These limits are designed
to provide reasonable protection against harmful interference in a residential
installation. This equipment generates, uses and can radiate radio frequency
energy and, if not installed and used in accordance with the instructions, may cause
harmful interference to radio communications. However, there is no guarantee that
interference will not occur in a particular installation. If this equipment does cause
harmful interference to radio or television reception, which can be determined
by turning the equipment off and on, the user is encouraged to try to correct the
interference by one or more of the following measures:
• Reorient or relocate the receiving antenna.
• Increase the separation between the equipment and receiver.
• Connect the equipment into an outlet on a circuit different from that to which the
receiver is connected.
• Consult the dealer or an experienced radio/TV technician for help.
MADE IN CHINA
GE is a trademark of General Electric Company and
is under license by Jasco Products Company LLC,
10 E. Memorial Rd., Oklahoma City, OK 73114.
This Jasco product comes with a 90-day limited
warranty. Visit www.byjasco.com for warranty details.
Questions? Contact our U.S.-based Consumer Care at
1-800-654-8483 between 7AM—8PM CST.
41617 EnSp Manual v2
05/16/19
Advertisement

Related Manuals for GE 41617

Summary of Contents for GE 41617
- Page 1 6. The “SAVE” button allows you to quickly return to your favorite color. Once the desired color is found, hold the “SAVE” button SUPPLIERS DECLARATION OF CONFORMITY | MODEL #: 41617 | Jasco Products Co., LED Light Bar until the light flashes. The color will now be easily selectable by 10 E.
- Page 2 “SAVE” hasta que de 12’’ con cambio de colores Declaración de conformidad del proveedor | Modelo #: 41617 | Jasco Products Co., 10 E. parpadee. Ahora el color se podrá elegir fácilmente al presionar “SAVE”.