Advertisement
Quick Links
How to Setup the Wireless Alarm Kit
ⅠPreparation
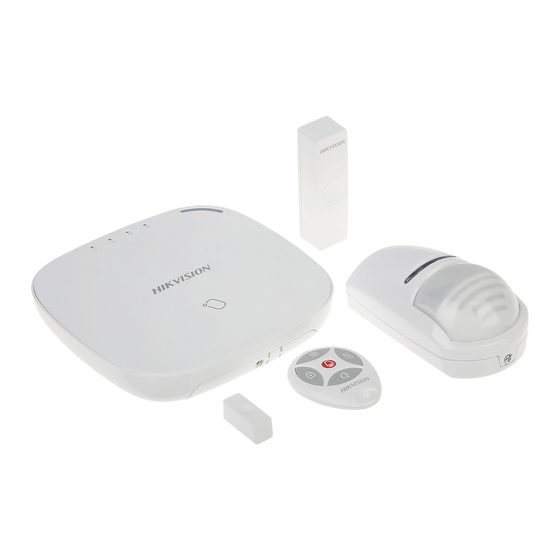
Wireless Alarm Kit:.DS-PWA32-K
(Control Panel×1,PIR Detector×1,Magnetic Contact×1,Keyfob×1)
Note:
This document is for 433Mhz wireless Kit reference only.
ⅡDescription for hardware:
1.
Description of Control panel:
a) For the front panel, there are five lights, and the meanings are showing below:
b) For the rear panel, there are eight ports or buttons, the meanings are showing
below:
①Network Port ②Power Port ③Serial port ④Backup Battery port ⑤AP/Station
Mode switch ⑥SIM model optional ⑦Reset button ⑧Tamper Button
Advertisement

Related Manuals for HIKVISION DS-PWA32-K


Summary of Contents for HIKVISION DS-PWA32-K
- Page 1 How to Setup the Wireless Alarm Kit ⅠPreparation Wireless Alarm Kit:.DS-PWA32-K (Control Panel×1,PIR Detector×1,Magnetic Contact×1,Keyfob×1) Note: This document is for 433Mhz wireless Kit reference only. ⅡDescription for hardware: Description of Control panel: a) For the front panel, there are five lights, and the meanings are showing below:...
- Page 2 Description of Sensors: a) PIR sensor: ①Tamper Button ②Battery ③Reset Button b) Magnetic Contact sensor: ①Tamper & Reset Button ②Battery...
- Page 3 Description of Keyfob: a) Keyfob: ①Home Arm button ②Arm button ③Disarm button ④Clear Button ⑤Emergency button...
- Page 4 ⅢConfiguration steps: Note: For the wireless alarm panel, we can configure through three mainly ways: Local, Web, Hik-connect, also you can configure the device through the iVMS4200. A. Local configuration Way: a) Power the alarm panel and waiting it to run normally; b) Remove the protection plastic papers to let the battery work;...
- Page 5 ②This local mode cannot add the Keyfob since the security reason; ③If you add the wrong sensor to alarm panel. You can reset the panel or sensors. For the alarm panel, you can long press the reset button. ④For the PIR sensor, you can remove the battery, long press the reset button, then put the battery back.
- Page 6 c) Then you can search the WIFI on your laptop with the name ‘HAP+ SN code’ , connect this WIFI and type the password with ‘AP+VERTIFICATION CODE’.
- Page 7 So the WIFI name is ‘HAPQ00242384’, and the password for this panel is ‘APJLQTDJ’ d) Search the Alarm Panel on SADP, then active it and set the password or IP. e) Log in the alarm panel through the IE by the IP;...
- Page 8 f) Choose to the Keyfob interface and click Add button. Note: You can add the keyfob through the WEB, iVMS4200, but cannot be added on local. g) After you click add, it will remind you press any key on the keyfob. Then click any button on the keyfob, it will pop-up the add interface.
- Page 9 You can set the name and the authority for this keyfob. After you finished all steps, you can see the keyfob on the list. h) After you have added the keyfob, you can continue to add sensors. Choose to Zone interface on the Wireless Device. Click the Settings.
- Page 10 Then you will see the settings interface, you can set the Name and Type of the sensors, Enable the wireless detector, type in the serial No. of the sensors, click OK, then the sensors will be added to the wireless Panel. After these steps, you can see the Door Contact on the Zone 2.
- Page 11 MainDoor and the type is instant zone. i) After you have added all sensors, you can set the WIFI, which means the alarm panel will connect to this WIFI and connect to the Internet. Choose the WIFI Parameters, and click the WIFI on the list, click the connect button, then type the password.
- Page 12 Note: All settings should be on the disarm mode. C. Hik-connect configuration: a) Power the alarm panel and waiting it to run normally; You can refer to the Way B Step I to connect the panel to one stable Wi-Fi. b) Download the Hik-Connect mobile client from Google Play (for Android) or App store (for iOS) and login the client before operating the Axiom security control panel.
- Page 13 Link Camera: You can link the zone to cameras. When an alarm is triggered, you can monitor the zone via the linked cameras. Stay/Away: Enable the function and the zone will be auto bypassed when the zone is in stay or away status. Chime: Enable the function and the zone will be start audible alarm when it is triggered.
- Page 14 Enable the auto arm/disarm function and set the auto arm time/auto disarm time. You can also set the late to disarm time, entry delay time, exit delay time, and siren delay time. i) You can check the system Status on the Hik-connect APP, also you can receive all...
- Page 15 alarms after you arm the zones. PS: This document just for the simple settings, please check the user manual for more details.
- Page 16 First Choice for Security Professionals HIKVISION Technical Support...
Need help?
Do you have a question about the DS-PWA32-K and is the answer not in the manual?
Questions and answers