Advertisement
Quick Links
This instruction manual covers the basics that you need to get started using the Lido OG grinder. There is a second
document called the "Deep Dive Manual" (DDM) which gives in depth detail and expanded information from this basic
manual. The manuals, schematic and links to videos are available here: https://www.oehandgrinders.com/og-manuals
There is a 3rd area for people who never read manuals - it is called the Hand Grinder Parts section on our website,
oehandgrinders.com, where you can find repair parts... :)
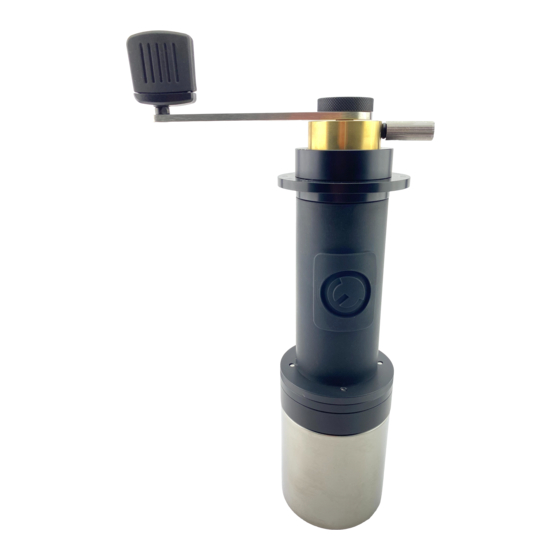
Adjustment Module
Micro Adjustment Disk (MD)
Stepped Adjustment Disk (SD)
Top Cap
Burr Module
Lower Bearing Holder
Ring Burr Carrier
Jar Holder
Install the handle so it points in the direction away from the locking pin.
Your grinder arrives with the adjustment set at Micro Adjustment Disk (MD) = zero, Stepped Adjustment Disk (SD) = zero.
Set SD = 500, grind 10 grams of Coffee beans to lubricate the burrs.
Set SD back to zero, turn handle clockwise (CW) to observe what zero feels like.
This tactile information will be important later...
Note: Numbers on the Top Cap equal Microns (µm) of Verical Cone Burr Movement (VBM), not burr gap or particle size.
1000µm equals 1millimeter.
Lido OG Manual
Parts of the Grinder:
Knob
Do NOT change the brass Micro Adjustment Disk setting at this time.
→
ALWAYS turn handle in clockwise direction
{
{
1
Top Nut
Handle
Micro Adjustment Locking Pin
Micro Adjustment Disk (MD)
Stepped Adjustment Disk (SD)
Top Cap
Hopper
Bean Port / Plug
Lower Bearing Holder
Ring Burr Carrier
Jar Holder
Grounds Jar
←
Advertisement

Related Manuals for Orphan espresso Lido OG

Summary of Contents for Orphan espresso Lido OG
- Page 1 Lido OG Manual This instruction manual covers the basics that you need to get started using the Lido OG grinder. There is a second document called the “Deep Dive Manual” (DDM) which gives in depth detail and expanded information from this basic manual.
- Page 2 Adjusting the Grind Size Large changes in grind size are made by turning the Stepped Adjustment Disk (SD) to the desired number. Each step is 100 Microns (µm) VBM. The SD is self locking. Micro Disk (MD) Dialing in for your target grind size is like any other Stepped Disk (SD) grinder - set, grind, observe, test, &...
- Page 3 ReZero the adjustment system. You will not need to realign the burrs, just ReZero the adjustment system. Cleaning the Lido OG may require various levels of disassembly. Without disassembling you can simply brush off the external parts from below, and blow out the grinder with compressed air or a hand blower.
- Page 4 Put it together... Reassembly is the reverse: Install the Grind Adjustment Module on top of the Hopper by turning CW (Right). Install the Burr Module on bottom by turning CCW (Left). Tighten both the Modules securely onto the Hopper. Set the SD to Zero. Install the axle/cone burr assembly carefully through the Roller Bearings.
- Page 5 You can check, or ReZero at any time, by repeating the above procedure (this is in case you lose track of your MD setting on Fine Dialing in situations) Other concepts, such as alignment, theory, and special cases are presented in the Deep Dive Manual. Orphan Espresso 4-19-2021...
Need help?
Do you have a question about the Lido OG and is the answer not in the manual?
Questions and answers