Califone POWERPRO 916-SD PA916-PS Owner's Manual
Portable public address systems
Hide thumbs
Also See for POWERPRO 916-SD PA916-PS:
- Product overview (2 pages) ,
- Owner's manual (16 pages)

Related Manuals for Califone POWERPRO 916-SD PA916-PS


Summary of Contents for Califone POWERPRO 916-SD PA916-PS
- Page 1 PowerPro 916-SD Portable Public Address Systems Owner’s Manual PA916-SD Public Address Speaker PA916-PS Powered Companion PA PA916-SP Passive Companion Speaker...
- Page 2 I invite you to register your product online for warranty coverage at our website: www.califone.com — while you’re there — make sure to visit our complete line of multimedia players and recorders, wired and wireless headphones and headsets, computer peripherals and other Califone products.
- Page 3 Califone ® wireless PA systems deliver professional quality sound in a variety of presentation settings. Since they’re simple to set up and operate, you won’t need an audio expert. Whether it’s a large meeting of parents, an all-school spirit rally or a guest lecturer transmitting wireless audio from a laptop, you’ll have clear audio so everyone can listen and participate!
-
Page 4: Operation
Operation Battery Charge the battery for at least 10 hours before using the PA916 or PA916-PS. Simply plug the power cord into an AC outlet and charging begins automatically. The charging indicator will flash until fully charged, then it will stay green. The unit can be used while it is plugged in for charging. - Page 5 Operation continued Line In Insert both RCA plugs into the RCA jacks when using a stereo input. The left and right channels are combined so no pro- gram material is lost. If the source is monaural, either RCA jack can be used. The Line In volume control is used to increase or decrease the level of the input signal.
-
Page 6: Wireless Operation
Wireless Operation Feedback is a shrill screeching sound produced by the speaker system when a microphone is being used too close to the front of the speaker. The microphone picks up the sound of the speaker system and it becomes reamplified. It is a self- sustaining loop which can damage the system if allowed to continue, not to mention the annoyance caused to persons nearby. - Page 7 Microphones & Belt-Pack Transmitter Q-316 Wireless Microphone 16-Channel UHF Transmitter Power Low Battery LED Channel Selector Switch M-316 Wireless Belt Pack Transmitter Microphone Jack Power On Switch Power On/ Low Batt. LED Volume Control 16-Channel UHF Transmitter Battery Compartment Battery Compartment HBM-316 Headband Mic LM-316 Lapel Mic CM-316 Collar Mic...
- Page 8 Digital Audio Player/Recorder (11) (10) (11) (10) (11) (10) Music mode (12) (6) (7) (8) (9) (10) (11) 00:00 SOFT 00:00 Music mode X X X X X X X (12) (6) (7) (8) (9) (10) (11) Music mode 00:00 SOFT 00:00 SOFT...
-
Page 9: Main Menu Operation
Digital Audio Player/Recorder MP3 - Operation Guide Basic Menu/Button Operation The menu for the digital audio player/recorder section is operated using the following buttons: • “RECORD”: Immediately enters into Recording Mode and starts recording audio on the currently selected memory. •... - Page 10 SOFT 00:00 00:00 X X X X X X X Digital Audio Player/Recorder Equalizer Fast forward/ Tempo Rate Equalizer Next/ Prev Backward Next/ Prev 1. Short press “REV” once: last song; short press “FWD” once: next song. 2. Long press “REV” to decrease the digital audio player volume. Long press “FWD” to increase the digital audio player volume.
-
Page 11: Record Mode
Digital Audio Player/Recorder Equalizer Continued ROCK Normal Rock 3. You can also skip to the next or previous tracks within this mode. Simply stop the playback by pressing “PLAY / PAUSE” And then use the “FWD” and “REV” buttons to skip to the previous or next track. Press “PLAY /PAUSE”... - Page 12 Digital Audio Player/Recorder Voice Mode Continued Voice Mode (While music/voice is playing): The following instructions apply to while music is playing. 1. Short press “MENU” once to enter the local menu. 2. Short press “FWD” or “REV” to select the desired item and then short press “PLAY / PAUSE” once to confirm. Available options include: Next/ Prev 1.
-
Page 13: Setting Mode
(11) (10) Digital Audio Player/Recorder Setting Mode Music mode Within “Setting Mode, ” short press “REV” and“FWD” to select Record mode the desired option. (12) (6) (7) (8) (9) (10) (11) (12) Available options include: SOFT 00:00 00:00 Repeat X X X X X X X X X X X X X X 1. -
Page 14: Usb Connection
Digital Audio Player/Recorder Setting Mode Continued Contrast adjustment 1. Press “REV” and “FWD” to adjust contrast. 2. Press “PLAY / PAUSE” to confirm the setting or short press “MENU” to cancel. Memory Info 1. This screen displays the used and unused memory. It can display this information for either the ‘ internal (Flash) or SD card. - Page 15 Digital Audio Player/Recorder USB Connection Continued Compatibility (System Requirements) 1. Operation system: WIN98 SE, Windows.ME.2000.XP. 2. USB port. Features/Specs • 512MB Internal Flash memory. • Supports standard bitrate WMA and MP3 format audio files. • WAV file format recording and playback are supported in Recording and Voice modes. Various bitrates for the wav file recording are supported from low quality to high quality.
- Page 16 CD Player After the power is turned on the LCD display will read “NO disc” Gently push the CD into the slot and CD SLOT the CD will be recognized and begin playing track #1. LCD DISPLAY When “Play” is pressed, the first track will begin to Play. When Play is pressed again, the mode goes to PAUSE/PLAY Pause.
- Page 17 CD PLAYER Continued SKIP/REVERSE When REV is pressed from the Stop mode, the program will go back one track and begin playing the last track on the CD. When pressed from Play or Pause mode, the program will go back to the beginning of the track which was already playing.
- Page 18 Powered Companion Speaker PA916-PS The Powered Companion PA has the same amplifier, power supply and speaker compliment as the full featured PowerPro PA916. It does not have the mixer panel because it can be controlled by the PowerPro PA916. With the integral 16-channel selectable wireless UHF receiver, it can function as a stand alone PA speaker when using a Q-316 Handheld microphone or the M-316 Beltpack transmitter with a LM-316, CM-316 or HBM-316 microphone.
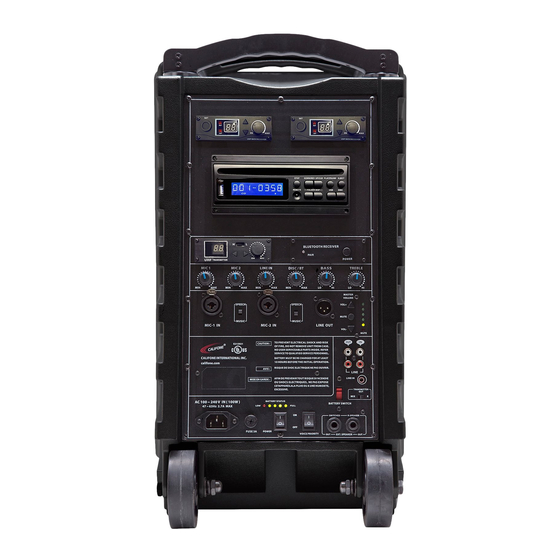
- Page 19 Powered Companion Speaker PA916-PS Telescoping Handle 16-channel UHF wireless mic receivers Audio Line Out XLR Treble Control Bass Control Digital Master Volume Dual Steel Skid Guards A/C Power Socket Battery Low/Charge Indicators Green Power On Indicator Power On/Off Switch Voice Priority (Ducking) Switch 1/4”...
- Page 20 Mechanical Notations Telescoping Handle and Wheels These are only intended for pulling the PowerPro over relatively smooth surfaces. Using the handle to lift or carry the unit or pulling up stairs will cause damage not covered by the warranty. Tripod Mount A recess is incorporated on the bottom of all PowerPro Speakers for mounting to the TP-50 tripod.
-
Page 21: Specifications
Acoustic Speaker Compliment Woofer Tweeter Frequency Response Amplifier Sound Pressure Level Power Sources Wireless System Receiver: Two 16-channel selectable UHF diversity wireless receivers 798-805 MHz. Antennas are hidden internally. Microphone Transmitters Handheld wireless microphone or beltpack transmitters optional. Powered by 2 ea. 1.5 volt AA batteries (included). Beltpack trans- mitter used with choice of hands-free headset, collar or lapel microphones. -
Page 22: Important Safety Instructions
RISK OF ELECTRIC SHOCK - DO NOT OPEN CAUTION: TO REDUCE THE RISK OF ELECTRIC SHOCK, DO NOT REMOVE COVER OR BACK. NO USER SERVICEABLE PARTS INSIDE. REFER SERVICING TO QAULIFIED PERSONNEL. The lightening flash with arrowhead within a triangle is intended to tell the user that parts inside the product are a risk of electric shock to persons. - Page 23 Notes...
- Page 24 Califone® International Inc. • 1145 Arroyo Avenue, # A • San Fernando, CA 91340 USA Toll Free 800.722.0500 | Toll Free Fax 877.402.2248 International Customers call 818.407.2400 or Fax 818.407.2405 califone.com...
Need help?
Do you have a question about the POWERPRO 916-SD PA916-PS and is the answer not in the manual?
Questions and answers