Table of Contents
Advertisement
Quick Links
Advertisement
Table of Contents

Related Manuals for VonHaus 3000098


Summary of Contents for VonHaus 3000098
- Page 1 GREY CORDLESS BRUSHED MOTOR HANDHELD VACUUM 3000098 - Instruction Manual 0119...
- Page 2 CONTENTS Safety Instructions Safety Instructions Safety Instructions Specifications Charging, Handheld Useage Upright Useage, Attchment Useage...
- Page 3 Opeation, Emptying the Dust Tank Removing the Filters, Cleaning the Filters Cleaning & Care, Wall Mounting Troubleshooting User Notes Warranty...
- Page 4 WARNING PLEASE READ THESE INSTRUCTIONS CAREFULLY AND KEEP FOR FUTURE REFERENCE INTENDED USE. Do not use with a damaged cable or plug. If the supply cable is damaged, it must The appliance is intended for domestic be replaced by a qualified engineer or an use only.
- Page 5 WARNING PLEASE READ THESE INSTRUCTIONS CAREFULLY AND KEEP FOR FUTURE REFERENCE • Reactive liquids (solvents, corrosives, for any purpose other than charging the detergents) battery pack for this product. Any other use may result in risk of fire or electric •...
- Page 6 WARNING PLEASE READ THESE INSTRUCTIONS CAREFULLY AND KEEP FOR FUTURE REFERENCE unplug the charger from the outlet before 1. Do not operate the Vacuum attempting any cleaning. Removing the too close to heaters, radiators, battery pack will not reduce this risk. cigarette butts and ect.
-
Page 7: Specification
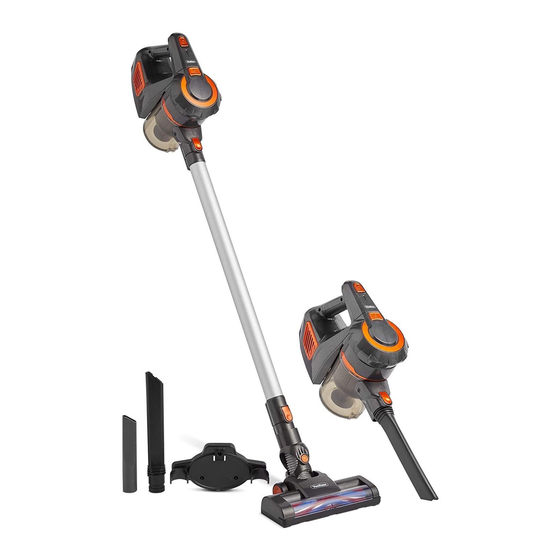
SPECIFICATION BATTERY WORKING CHARGING VOLTAGE POWER TIME TIME MINS HOURS 22.2 2200 25 High Power 40 Low Power 1. Wall Mount 2. Charger 3. Floor Brush 4. Dust Tank Release 5. Fabric Filter 6. Filter 7. Dust Tank Empty Clip 8. - Page 8 CHARGING Charge the appliance fully before first use Insert the Charger (2) into the Charger Input. Ensure it is positioned correctly for charging. The Indicator Light (9) located on top of the Vacuum will flash red while charging. Once the Vacuum is fully charged the light will illuminate a solid green.
- Page 9 USAGE - UPRIGHT Use only the attachments that comes supplied with this appliance. The upright assembly uses the Vacuum Tube (11) , the Motor Unit and the Floor Brush (3). Align the clip on the Vacuum Tube (11) with the connection clip on the Motor Unit and push in until it audibly clicks into place.
-
Page 10: Operation
OPERATION To power on push the ON/OFF Button (10) once. The Indicator Light (9) will illuminate Green to indicate the vacuum is On, and operating in Quiet Mode. To increase the power to maximum setting, press the On/Off Button for a second time. To switch off, press the On/Off Button once again. - Page 11 REMOVING THE FILTERS Press Down the Dust Tank Release (4), and remove the Main Unit. Fabric Filter Twist the top of the Dust Tank to the left to access the Filters. Remove the Fabric Filter (5) and Filter (from the Dust Filter Tank.
-
Page 12: Cleaning And Maintenance
CLEANING & MAINTENANCE BRUSH REMOVAL & CLEANING Slide the Locking Clip away from the Brush Head to release the Brush. IMPORTANT Always ensure the Vacuum is switched off before performing maintenance and cleaning. WARNING Always detach the Floor Brush (3) from the Handle and Motor Unit before removing/cleaning the Brush Head. -
Page 13: Troubleshooting
TROUBLESHOOTING PROBLEM SOLUTION NO POWER Check the appliance is fully charged before use Empty Dust Tank and clean the Filters. Check openings for any blockages. Unplug and LOSS OF SUCTION remove if necessary. Ensure the Filters are correctly in place. Empty Dust Tank and clean the Filters. - Page 14 USER NOTES...
-
Page 15: Warranty
This does www.VonHaus.com/warranty not affect your statutory rights. Please retain a proof of purchase receipt or statement No rights are given under this warranty to a as proof of the purchase date. - Page 16 Thank you for purchasing the Grey Cordless Handheld Vacuum. VonHaus is a registered trademark of DOMU Brands Ltd. Made in China for DOMU Brands Ltd M24 2RW.
Need help?
Do you have a question about the 3000098 and is the answer not in the manual?
Questions and answers