Table of Contents
Advertisement
Quick Links
3500181
Please read all instructions carefully before use and
retain for future reference
CAUTION Do not immerse in water
Wear a dust mask
DO NOT allow two people to use the sander at the
same time. Remeber that when the sanding belt and
disc are in operation they both are turning.
Always ensure the Sanding Belt is correctly tracked
before operation see (Tracking Section)
A5P | 01
Protect your eyes
Protect your ears
Protect your hands
Protective clothing must be worn.
CAUTION Potential finger trap/pinchment points.
Advertisement
Table of Contents

Related Manuals for VonHaus 3500181


Summary of Contents for VonHaus 3500181
- Page 1 3500181 Please read all instructions carefully before use and Protect your eyes retain for future reference CAUTION Do not immerse in water Protect your ears Protect your hands Wear a dust mask DO NOT allow two people to use the sander at the same time.
- Page 2 If devices are provided for the connection of dust extrac- tion and collection facilities, ensure these are connected and properly used. Use of dust collection can reduce dust-related hazards. WORK AREA SAFETY Keep work area clean and well lit. Cluttered or dark areas invite accidents. Do not operate power tool/machine in explosive atmos- pheres, such as in the presence of flammable liquids, gases or dust.
-
Page 3: Technical Specification
locked unit. Make sure that the cord is located so that it will not be stepped on, tripped over, or otherwise subjected to dam- age or stress. Remove the plug from the mains socket / battery (where applicable) before carrying out any adjustment or main- tenance. -
Page 4: Declaration Of Conformity
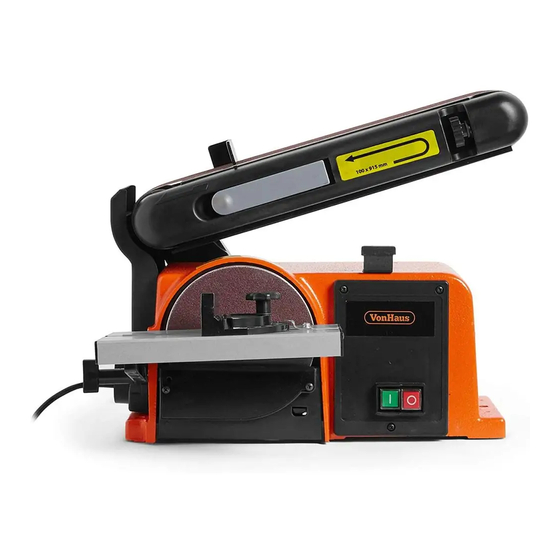
DOMU Brands Ltd 5th Floor The Tower Deva City Office Park Manchester M3 7BF Declare under our sole responsibility the product: 3500181 Description 100 x 915mm Benchtop Belt & Disc Sander Complies with the essential requirements of the following directives: 2006/42/EC 2014/30/EU... - Page 5 COMPONENTS A5P | 01...
- Page 6 COMPONENTS A5P | 01...
- Page 7 CONTENT LIST 1. Sanding Belt 2. Belt Tension Release 3. Sanding Belt Tensioning Screw 4. Grinding/Sanding Disk 5. Bevel Scale 6. Vacuum Outlet 7. On/Off Switch 8. Sanding Belt Angle Adjustment Screw 9. Power Cable 10. Mounting Screws x 3 11.
- Page 8 ASSEMBLY / ASSEMBLÉE / VERSAMMLUNG / MONTAJE / MONTAGGIO / EL MONTAJE A5P | 01...
-
Page 9: Tracking Adjustment
TRACKING ADJUSTMENT Always ensure the Sanding Belt is correctly tracked before operation. Ensure the sanding belt runs central to the rollers. A5P | 01... - Page 10 ASSEMBLY VACUUM OUTLET 1/2” (60mm) * Not Supplied A5P | 01...
- Page 11 TABLE ADJUSTMENTS A5P | 01...
- Page 12 INSTALLING THE TABLE (DISC) 1.5mm Max A5P | 01...
- Page 13 INSTALLING THE TABLE (BELT) A5P | 01...
- Page 14 SET THE TABLE TO 90º 90º 90º A5P | 01...
- Page 15 MITRE GUIDE A5P | 01...
-
Page 16: Operation
OPERATION A5P | 01... - Page 17 CHANGING THE SANDING BELT (BELT SIZE 100MM X 915MM) CAUTION Potential finger trap/pinchment points A5P | 01...
- Page 18 CHANGING THE SANDING BELT (BELT SIZE 100MM X 915MM) CAUTION Potential finger trap/pinchment points A5P | 01...
- Page 19 CHANGING THE SANDING DISC (DISC 150MM) Remove the existing sanding disc with adhesive remover and thorough clean the disc of excess residue. Peel backing off the new sandpaper disc. A5P | 01...
-
Page 20: Replacing The Drive Belt
REPLACING THE DRIVE BELT Belt Type: 4 Rib 155J Belt. Replacement Drive Belt not supplied. Unscrew and remove backing plate. Loosen the 3 indicated screws. Loosen the Tension Bolt. Remove and discard the damaged belt. A5P | 01... - Page 21 REPLACING THE DRIVE BELT Place the new belt over top of the upper drum. Place the new belt over top of the lower drum. Re-tighten the 3 screws and install the backing plate. Re-tighten the Tension Bolt A5P | 01...
- Page 22 PROBLEM CAUSE SOLUTION 1. Sanding belt/disc grit is too coarse 1. Use a finer-grit sanding accessory. for the desired finish. 2. Workpiece sanded across the 2. Sand with the grain of the wood. grain. Deep sanding grooves or scars in the workpiece.
- Page 23 PROBLEM CAUSE SOLUTION 1. Feed rate too great. 1. Reduce the rate at which the workpiece is fed onto belt or disc. Machine slows when operating. 2. Undersized circuit or use of under- 2. Ensure circuit wires or extension sized extension cords are proper cord.
- Page 24 Thank you for purchasing your product/appliance. Should you require further assistance with your pur- chase, you can contact us at hello@domu.co.uk (UK/EU) usasupport@domubrands.com (US) VonHaus is a registered trademark of DOMU Brands Ltd. Made in China for DOMU Brands. M24 2RW. A5P | 01...
Need help?
Do you have a question about the 3500181 and is the answer not in the manual?
Questions and answers