
Related Manuals for Slee MSM


Summary of Contents for Slee MSM
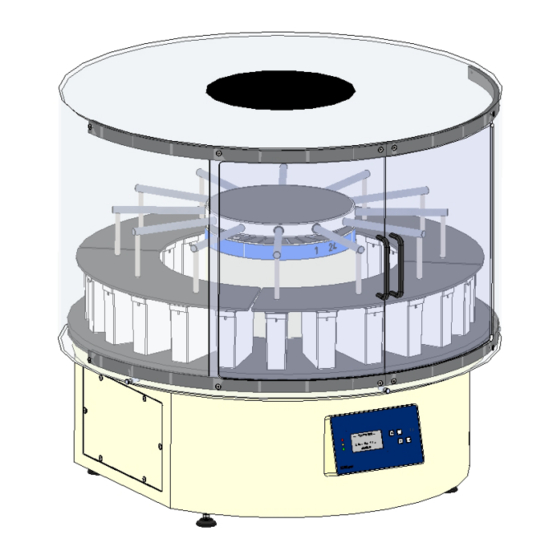
- Page 1 O P E R A T I N G M A N U A L M S M CAROUSEL SLIDE STAINER D ES I GN & M A N UFACT UR I NG M A DE IN GE R M A NY...
- Page 2 Manual_MSM_2021-10-013.00_EN.docx...
-
Page 3: Table Of Contents
CONTENTS 1. INTENDED USE ............... 4 2. SYMBOLS ............... 4 3. SAFETY NOTES ............... 4 4. COMPONENTS ............... 5 5. SPECIFICATIONS ............... 6 6. UNPACKING AND INSTALLATION ............... 7 7. INITIAL OPERATION ............... 9 8. OPERATION ............... 15 9. MAINTENANCE ............... -
Page 4: Intended Use
2. SYMBOLS Dangers, warnings and cautions are marked by this symbol Special instructions regarding the operation of the instrument are marked by this symbol The Slee carousel staining machine MSM is provided with the following safety features: Standard Optional Accessory •... -
Page 5: Components
• Do not connect another unit to the same power circuit. • Before turning on the instrument, check if the voltage of the mains supply is identical with the name plate of the unit Slee carousel staining machines are provided with the following standard components: MSM 24 •... -
Page 6: Specifications
5. SPECIFICATIONS General Nominal supply voltage 100 – 240 V AC +/- 10% Nominal frequency 50 / 60 Hz Power draw 110 VA Protective class Power fuses 2 * T 6,3 A Pollution degree Overvoltage installation category Maximum heat emission 110 J/s Operating temperature range +10 to +35 °C... -
Page 7: Unpacking And Installation
6. UNPACKING AND INSTALLATION 6.1 UNPACKING THE INSTRUMENT Remove the upper wooden cover. Remove the upper supporting foams. Lift the instrument out of the wooden transportation case. Lift the instrument according to the photo only at the platform of the cuvettes or at the bottom of the instrument –... - Page 8 6.3 INSTALLATION OF HOOD In case of the option Perspex hood, it must be installed as follows: Place the hood on the pins provided for this purpose and check whether it can be turned easily. Manual_MSM_2021-10-013.00_EN.docx...
-
Page 9: Initial Operation
7. INITIAL OPERATION 7.1 STARTUP To switch on the instrument, use the main switch at the backside of the unit. The display lights up and the instrument will ask for a reference drive. Confirm by pressing The instrument will auto adjust the carousel. ----- MAIN MENU----- The main menu is displayed. - Page 10 ----- SETUP----- Select Vacuum by pressing Press to change the operation of the vacuum Time 15:30:10 system. Date 23.11.09 [not applicable to MSM instruments] Vacuum ---- Dryer ---- ----- SETUP----- Select Dryer by pressing Dryer Press to change the operation of the drying unit.
- Page 11 ----- SETUP----- Select Default end by pressing Press to change the default time for the Dryer ---- program end. Def. End Mon 08:00 Language English Contrast Fan speed (open) ----- SETUP----- Select Language by pressing Dryer ---- Press to change the system language. Def.
- Page 12 ----- SETUP----- Select Fan Speed (closed) by pressing Press to change the fan speed when the Fan speed (open) transport basket is lowered into the reagent Fan speed (closed) cuvettes during incubation. Temperatures Display System info System Configuration ----- SETUP----- Select Temperatures by pressing The actual temperatures are displayed.
- Page 13 7.3 PREPARATION AND LOADING Preparation of reagents and staining solutions Fill the staining cuvettes up to the filling mark on the inside. Loading of staining cuvettes Load the filled staining cuvettes to their respective positions on the carousel. Placement of filled staining cuvettes can be performed by moving the respective carousel position to the front end of the instrument (See MANUAL MODE) To prevent mix-up, the cuvettes are designated in numbers 1 to 24.
- Page 14 Loading of transport basket Load the transport basket with micro slides outside the instrument by positioning each micro slide with the labelling field upwards into the transport basket. The transport basket can then be loaded to the instrument by placing it into the holder on one arm of the lifting unit.
-
Page 15: Operation
8. OPERATION 8.1 MANUAL MODE ----- MAIN MENU----- Select MANUAL OPERATION by pressing QUICKSTART Press to enter the manual operation menu. PROGRAMS MANUAL SETUP 23.11.09 15:30:10 ---- MANUAL ---- Next station (02) Select Next station by pressing Previous station (12) Press to start the command. - Page 16 ---- MANUAL ---- Next station Select Move up by pressing Previous station Press to start the command. Turn to station no. The lifting unit will move up. Move up Move down ---- MANUAL ---- Next station Select Move down by pressing Previous station Press to start the command.
- Page 17 8.2 QUICKSTART In quick start mode all incubation times are equal for all positions. Step 1 ---- MAIN MENU ---- Select Quickstart by pressing QUICKSTART Press to start the quick start menu. PROGRAMS MANUAL SETUP 23.11.09 15:30:10 Step 2 ---- QUICKSTART ---- Select No.
- Page 18 Step 5 ---- QUICKSTART ---- Select Temperature by pressing Press to change the temperature for the No. of baskets drying station. Exposure 00:05:00 Drip off time 00:10 Changes are stored by pressing again. Temperature -- °C [only applicable to instruments equipped with this feature] Start Step 6 ---- QUICKSTART ----...
- Page 19 Step 8 Select Used / Failsafe for each position by ---- QUICKSTART ---- pressing Start Press to select those positions that shall be Delayed start active and for each position the stop position if Used / Failsafe 01 the system fails to finish the run. Used / Failsafe 02 Changes are stored by pressing again.
- Page 20 8.3 SETTING AND STORAGE OF CUSTOMIZED PROGRAMS Step 1 ---- Main Menu ---- Select Programs by pressing Quickstart Press to change to the Programs menu. Programs Manual Setup 23.11.09 15:30:10 Step 2 ---- Programs ---- Select Edit program by pressing Prog.
- Page 21 Step 5 ---- Edit program 01 ---- Select Station 01 by pressing Press to enter the editing mode for position Name Routine____ No. of baskets Station 01 00:05:00 Station 02 00:00:15 Station 03 00:01:00 Step 6 ---- P 01 STATION 01 ---- Select position by pressing Press to enter the step position of the...
- Page 22 Step 9 ---- P01 STATION 01 ---- Select Failsafe pos. by pressing Press to select those positions that shall be Position active and for each position the stop position if Exposure 01:00:00 the system fails to finish the run. Drip off time 00:05 Temperature ___ °C...
- Page 23 Step 11a Example for different step and station positions. ---- Edit program 01 ---- Name Routine____ In this case the basket moves from cuvette 2 No. of baskets into cuvette 3 and then in cuvette 1. Station 01 00:05:00 Station 02 00:00:15 Station 03 00:01:00...
- Page 24 8.4 RUNNING A PROGRAMME Step 1 ---- Main Menu ---- Select Programs by pressing Press to change to the Programs menu. Quickstart Programs Manual Setup 23.11.09 15:30:10 Step 2 ---- Programs ---- Select Prog. by pressing Prog. Routine Press to select the program. Edit program Start (01:04:50) Delayed start...
- Page 25 Step 5 Load the basket to the lifting unit. Press to start the run. Load basket Enter = OK 12:04:34 Prog. 01 Daily 01 Exposure 00:59:43 For discontinuation of the run, please refer to section 8.6. During incubation times, the instrument will automatically mix by moving the slide holder up and down every 5 seconds.
- Page 26 8.5 TIME DELAY The instrument is equipped with a delay function that allows delaying the start of the run by a defined time. Step 1 ---- Main Menu ---- Select Programs by pressing Quickstart Press to change to the Programs menu. Programs Manual Setup...
- Page 27 Step 4 Load the basket to the lifting unit. Press to start the run. Load basket Enter = OK Step 5 The display will show the starting time of the run. (e.g. 2 hours and 58 minutes in this example) Starting program in 02:58:00 For discontinuation of the run, please refer to section 8.6.
- Page 28 8.6 DISCONTINUATION OF A RUN Press to discontinue or interrupt a run. 12:04:34 Prog. 01 Daily 01 Exposure 00:59:43 Step 1 Select Continue by pressing 12:04:34 Press to continue the run without discontinuation. Continue Add specimen Abort Step 2 Select Add specimen by pressing 12:04:34 Press to lift the lifting unit temporarily to add...
- Page 29 Please note that the number of incubation stations is reduced by two stations. As each basket will be incubated in a different Double basket loading in MSM 24. The number of incubation stations should be beaker, all incubation times must be equal reduced by the last two incubation positions.
- Page 30 The hood is mandatory for optional Carousel staining processor MSM with closed hood. fume extraction system (see section 8.10). Carousel staining processor MSM open for loading and unloading of instrument.
- Page 31 8.10 FAN / CARBON FILTER [only applicable to instruments equipped with this feature] For more safety (especially to remove vapours) the instrument can be directly connected to a central fume extraction system or be equipped with an optional fan (plus carbon filter).
-
Page 32: Maintenance
It must be returned in its original packing. If the instrument or parts thereof are sent back in a dirty or non-disinfected condition, SLEE medical GmbH reserves the right to return the parts to the debit of the customer. Manual_MSM_2021-10-013.00_EN.docx... -
Page 33: Optional Accessories
11. Optional accessories Perspex hood • #11000220 Staining cuvettes (360 ml, plastic) • #12000260 Slide basket (30 slides, plastic) • #12000261 Twin option • #12000260 Drying Station • #12000256 Exhaust fan • #11000210 Exhaust fan including carbon filter • #11000211 Exchange carbon filter •... -
Page 34: Warranty
12. WARRANTY SLEE medical GmbH guarantees that the product delivered has been subjected to a comprehensive quality control procedure, and that the product is faultless and complies with all technical specifications and/or agreed characteristics warranted. SLEE medical GmbH guarantees that the instrument is manufactured under an ISO 9001:2015 and ISO 13485:2016 quality management system. - Page 35 Notes Manual_MSM_2021-10-013.00_EN.docx...
- Page 36 SLEE medical GmbH • Am Neuberg 14 55268 Nieder-Olm • Germany www.slee.de T: +49 (0) 6136 76997-0 E: mail@slee.de www.slee.de YouTube LinkedIn Instagram INS5000GB ∙ Manual_MSM_2021-10-013.00_EN...
Need help?
Do you have a question about the MSM and is the answer not in the manual?
Questions and answers