Table of Contents
Advertisement
Quick Links
Advertisement
Table of Contents

Related Manuals for THORLABS PMT2100 Series


Summary of Contents for THORLABS PMT2100 Series
- Page 1 PMT2100 Series Photomultiplier Tubes User Guide...
- Page 2 Copyright June 6, 2019 Thorlabs, Inc. All rights reserved. Information in this document is subject to change without notice. The software described in this document is furnished under a license agreement or nondisclosure agreement. The software maybe used or copied only in accordance with the terms of those agreements. No...
-
Page 3: Table Of Contents
3.1. Overview ............... 3 Chapter 4 Getting Started ..............5 4.1. Ordering Codes .............. 5 4.2. Unpacking and Inspection ..........5 4.3. Setting Up PMT2100 Series PMT ........6 Minimum Computer Requirements ..........6 Preparation .................. 6 Chapter 5 Operation ................7 Chapter 6 Software ................ - Page 4 PMT2100 Series Photomultiplier Tubes 10.2. PMT Specifications ............35 10.3. Amplifier Specifications ..........36 Chapter 11 Mechanical Drawing ............37 Chapter 12 Commands ..............41 Chapter 13 Certifications and Compliance........43 Chapter 14 Warranty ................44 Chapter 15 Regulatory ............... 45 Chapter 16 Thorlabs Worldwide Contacts........
-
Page 5: Chapter 1 Warning Symbol Definitions
PMT2100 Series Photomultiplier Tubes Chapter 1: Warning Symbol Definitions Chapter 1 Warning Symbol Definitions Below is a list of warning symbols you may encounter in this manual or on your device. Symbol Description Direct Current Alternating Current Both Direct and Alternating Current... -
Page 6: Chapter 2 Safety
WARNING DO NOT use the device for anything other than its intended use. If the device is used in a manner not specified by Thorlabs, the protection provided by the equipment may be impaired. CAUTION DO NOT operate in a wet, damp, or explosive environment. -
Page 7: Chapter 3 Description
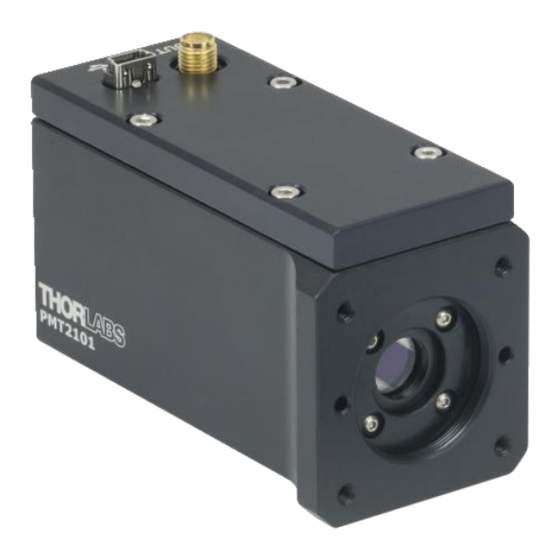
50 Ω impedance up to ±1.5 V. The housing includes C-Mount threading (1.00"-32) for convenient mounting of external optics, emission filters, and irises. The PMT2100 series consist of PMT2100 (C-Mount threading, only available with Thorlabs Imaging Systems), PMT2101 (SM1-threaded aperture with imperial mounting threads), PMT2101/M (SM1-threaded aperture with metric mounting threads), and PMT2102 (C-Mount threading, standalone unit). - Page 8 PMT2100 Series Photomultiplier Tubes Chapter 3: Description SMA Cable Output USB Port Serial Number Figure 2 PMT2100 Series PMT Rear View Page 4 TTN094969-D02...
-
Page 9: Chapter 4 Getting Started
SM1-Threaded Aperture with Metric Mounting Threads Non-Cooled GaAsP PMTs with Built-in Amplifier, PMT2102 C-Mount 4.2. Unpacking and Inspection Open the package, and carefully remove the PMT2100 series PMT and its accessories. The table lists the standard accessories shipped with the device. Quantity Name PMT2100 PMT2101... -
Page 10: Setting Up Pmt2100 Series Pmt
PMT2100 Series Photomultiplier Tubes Chapter 4: Getting Started 4.3. Setting Up PMT2100 Series PMT Minimum Computer Requirements Computer Requirements Operating System Windows 7 or 10 (64-Bit) Driver Keysight IO Libraries Suite (Version 17.2.20818.0) Visual C++ Redistributable Package (2012), Microsoft Other Software .NET 4.5.2... -
Page 11: Chapter 5 Operation
PMT2100 Series Photomultiplier Tubes Chapter 5: Operation Chapter 5 Operation The light to voltage conversion can be estimated by multiplying the wavelength- dependent responsivity of the photomultiplier tube by the transimpedance gain and input optical power: Output (V) = Transimpedance Gain (V/A) x Sensitivity (A/W) x Gain x Input Optical Power (W) The sensitivity can be estimated from Figure 3 and the calibration data. - Page 12 Figure 5 Temperature oefficient The maximum output of a PMT2100 Series PMT is ±1.5 V for 50 Ω loads. To avoid saturation, the output signal should not exceed the maximum output voltage. If necessary, use external neutral density filters (e.g., Item # NDC-50C-4M-A) to reduce the input light level.
-
Page 13: Chapter 6 Software
PMT2100 Series Photomultiplier Tubes Chapter 6: Software Chapter 6 Software The gain, output offset and bandwith can all be control with the PMT2100 software. 6.1. PMT2100 Software Development Kit (SDK) Installation Insert the PMT2100 Software CD into the computer, and open 70-0037 –... - Page 14 PMT2100 Series Photomultiplier Tubes Chapter 6: Software In the Choose Install Location window, select the destination folder you like the files installed, then click Install. Figure 8 Choose Install Location Window The PMT2100 setup will begin installation. Figure 9 Installing Window...
- Page 15 PMT2100 Series Photomultiplier Tubes Chapter 6: Software During installation, the Device Driver Intallation Wizard will appear. Click Next to begin installing the software drivers that some computer devices need in order to work Figure 10 Device Driver Installation Wizard Window Once drivers are installed, click Finish to complete drivers installation.
- Page 16 Figure 12 Microsoft Visual C++ 2012 Redistributable Window 10. Once done installing the necessary software, select Reboot now and click Finish in the Completing Thorlabs PMT2100 Setup window to close the Setup window and restart your computer. Figure 13 Completing the Thorlabs PMT2100 Setup Window 11.
-
Page 17: Keysight Io Libraries Suite
PMT2100 Series Photomultiplier Tubes Chapter 6: Software 6.2. Keysight IO Libraries Suite Note: Install Version 17.2.20818.0 provided in the PMT2100 Control Software CD. DO NOT update the Keysight IO Libraries Suite to the latest version available on www.keysight.com. Insert the PMT2100 Software CD into the computer, and open Keysight IO Libraries folder. - Page 18 PMT2100 Series Photomultiplier Tubes Chapter 6: Software Note: If installation fails due to error 0x800F081F (a .NET Framework 3.5 incompatability), abort Keysight installation and proceed to Section 6.3: VISA Runtime 18.5; otherwise, continue. Figure 17 Windows Error Code: 0x800F081F Select Typical for the setup type, and click Next.
- Page 19 PMT2100 Series Photomultiplier Tubes Chapter 6: Software Click Install to copy the files. Figure 19 Installshield Wizard – Copying Files Click Finish to exit the InstallShield Wizard window. The Keysight IO Libraries Suite setup is complete. Rev D, June 6, 2019...
-
Page 20: Keysight Visa Settings Configuration
PMT2100 Series Photomultiplier Tubes Chapter 6: Software Keysight VISA Settings Configuration Follow the below procedure, if you have installed NI (National Instruments) Software on your computer. If you do not configure the Keysight VISA Settings, the PMT may not respond. - Page 21 PMT2100 Series Photomultiplier Tubes Chapter 6: Software Figure 21 Keysight Connection Expert Window In the Keysight Connection Expert window, click Settings>VISA Conflict Manager>USB0. Set the parameters as shown in the figure below and click Accept. Figure 22 VISA Conflict Manager Tab 10.
-
Page 22: Ni-Visa Runtime 18.5
PMT2100 Series Photomultiplier Tubes Chapter 6: Software 6.3. NI-VISA Runtime 18.5 Note: It is NOT necessary to install NI-VISA Runtime 18.50 provided in the PMT2100 Software CD, unless Keysight IO Library failed to install. If Keysight installed successfully, continue to next section. DO NOT update the NI-VISA Software. - Page 23 PMT2100 Series Photomultiplier Tubes Chapter 6: Software The NI-VISA 18.5 Runtime setup window appears. Click Next. Figure 26 NI-VISA 18.5 Runtime Setup Window In the Destination Directory window, select the destination folder you like the files installed, then click Next.
- Page 24 PMT2100 Series Photomultiplier Tubes Chapter 6: Software In the Features window, make sure Runtime Support>COM Support and .NET 4.0-4.5.1 Runtime Support (IVI) are selected, then click Next. Figure 28 Features Window In the Product Notifications window, uncheck “Search for important messages and updates…”...
- Page 25 PMT2100 Series Photomultiplier Tubes Chapter 6: Software In the License Agreement window, select I accept the above 2 License Agreement(s), then click Next. Figure 30 License Agreement Window 10. In the Driver Software Installation window, select Always trust software from National Instruments Corporation, then click Next.
- Page 26 PMT2100 Series Photomultiplier Tubes Chapter 6: Software 11. In the Disable Windows Fast Startup window, select Disable Windows fast startup to prevent problems with installing or removing hardware,then click Next. Figure 32 Disable Windows Fast Startup Window 12. In the Start Installation window, click Next to begin installation.
- Page 27 PMT2100 Series Photomultiplier Tubes Chapter 6: Software 13. Click Finish in the Installation Complete window. Figure 34 Installation Complete Window 14. You must restart your computer to complete this operation, click Restart. Figure 35 NI-VISA 18.5 Runtime Restart Prompt Window...
-
Page 28: Software Startup
PMT2100 Series Photomultiplier Tubes Chapter 6: Software 6.4. Software Startup The PMT2100 Control Software can control both PMT1000 and PMT2100 Series. The software can control up to six PMTs. Double click the PMT2100_Control.exe file from the Application folder. The Connection Settings window appears. - Page 29 PMT2100 Series Photomultiplier Tubes Chapter 6: Software Figure 37 Connection Settings Window with Serial Number Figure 38 PMT2100 Control Window Rev D, June 6, 2019 Page 25...
-
Page 30: Setting The Pmt2100 Offset
PMT2100 Series Photomultiplier Tubes Chapter 6: Software Click the button next to each PMT to expand the respective PMT panel. Figure 39 PMT2100 Control Window Note: If the serial number is unavailable, select the respective PMT on the PMT2100 Control window, and click the Update Settings SN button to update the PMT’s serial number in the PMTSettings file. -
Page 31: Gui (Graphical User Interface)
PMT2100 Series Photomultiplier Tubes Chapter 6: Software 6.6. GUI (Graphical User Interface) The GUI consists of the display area and the menu. Figure 40 PMT2100 Graphic User Interface Display Area You can control the PMT activities from the main display area. It displays all the PMTs (maximum six) that are connected to the system. -
Page 32: Menu
Click File>Update Firmware to open the file path for the .hex file (provided by Thorlabs). Select the .hex file, and click Open to update the firmware. (Refer to Section 6.7: Updating the Firmware if you are updating the firmware for the first time.) Note: DO NOT update the firmware until you receive a newer version of firmware from Thorlabs. -
Page 33: Updating The Firmware
A Firmware Update window appears; click Yes to continue. Figure 44 Firmware Update Browse the .hex file on your computer then click Open. The Thorlabs Update Com Port Selection window appears. Select the COM port your PMT appears in the Device Manager, then click OK. - Page 34 PMT2100 Series Photomultiplier Tubes Chapter 6: Software Figure 46 Device Manager Window Figure 47 Loading New Firmware When finished, click the X to close the Firmware Update window. Figure 48 Firmware Update Completed Successfully Your PMT will now show as USB Test and Measurement Devices (IVI) under Device Manager>USB Test and Measurement Devices.
-
Page 35: Chapter 7 Maintaining The Pmt2100 Series
Use only optical grade wipes to clean the window of the tube. There are no serviceable parts in the PMT2100 series’ optical head. If you suspect a problem with the PMT2100 series, please contact our nearest office for assistance from an application engineer (see Chapter 16 Thorlabs Worldwide Contacts for details). -
Page 36: Chapter 8 Electrical Schematic
PMT2100 Series Photomultiplier Tubes Chapter 8: Electrical Schematic Chapter 8 Electrical Schematic Figure 50 Electrical schematic of the PMT2100 Page 32 TTN094969-D02... -
Page 37: Chapter 9 Performance Plots
PMT2100 Series Photomultiplier Tubes Chapter 9: Performance Plots Chapter 9 Performance Plots Figure 51 Amplifier Frequency Response Figure 52 Input Current Noise Density Rev D, June 6, 2019 Page 33... -
Page 38: Chapter 10 Specifications
PMT2100 Series Photomultiplier Tubes Chapter 10: Specifications Chapter 10 Specifications 10.1. General Specifications Specification Value 3.32" x 1.35" x 1.93" PMT2100 (84.4 mm x 34.3 mm x 49 mm) 3.43" x 1.6" x 2.10" PMT2101 (87.2 mm x 40.6 mm x 53.5 mm) -
Page 39: Pmt Specifications
PMT2100 Series Photomultiplier Tubes Chapter 10: Specifications 10.2. PMT Specifications Specification Value Hamamatsu GaAsP PMT Type H10770PA-40 Cooling Non-Cooled Photocathode Geometry Head On Window Borosilicate, Flat Window Spectral Response 300 - 720 nm PMT Gain (Max) >1.0 x 10 Supply Adjustable Range (Relative Sensitivity, Gain... -
Page 40: Amplifier Specifications
PMT2100 Series Photomultiplier Tubes Chapter 10: Specifications 10.3. Amplifier Specifications Specification Conditions Typical Noise Input Current @ 1 MHz, C in = 4 pF ‐ ‐ 6.5 pA/√Hz Noise 5.8 pA/√Hz ‐ ‐ Total Input Noise DC to 80 MHz... -
Page 41: Chapter 11 Mechanical Drawing
PMT2100 Series Photomultiplier Tubes Chapter 11: Mechanical Drawing Chapter 11 Mechanical Drawing Figure 53 Mechanical Drawing of the PMT2100 Series PMT Housing Rev D, June 6, 2019 Page 37... - Page 42 PMT2100 Series Photomultiplier Tubes Chapter 11: Mechanical Drawing Figure 54 Mechanical Drawing of the PMT2101 Series PMT Housing Page 38 TTN094969-D02...
- Page 43 PMT2100 Series Photomultiplier Tubes Chapter 11: Mechanical Drawing Figure 55 Mechanical Drawing of the PMT2101/M Series PMT Housing Rev D, June 6, 2019 Page 39...
- Page 44 PMT2100 Series Photomultiplier Tubes Chapter 11: Mechanical Drawing Figure 56 Mechanical Drawing of the PMT2102 Series PMT Housing Page 40 TTN094969-D02...
-
Page 45: Chapter 12 Commands
Mnemonic Name 488.2 Section *IDN? Identification Query 10.14 *STB? Read Status Byte Query 10.36 The specific commands that are implemented in the PMT2100 series are as follows: Command Description INSTrument Selects Source Channel by :NSELect <numeric> Number Gets the Selected/Last... - Page 46 PMT2100 Series Photomultiplier Tubes Chapter 12: Commands Description Command SENSe Sets the Type of PMT :DETector[:FUNCtion] <function> Connected to the System <H10721-20> Sets the Low Pass Frequency after the Second :FILTer[:LPASs]:FREQuency <numeric> Amp Stage <80MHz; 2.5MHz; 250kHz> ON - Turns the PMT Power :FUNCtion[:ON] <sensor>...
-
Page 47: Chapter 13 Certifications And Compliance
PMT2100 Series Photomultiplier Tubes Chapter 13: Certifications and Compliance Chapter 13 Certifications and Compliance Rev D, June 6, 2019 Page 43... -
Page 48: Chapter 14 Warranty
Chapter 14: Warranty Chapter 14 Warranty Thorlabs warrants that all products sold will be free from defects in material and workmanship, and will conform to the published specifications under normal use, when correctly installed and maintained. Thorlabs provides the warranty for a period of one year. -
Page 49: Chapter 15 Regulatory
Waste Treatment is Your Own Responsibility If you do not return an “end of life” unit to Thorlabs, you must hand it to a company specialized in waste recovery. Do not dispose of the unit in a litter bin or at a public waste disposal site. -
Page 50: Chapter 16 Thorlabs Worldwide Contacts
PMT2100 Series Photomultiplier Tubes Chapter 16: Thorlabs Worldwide Contacts Chapter 16 Thorlabs Worldwide Contacts For technical support or sales inquiries, please visit us at www.thorlabs.com/contact for our most up-to-date contact information. USA, Canada, and South America UK and Ireland Thorlabs, Inc. Thorlabs Ltd. - Page 51 www.thorlabs.com...
Need help?
Do you have a question about the PMT2100 Series and is the answer not in the manual?
Questions and answers