Table of Contents

Related Manuals for Bissell PRO LITE 17G5


Summary of Contents for Bissell PRO LITE 17G5
- Page 1 U S E R ’ S G U I D E 17G5 SERIES Safety Instructions Product View Assembly Operations 8-12 Maintenance and Care Troubleshooting Consumer Services Replacement Parts Additional Accessories Warranty Part# 110-4164...
- Page 2 BISSELL PROlite Multi Cyclonic vacuum We’re glad you purchased a BISSELL vacuum. Everything we know about floor care went into the design and construction of this complete, high-tech home cleaning system. By purchasing this product you are helping BISSELL with our commitment to reducing our impact on the environment through an expanding range of sustainable design efforts.
-
Page 3: Important Safety Instructions
Do not pick up toxic material (chlorine bleach, ■ ammonia, drain cleaner, etc.). To reduce the Do not use vacuum cleaner in an enclosed space ■ filled with vapors given off by oil base paint, paint thinner, some moth proofing substances, flammable dust, or other explosive or toxic vapors. -
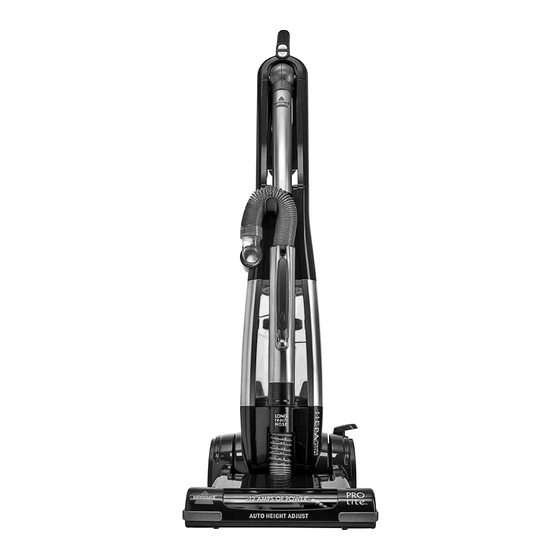
Page 4: Product View
roduct view Power Switch Brush On/Off Switch Stretch Hose Hose Clip Twist-n-Snap™ Hose Connection Hose Handle Hose Base Foot Hose Brush Automatic Height Powerfoot Adjustment CAUTIOn: Do not plug in your vacuum cleaner until you are familiar with all instructions and operating procedures. -
Page 5: Attach Handle To Vacuum
The only tool you’ll need to assemble your vacuum cleaner is a Philips head screwdriver. Remove handle and tools from box 1. Locate and remove the deluxe floor tool, extension wand, bendable wand attachment, dusting brush, TurboBrush accessory bag from box. 2. Locate and remove vacuum handle and Twist ‘n Snap Hose and set aside. 3. Lift vacuum body out of box using carrying handle on dirt container. Attach handle to vacuum 1. Take vacuum handle and remove the screw packet taped to the base of the handle. -
Page 6: Operation
“Off” by pressing the “BRUSh” switch once for bare floor cleaning or other delicate surfaces, or when using the hose. note: your BISSELL PROlite Multi Cyclonic vacuum is equipped with a special internal switch that turns the rotating brush off whenever the unit is in the Upright position. -
Page 7: Special Tools
. b i s s e l l . c o m CAUTIOn: Always place vacuum cleaner on floor in its fully upright position and make sure it is locked into place when using tools. Placing... -
Page 8: Power Cord Storage
peration Power cord storage When you are finished using your vacuum, return it to the Upright position and store the power cord. 1. Turn vacuum cleaner off by pushing the power switch. 2. Unplug power cord by grasping the polarized plug (NOT the cord) and disconnect from outlet. 3. Loop power cord around cord wraps on back of handle. 4. Clip molded plug to power cord to secure. Transporting cleaner 1. To move your vacuum cleaner from room to room, put the Handle in the Upright Position, tilt the cleaner back on its rear wheels and push forward. 2. The cleaner can also be moved by using the carrying handle on the dirt container. -
Page 9: Emptying The Dirt Container
aintenance and care Emptying the dirt container The dirt container needs to be emptied when the dirt reaches the “full” line on the back of the container. 1. Press the release button on the top of the carrying handle to remove the dirt container. 2. Hold the dirt container over trash can and push the emptying button to open the bottom. Close the dirt container door when empty. 3. Replace dirt container on cleaner by align- ing the bottom and pushing forward until it snaps into place. Cleaning the inner cyclone Unplug the cleaner from electrical outlet. - Page 10 Rotating brush and drive belt maintenance Check your vacuum cleaner’s rotating floor brush and drive belt regularly for debris, wear or damage. Debris can wrap around the brush and hamper its ability to effectively clean your carpet.
- Page 11 Cleaning clogs Low suction or poor pickup may be due to a clog in the vacuum cleaner. If you notice a change in the sound of the motor or a reduction in the spinning action, check for clogs.
- Page 12 3. Refer to the "Cleaning Clogs" section on pg.12. 4. After the above steps are completed, plug vacuum in and continue cleaning. If the electronic motor protector continues to activate after following the above steps, your cleaner may need servicing. Call BISSELL Consumer Services, or visit the website. w w w . b i s s e l l . c o m Air Passageway Caution: To reduce the risk of injury from moving parts, turn off vacuum...
-
Page 13: Troubleshooting
4. Hose handle not full attached Brush not rotating fully Possible causes 1. Brush switch turned "OFF" 2. Vacuum is in upright position 3. Brush is jammed 4. Brush needs to be reset 5. Handle not fully attached Vacuum cleaner won't pick up or low suction Possible causes 1. Hose wand not properly positioned 2. Dirt container not installed properly 3. Dirt container full 4. Clog in cleaner 5. Filters are dirty 6. Hose not properly attached... -
Page 14: Please Do Not Return This Product To The Store
If you should happen to need assistance during assembly or operation, call 1-800-237-7691. Please do not return this product to the store. for any questions or concerns, BISSELL is happy to be of service. Contact us ISSELL consumer service For information about repairs or replacement parts, or questions about your warranty, call:... -
Page 15: Additional Accessories
Item Part no. 203-2050 203-2011 203-2054 203-2091 203-2093 203-2097 dditional accessories These items are available for purchase as accessories for your BISSELL PROlite Multi Cyclonic: To purchase call 1-800-237-7691 or visit www.bissell.com. Item Part no. 203-2002 203-1429 203-2001 203-2003 203-2004 203-2006 w w w . -
Page 16: Limited Five Year Warranty
Subject to the *EXCEPTIONS AND EXCLUSIONS identified below, upon receipt of the product BISSELL Homecare, Inc. will repair or replace (with new or remanufactured components or products), at BISSELL’s option, free of charge from the date of purchase by the original purchaser, for five years any defective or malfunctioning part.
Need help?
Do you have a question about the PRO LITE 17G5 and is the answer not in the manual?
Questions and answers