
Related Manuals for HAUSSLER NOVA

Summary of Contents for HAUSSLER NOVA
- Page 1 Operating instructions Dough mixer NOVA Translation of the original operating instructions...
-
Page 2: Table Of Contents
Inhalt 1 Welcome ......................4 ... to our world of milling, kneading, baking, and pasta making! ......4 2 For your safety ....................5 List of symbols ......................5 Intended use ......................5 Basic rules ........................ 5 Safety instructions ....................5 3 Product overview ....................7 Product description .................... - Page 3 10 Cleaning ......................35 Disconnecting the power supply ................35 Removing the dough hook and bowl ..............35 Cleaning the parts ....................36 11 Maintenance ....................37 Disconnecting the power supply ................37 Lubricating the locking latch .................. 37 Belt 37 12 Faults .......................38 Fault indication in the display ................
-
Page 4: Welcome
You have opted for the NOVA dough mixer and no longer have to knead dough laboriously by hand. The NOVA is easy to clean, and it does not matter whether you are making dough for pasta, bread or other delicacies. -
Page 5: For Your Safety
For your safety 2 For your safety List of symbols Description of symbol ⚠ Hazard symbol Request for action Notice Bullets Tab. 1: List of symbols If the operating instructions or parts of them are illustrated too small for you, then you can view and enlarge the operating instructions on our homepage www.backdorf.de. - Page 6 For your safety ⚠ Danger to life from electric shock Do not put the unit into operation if the cable or plug are damaged and do not touch damaged parts. Contact a professional in the event of damage to the cable or plug. ...
-
Page 7: Product Overview
3 Product overview Product description In the NOVA dough mixer from Häussler, you have purchased a very robust and high-performance device. The dough mixer is easy to clean, easy to operate, almost maintenance-free and suitable for the production of all doughs. - Page 8 Product overview Name Power supply 110-240V ~ 50/60Hz Connection cable Cold device power cable (1.5 m with shock-proof plug) Housing coating Powder coating Colour • Pure white RAL 9010 (according to order type) • Steel blue RAL 5011 • Wine red RAL 3005 •...
-
Page 9: Scope Of Supply
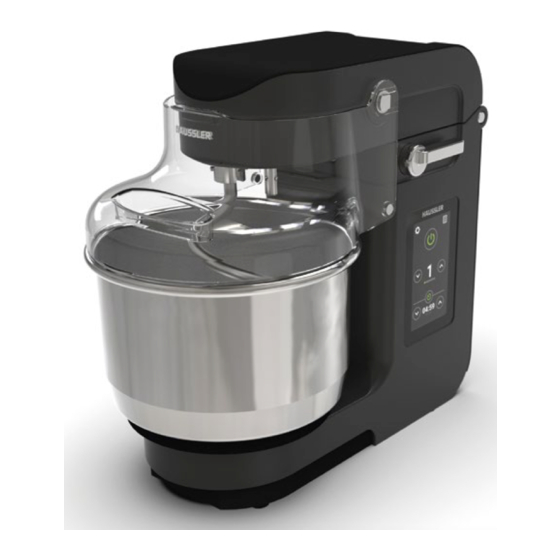
Scope of supply 4 Scope of supply Scope of supply and part designation Designation Designation NOVA Tilting head Release lever Display Power cable Recipe book/operating instructions Dough hook Bowl cover Bowl mounting Bowl Bowl cover mounting Tab. 3: Scope of supply and part designation The display is shown active here for illustrative purposes only and for better recognition. -
Page 10: The Tools
The Tools 5 The Tools Dough hook Designation Dough hook locking unit Dough hook Tab. 4:Dough hook Production marker The production process can lead to “production markers” (small Kneading dough and mixtures grooves or dents) at the dough hook. Unfortunately, these can- Quantity not be avoided, but do not affect the quality of the product at all. -
Page 11: Stirring Paddle
The Tools Stirring paddle * Designation Stirring paddle locking unit Stirring paddle Tab. 5:Stirring paddle Stirring mixtures e.g. creams, ready-made doughs, hot soaked grains. Quantity from 0.2 - 2.4 kg Speed levels Level 1 to 7 can be used For a more precise determination, please refer to the recipe book included in the scope of delivery. -
Page 12: Whisk
The Tools Whisk * Designation Whisk locking unit Locking sleeve Whisk Tab. 6: Whisk Whipping ingredients e.g. egg white, biscuits, cream Quantity from 0.2 - 1.5 litres Speed levels Level 1 to 7 can be used For a more precise determination, please refer to the recipe book included in the scope of delivery. -
Page 13: Putting Into Operation
Putting into operation 6 Putting into operation ⚠ CAUTION Risk of injury owing to catching and entanglement of clothing or hair in rotating parts Injuries to the head and limbs Wear snugly fitting clothing. Tie long hair back. ... -
Page 14: Handling
Putting into operation Connecting the machine Connecting the machine Switch on the machine Switch on the main switch on the back of Insert the cold-device plug into the the machine. socket on the machine. Insert the shock-proof plug ... - Page 15 Putting into operation Unlocking/locking tilting head Unlock tilting head Lock tilting head Press the release lever down. Press the tilting head down until it clicks into the lock. The tilting head opens automa- tically and swings slowly upwards. If The locking is clearly audible and the the dough hinders/impedes it from release lever is back in the horizontal...
- Page 16 Putting into operation Inserting/removing tools No. Designation Kneading and stirring paddle mounting Whisk mounting Stirring paddle Dough hook Insert Insert To do this, hold the kneading and stirring To do this, hold the kneading and stirring paddle mounting firmly.
- Page 17 Putting into operation Whisk Insert Push the locking sleeve of the whisk down with your fingers and guide the whisk onto the whisk mounting until it is in position. Release the locking sleeve. If necessary, turn the whisk a little to ...
- Page 18 Putting into operation Inserting/removing bowl Insert bowl Remove bowl Place the bowl on the bowl mounting Turn the bowl counterclockwise with a little swing so that it releases itself from the bowl mounting. Turn the bowl clockwise until it slides ...
- Page 19 Putting into operation Dismantling the bowl cover Dismantling the bowl cover Removing the bowl cover Pull the bowl cover apart slightly Pull the bowl cover forward off the with both hands at the height of the machine.
-
Page 20: The Display
The display 7 The display Overview Designation Designation Recipe list Start/Stop button Time display Speed level (if timer is deactivated) (in numbers) Increase the speed level Speed level (in points) Timer on/off Increase the timer time Time display timer Reduce the timer time Reduce the speed level Settings Tab. -
Page 21: Basic Principle Of The Colours
The display Basic principle of the colours: Colour - White - : Standby/ready Colour - Green - : activated Colour - Orange - : Warning Colour - Red - : Fault Symbols Symbol Meaning Symbol Meaning Page forward Abort Page back Confirm Home screen Clear... - Page 22 The display Home screen Starting the machine with the timer 1 Select the speed level. 2 Start the machine with the start/stop symbol. The timer is programmed at the factory to a start value of 5 minutes. The time counts down so that you can always see the remaining time.
- Page 23 The display Starting the machine without the timer Select the timer 1 . The timer display disappears and a time dis- play appears. Select the speed level 2 . Start the machine with the start symbol 3 . The time runs forward so you can see the time that has elapsed.
-
Page 24: Recipes
The display Recipes Recipe list 1 Save/edit recipe. 2 Call up/play recipe. The list includes 9 memory locations. With 3 you can change the page. Save/edit recipe In the recipe list, tap on the gear wheel 1 to save/edit a recipe ... - Page 25 The display Select the desired speed level for this recipe step 6 . Select the desired duration for this recipe step 7 . Confirm your entry 8 . If you want to insert another recipe step, start again as described on page 24.
- Page 26 The display Tap on the next recipe step to skip the remaining time of the current step. Tap on the pause symbol or open the bowl cover to pause the recipe. Press the start symbol 9 to continue with the reci- Clearing a recipe ...
- Page 27 The display Confirm that you want to clear the recipe. The recipe irrevocably cleared!
- Page 28 The display Settings • Standby time Setting of the time from when the screen goes into standby. Note that only the display is deactivated in standby, but the machine continues to remain active. To switch it off completely, use the main switch at the back. •...
-
Page 29: Notices
The display Notices The notice always appears whenever a sensor is not in use and you try to start the machine. Notice "Bowl missing" The bowl has not been inserted or not inserted correctly. Check if a bowl has been inserted in the machine. ... -
Page 30: The Tools During Operation
Tie long hair back. Do not wear necklaces or bracelets. The NOVA is suitable for normal household use and not for continuous operation. In the case of high loads, for example, when kneading very firm dough, slightly increased noise might occur, which is due to the mechanical load and cannot be avoided. -
Page 31: Stirring
The tools during operation Starting the machine Follow the description on pages 22 and onwards. Refer to the contents Fold the tilting head 2 up. Remove the tool. Loosen the bowl 10 by jerkily turning it counterclockwise. ... -
Page 32: Whipping
The tools during operation Remove the tool. Loosen the bowl 10 by jerkily turning it counterclockwise. Remove the bowl 10 from the bowl mounting 9 . Take the contents out of the bowl. Whipping Area of application of whisk ... -
Page 33: Worth Knowing
Worth knowing 9 Worth knowing The window sample Recognize when wheat or spelt dough has been kneaded The window sample can be used to check whether wheat or spelt dough has been kneaded and the adhesive framework is stable enough. For this purpose, a small piece of dough is taken out of the cauldron, coated in flour and carefully removed. -
Page 34: What Does Dy Mean
Worth knowing What does DY mean DY = Dough yield - describes the mixing ratio of flour to water. Flour is always weighted with 100 parts. For example: DY 160: 100 parts flour to 60 parts water Practical example: 1,000 g flour and 600 ml water DY 220: 100 parts flour to 120 parts water Practical example: 1,000 g flour and 1,200 ml water What are the benefits of pre-dough? -
Page 35: Cleaning
Cleaning 10 Cleaning Clean the device before initial commissioning and after each use. Cleanliness is a mandatory requirement for hygienic dough production. ⚠ WARNING Danger to life from mains voltage 110-240V ~ 50/60Hz Electric shock Disconnect the device from the power supply. ... -
Page 36: Cleaning The Parts
• Stirring paddle • Whisk Bowl 10 • Dishwasher unsuitable components NOVA 1 • Bowl cover 8 • Power cable 5 • First clean the bowl 10 and tool (dough hook 7 , stirring paddle or whisk) roughly with a dough scraper. -
Page 37: Maintenance
Maintenance 11 Maintenance ⚠ WARNING Danger to life from mains voltage 110-240V ~ 50/60Hz Electric shock Always disconnect the device from the power supply before commencing maintenance work. Only qualified specialist personnel are permitted to carry out maintenance work on electric components. -
Page 38: Faults
Faults 12 Faults Fault indication in the display Black display The machine is without current. Plug in the machine and switch on the main switch. The machine is in standby. Tap the display. "System overheated" fault The machine is overheated. ... - Page 39 Faults Error codes and their meanings General error Critical overvoltage Overvoltage Motor control error Motor control overtemperature Motor jammed Motor phase loss Other faults Fault Cause Solution The unit does not turn Bowl is not installed Install the bowl. The tilting head is not ...
-
Page 40: Disposal
Disposal 13 Disposal Used equipment contains valuable materials that can be recycled and put back into circulation. You should use suitable collection systems to dispose of used devices. -
Page 41: For Specialist Personnel: Circuit Diagrams And Parts Lists
For specialist personnel: Circuit diagrams and parts lists 14 For specialist personnel: Circuit diagrams and parts lists ⚠ WARNING Only specialist technicians should work with the following pages! Do not undertake work on the equipment without seeking assistance. Take the operating instructions with you to your specialist dealer. -
Page 42: Circuit Diagram
For specialist personnel: Circuit diagrams and parts lists Circuit diagram ⚠ WARNING Danger to life from mains voltage 110-240V ~ 50/60Hz Electric shock Always disconnect the device from the power supply before commencing repair work. Never carry out work on the equipment electronics. ... -
Page 43: Parts List
For specialist personnel: Circuit diagrams and parts lists Parts list 15 14 Designation Top cover Top toothed belt Belt tensioner Clutch shaft Locking hook Bowl cover shaft Top housing... - Page 44 For specialist personnel: Circuit diagrams and parts lists Designation Pneumatic spring Rear cover Motor with suspension Controls Release lever IEC filter Main switch Lock Display Bottom cover Bowl control system Belt tensioner Bottom toothed belt Axial fan Bowl mounting Bottom housing Bowl Hinge shaft Bowl cover...
-
Page 45: Accessories
Accessories 15 Accessories Replacement bowl Do you want to start preparing a new dough while the NOVA is kneading? Or do you want to knead a dough while another is proving? This is possible with an additional mixer bowl. Product ref.: 304107... - Page 46 The robust stirring paddle for mixtures, creams, batters, noodles and for preparing cold- and hot soaked grains. Product ref.: 304102 NOVA Cover Hood The cover hood protects against dust, dirt and scuffs and is made from a robust, wipe-down material. The materials is food-safe and extremely durable.
-
Page 47: Ec Declaration Of Conformity
EC Declaration of Conformity 16 EC Declaration of Conformity... - Page 48 EC Declaration of Conformity EG-Konformitätserklärung im Sinne der Maschinenrichtlinie 2006/42/EG, Anh. 111. A Original Fundstelle der angewandten harmonisierten Normen entsprechend Artikel 7 Absatz 2: EN 61000-3-3:2013 Elektromagnetische Verträglichkeit (EMV) - Teil 3- 3: Grenzwerte - Begrenzung von Spannungsänderungen, Spannungsschwankungen und Flicker in öffentlichen Niederspannungs Versorgungsnetzen für Geräte mit einem Bemessungsstrom <= 16 A je Leiter, die keiner Sonderanschlussbedingung unterliegen IEC 61000-3-3:2013 EN 61000-3-12:2011...
-
Page 49: Warranty
Warranty 17 Warranty Your appliance is supplied with a 12-month factory warranty commencing on the date of invoice. The appliance has been built by Karl-Heinz Häussler GmbH in accordance with the state of the art. All of the appliances that leave our factory are made from high-quality materials and have undergone thorough checks. - Page 50 Visit our Baking Village ... At Häussler, we have been focusing on enjoyable do-it-yourself for over 40 years. A family business with more than 120 employees, we are based in Heiligkreuztal in the Upper Swabian region of Germany. This is where we manufacture our products, such as our wood burning ovens, ourselves.
-
Page 51: Our Service To You
Our service to you Information about nearby tourist attractions and overnight accommodations Comfortable consulting spaces Children's play area Visitor toilets with baby-changing facilities Seating areas Shipping service On-site service for your equipment at our premises ... - Page 52 Karl-Heinz Häussler GmbH Nussbaumweg 1 D-88499 Heiligkreuztal Phone +49 73 71/93 77-0 Fax + 49 73 71/93 77-40 E-mail: info@backdorf.de Publication date: 14.10.2021...
Need help?
Do you have a question about the NOVA and is the answer not in the manual?
Questions and answers