Asko HIG1995AD Operating Instructions Manual
Gas induction hob
Hide thumbs
Also See for HIG1995AD:
- Operating instructions manual (44 pages) ,
- Instructions for use manual (40 pages)

Related Manuals for Asko HIG1995AD


Summary of Contents for Asko HIG1995AD
- Page 1 OPERATING INSTRUCTIONS HIG1995AD / IG9AA02DEA Gas induction hob HIG1995AF / IG9AA02IEA...
-
Page 2: Table Of Contents
Contents Pictograms used ........Induction operation ........Safety ............Switching on and power setting ..................Residual heat indicator ........ Safe use ............Boost ............Your gas-induction hob ......Two cooking zones behind each other ..Dear customer! ..........Bridge Induction zone ......... Description ........... -
Page 3: Pictograms Used
Pictograms used The following symbols are used throughout the manual and they have the following meanings: INFORMATION! Information, advice, tip, or recommendation WARNING! Warning general danger GAS CONNECTION! Warning gas connection ELECTRIC SHOCK! Warning danger of electric shock HOT SURFACE! Warning danger of hot surface DANGER OF FIRE! -
Page 4: Safety
Safety WARNING! READ CAREFULLY AND KEEP FOR FUTURE REFERENCE! General The manufacturer cannot be held liable for any damage resulting from failure to follow the safety instructions and warnings. Damage caused by incorrect connection, incorrect fitting, or incorrect use is not covered by the warranty. WARNING! This appliance and the accessible parts will become hot during use. - Page 5 Safety WARNING! Use only hob guards designed by the manufacturer of the cooking appliance or indicated by the appliance manufacturer in the instructions for use as suitable or hob guards incorporated in the appliance. The use of inappropriate guards can cause accidents. If a drawer underneath the appliance is permitted (see the installation instructions), without an intermediate bottom, this should not be used to store highly flammable objects/materials.
- Page 6 Safety WARNING! Ceramic glass plate broken Shut immediately off all burners and any electrical heating element and isolate the appliance from the power supply. Do not touch the appliance surface. Do not use the appliance. Do not use or store flammable materials in the appliance storage drawer or near this appliance.
- Page 7 Safety Gas burners WARNING! The use of a gas cooking appliance results in the production of heat, moisture and products of combustion in the room in which it is installed. Ensure that the kitchen is well ventilated especially when the appliance is in use: keep natural ventilation holes open or install a mechanical ventilation device (mechanical extractor hood).
- Page 8 Safety Clean the burner parts regularly for safe and correct operation of the burners. Missing rubber feet from the pan supports can cause scratches on the drip tray or poor combustion of the burner. If the rubber feet are missing, please contact our service department. Do not use large pots or heavy weights which can bend the pan support or deflect flame onto the hotplate.
-
Page 9: Safe Use
Safety Safe use Temperature safety induction zones Each induction zone is equipped with a sensor. This sensor measures the temperature of the base of the pan and the sections of the hob. This facility prevents overheating (for example through a pan boiling dry). In case of temperatures rising too high, the power of the cooking zone/hub is reduced automatically or shut off completely. -
Page 10: Your Gas-Induction Hob
Your gas-induction hob Dear customer! Welcome to our growing ASKO family! We are proud of our appliances. We hope that this appliance will be an appreciated and dependable aid for many years to come. Please read the operating instructions before use. They include general tips, information about the settings and adjustments you can make, and the best way to take care of your appliance. -
Page 11: Description
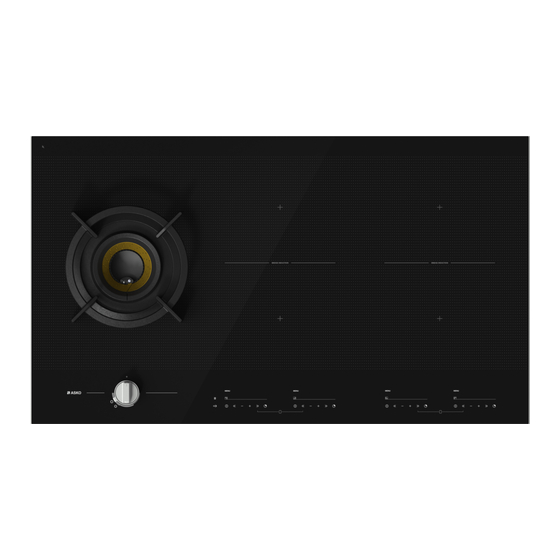
Your gas-induction hob Description 1. Fusion Volcano Wok burner (gas) 2. Bridge Induction zone Wok burner operation 1. 0 position 2. High setting 3. Low setting 4. Wok setting (wok burner) 5. Roasting setting (wok burner) - Page 12 Your gas-induction hob Induction zone operation 1. Pause button 2. Pause indicator 3. Childproof lock/Eco standby button 4. Childproof lock indicator/Eco standby indicator 5. Level indicator in cubes 6. On/off button 7. Reduce the power quickly 8. Reduce the power 9.
-
Page 13: Induction Use
Induction use Induction cooking Induction cooking is fast To start with, you will be surprised by the speed of induction cooking. Especially at higher settings, foods and liquids will come to a boil very rapidly. It is best not to leave pans unattended to avoid them boiling over or boiling dry. -
Page 14: Induction Sounds
Induction use Easy The electronic controls are accurate and easy to set. On the lowest setting, you can melt chocolate directly in the pan, for example, or cook ingredients that you would normally heat in au bain-marie. Fast Thanks to the induction hob’s high power levels, bringing food to the boil is very quick. Cooking food through takes just as long as for other types of cooking. - Page 15 Induction use Table continued from last page Suitable Unsuitable Solid enamelled pans Porcelain Enamelled cast-iron pans Copper Plastic Aluminium WARNING! Be careful with thin enamelled sheet steel pans: the enamel may come loose from the steel at high settings if the pan boils dry; high power level settings may cause the base of the pan to warp.
- Page 16 Induction use Container diameter The minimum diameter for the pan base is 12 cm. If a pan is too small, the zone will not work. Pressure cookers Induction cooking is very suitable for pressure cookers. The fast-reacting cooking zone brings the pressure cooker to pressure quickly.
-
Page 17: Wok Burner Use
Wok burner use Pans Always ensure that the flames remain under the pan. A lot of energy is lost when flames burn around the outside of the pan. The handles could also become too hot. wrong Do not use pans with a base diameter smaller than 12 cm. Smaller pans are not as stable. -
Page 18: Wok Burner Position
Wok burner use Wok burner position Place the wok burner in the correct way. Placing the wok burner parts incorrectly can result in a poorly functioning burner. 1. Place the burner distributor (2) in the burner housing (1). 2. Use the positioning notches to place the inner ring (3) on the burner distributor (2) position position rings... -
Page 19: Operation
Operation The eco standby mode In the eco standby mode, the hob is switched off and it uses as little energy as possible. The hob can also be switched to the eco standby mode from the standby mode and when cooking zones are still active. -
Page 20: Pause
Operation Switching on the childproof lock 1. Press the key button for 2 seconds. A double audio signal will be heard. All buttons are now inactive, except for the key button. The hob first switches to the eco standby mode and then to the childproof lock mode. -
Page 21: Timer/Kitchen Timer
Operation Table continued from last page The standby mode Not a single light is lit. The childproof lock mode The red light next to the key button is lit constantly. The pause mode The red light next to the pause button flashes. Timer/kitchen timer The timer function The kitchen timer function... -
Page 22: Switching The Audio Signal On And Off
Operation Switching on the kitchen timer 1. Press the timer/cooking timer button from the cooking zone once. 2. Press the + or - button to switch from the timer function to the kitchen timer function. After that, you can set the desired cooking time with the + button. Then you can change the set time with the - button. -
Page 23: Induction Operation
Induction operation Switching on and power setting 1. Press the key button. A single audio signal sounds. 2. Place a pan in the middle of a cooking zone. The APd registers a pan and a flashing -’ appears in the display. If you don’t do anything else, the cooking zone will switch off automatically after 10 seconds. -
Page 24: Boost
Induction operation Boost You can use the ‘boost’ function to cook at the highest power level during a short period of time (max 10 minutes). After the maximum boost time has passed, the power will be reduced to setting 12. Switching on ‘boost’... -
Page 25: Turning Off
Induction operation Enable connecting Bridge Induction zones 1. Place a large pan on both cooking zones so that both zones are well covered. 2. Switch on the front cooking zone. 3. Hold two keys down at the same time (for a few seconds): the << button on the rear Bridge Induction zone and the >>... - Page 26 Induction operation To set an automatic program The cooking zone is switched on. 1. Press the menu button. A series of 6 icons will light up, 1 of which brighter than the others. 2. Again press the menu button, or press and hold down the menu button to go to the next menu function.
- Page 27 Induction operation Searing function The searing setting provides the optimal searing temperature. After the audio signal, the pan has reached its temperature. The oil or butter can be put into the pan and then the dish. Grill function The grill setting provides the optimal grilling temperature. An audio signal can be heard when the pan has reached its temperature.
-
Page 28: Cooking Settings
Induction operation Cooking settings Because the settings depend on the quantity and composition of the pan and its contents, the table below is intended as a guideline only. Use ‘boost’ and settings 11 and 12 to: bring food or liquid to the boil quickly; ‘shrink’... -
Page 29: Wok Burner Operation
Wok burner operation Ignition and adjustment The burner is fully adjustable between high and low settings. 1. Press the control knob and turn it anticlockwise. The burner will ignite. 2. Keep the control knob fully depressed for at least 3 seconds between high and low settings. -
Page 30: Maintenance
Maintenance Cleaning glass top TIP! Activate the child lock before cleaning the hob. Daily cleaning Although food spills cannot burn into the glass, we nevertheless recommend you clean the hob immediately after use. For daily cleaning, a damp cloth with a mild cleaning agent is best. Dry off with kitchen paper or a dry tea towel. -
Page 31: Faults
Faults General NOTE! If you notice a crack in the glass top (however small), switch off the hob immediately, unplug the hob, and close off the gas supply. Then contact the Service Department. Symptom Possible cause Solution Wok burner There is a smell of gas near The appliance connection is Turn off the main gas supply valve. - Page 32 Faults Table continued from last page Symptom Possible cause Solution Ceramic glass plate broken Close the gas main switch and pull the plug out of the socket. Contact your installer. Please note! Do not throw a broken ceramic glass plate in the glass recycling bin but take this to the Municipality's waste recycling centre.
-
Page 33: Installation
Installation Safety If the safety instructions and warnings are not followed, the manufacturer cannot be held responsible for any resulting damage. Installation, maintenance or repairs should only be carried out by professionals who are authorized by the manufacturer, as failure to do so will void the warranty. - Page 34 Installation in accordance with the wiring rules. Using an omnipolar switch with a contact separation of at least 3 mm fitted in the supply cable will fulfil this requirement. The connection cable must hang freely and should not be fed through a drawer.
- Page 35 Installation We recommend that the gas hob be connected by means of a fixed pipe. Connection using a specially designed safety hose is also permitted. A safety hose may not be bent and must not come into contact with moving parts of kitchen units. The connection point for the appliance must always be placed in an easily accessible position.
- Page 36 Installation - or the plug has been pulled out of the socket. It is recommended the hotplate be checked and serviced by an authorized person every 2 years. This is not covered by warranty. For New Zealand If the cooking range is not provided with a supply cord fitted with a plug or an installation male connector and if this appliance is to be connected to a new or upgraded electrical installation, then it must be connected to the supply by a supply cord fitted with:...
-
Page 37: Preparations For Installation
Installation Preparations for installation Free space around the appliance A (>mm) B (>mm) C (>mm) D (>mm) E (>mm) Rangehoods and exhaust fans shall be installed in accordance with manufacturers instructions. For an overhead exhaust fan A>750 mm! - Page 38 Installation Accessibility Accessibility Oven Ventilation min. 200 cm...
-
Page 39: Built-In
Installation Drawer Drawer Min. 100 mm Built-in Appliance dimensions Cut-out in the worktop... -
Page 40: Gas Connection
Installation Sealing tape Stainless steel drip tray Glass drip tray worktop Gas connection The hotplate can be connected with rigid pipe as specified in AS/NZS 5601.1 current edition. Fitting of appliance regulator for Natural gas or test point adaptor for LPG. Check and set the gas pressure with appliance operating! metal safety hose... -
Page 41: Electrical Connection
Installation GAS BURNER INJECTOR BURNER BURNER RATE (MJ/h) PRESSURE (KpA) N.G. Wok (inner) 1.20 + 0.66 8.70 Wok (outer) 2.10 + 0.66 20.00 ULPG Wok (inner) 0.63 + 0.40 7.50 2.75 Wok (outer) 1.00 + 0.40 15.40 Electrical connection 3 phases - 1 neutral 2 phases - 1 neutral Cross sectional area: Cross sectional area:... - Page 42 Installation 1 phase - 1 neutral 2 phases - 2 neutral (only for NL) Cross sectional area: Cross sectional area: 3x4 mm 5x1.5 mm NOTE! Consult the wiring diagrams on the bottom of the appliance. Connected load Total load 3700 W 3700 W 20 W 7420 W...
-
Page 43: Connecting & Testing
Installation Connecting & testing WARNING! Check if connections are gastight. -
Page 44: Environment
Environment Disposal of the appliance and packaging Sustainable materials have been used during manufacture of this appliance. This appliance must be disposed of responsibly at the end of its service life. Ask your local authorities for more information about how to do this. The appliance packaging is recyclable. -
Page 45: Your Notes
The appliance identification card is located on the bottom of the appliance. Stick the appliance identification card here. www.asko.com 867094 We reserve the right to make changes.
Need help?
Do you have a question about the HIG1995AD and is the answer not in the manual?
Questions and answers