Rotenso CONTROL Series User Manual
Hide thumbs
Also See for CONTROL Series:
- Installation and user manual (100 pages) ,
- User manual (44 pages) ,
- Manual (12 pages)

Related Manuals for Rotenso CONTROL Series


Summary of Contents for Rotenso CONTROL Series
- Page 1 CONTROL REMOTE CONTOL INSTRUKCJA OBSŁUGI USER MANUAL MODELE/MODELS: DEFO www.rotenso.com...
-
Page 2: Table Of Contents
Pilot bezprzewodowy - DEFO STEROWNIK BEZPRZEWODOWY DEFO Instrukcja obsługi Spis treści ŚRODKI OSTROŻNOŚCI ..........................3 OBSŁUGA PILOTA ............................4 Specyfikacja techniczna ..................................4 Skrócona instrukcja obsługi ................................4 Podstawowa obsługa pilota ................................5 Przyciski i funkcje ....................................6 Wskaźniki na ekranie pilota ................................7 Jak korzystać z funkcji podstawowych ............................9 Automatyczny tryb pracy (AUTO) .............................9 Tryb chłodzenia (COOL) lub grzania (HEAT) .........................9 Tryb osuszania (DRY) ..................................9... -
Page 3: Środki Ostrożności
Pilot bezprzewodowy - DEFO ŚRODKI OSTROŻNOŚCI OSTRZEŻENIE Tylko wykwalifikowane osoby powinny instalować i serwisować sprzęt. Instalacja, rozruch i serwis urządzeń może być niebezpieczny i wymaga specjalistycznej wiedzy i przeszkolenia. Nieprawidłowo zainstalowany, przygotowany lub wymieniony sprzęt przez niewykwalifikowane osoby może spowodować poważne obrażenia ciała, a nawet śmierć. -
Page 4: Obsługa Pilota
Pilot bezprzewodowy - DEFO OBSŁUGA PILOTA 1. SPECYFIKACJA TECHNICZNA Model DEFO Zasilanie 3.0V ( Dry batteries R03/LR03×2) Zasięg pilota Temperatura pracy -5°C~60°C(23°F~140°F) 2. SKRÓCONA INSTRUKCJA OBSŁUGI AUTO COOL HEAT Włóż baterie Wybierz tryb Ustaw temperaturę Naciśnij przycisk zasilania Skieruj pilot w stronę Wybierz prędkość... -
Page 5: Podstawowa Obsługa Pilota
Pilot bezprzewodowy - DEFO OBSŁUGA PILOTA 3. PODSTAWOWA OBSŁUGA PILOTA 3.1. Wkładanie i wymiana baterii Twój klimatyzator może być wyposażony w dwie baterie (niektóre jednostki). Przed użyciem należy włożyć baterie do pilota. 1. Przesuń tylną pokrywę pilota w dół, odsłaniając komorę baterii. -
Page 6: Przyciski I Funkcje
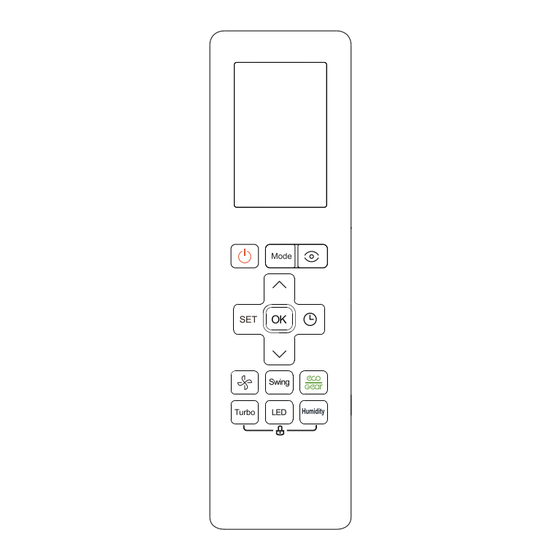
Pilot bezprzewodowy - DEFO OBSŁUGA PILOTA 4. PRZYCISKI I FUNKCJE Zanim zaczniesz korzystać z klimatyzatora, zapoznaj się z jego pilotem. Poniżej znajduje się krótkie wprowadzenie do samego pilota. Aby uzyskać instrukcje dotyczące obsługi klimatyzatora, zapoznaj się z rozdziałem „Jak korzystać z podstawowych funkcji” w tej instrukcji. 1. -
Page 7: Wskaźniki Na Ekranie Pilota
Pilot bezprzewodowy - DEFO OBSŁUGA PILOTA 11. Przycisk ECO/GEAR Naciśnij ten przycisk, aby przejść do trybu energooszczędnego w następującej kolejności: GEAR (75%) GEAR (50%) Poprzednie ustawienie ..12. Przycisk HUMIDITY Dostosowuje wilgotność w pomieszczeniu podczas pracy w trybie osuszania w zakresie 35% ~ 85%. Naciśnij ten przycisk, aby zwiększyć... - Page 8 Pilot bezprzewodowy - DEFO Wskaźnik prędkości wentylatora Wskaźnik Wind flow follow (niektóre modele) Wskaźnik Breeze Away (niektóre modele) 1% * Silence 2%-20% Niedostępne w tym modelu 21%-40% * Niedostępne w tym modelu 41%-60% * Wskaźnik funkcji ECO Smart Eye 61%-80% * High Wskaźnik aktywnego oczyszczania 81%-100% *...
-
Page 9: Jak Korzystać Z Funkcji Podstawowych
Pilot bezprzewodowy - DEFO OBSŁUGA PILOTA 6. JAK KORZYSTAĆ Z FUNKCJI PODSTAWOWYCH Informacje są wyświetlane, gdy pilot zdalnego sterowania jest włączony. UWAGA Przed rozpoczęciem pracy należy się upewnić się, że urządzenie jest podłączone i zasilanie jest dostępne. 6.1. Automatyczny tryb pracy (AUTO) Wybierz tryb AUTO Ustaw żądaną... -
Page 10: Tryb Wentylacji (Fan)
Pilot bezprzewodowy - DEFO OBSŁUGA PILOTA 6.4. Tryb wentylacji (FAN) Wybierz tryb wentylacji Ustaw prędkość wentylatora Włącz klimatyzator naciskając przycisk MODE z zakresu AU-100% MODE Uwaga: W trybie wentylacji nie można ustawić temperatury. W rezultacie na ekranie nie wyświetla się żadna temperatura. 6.5. -
Page 11: Jak Korzystać Z Funkcji Zaawansowanych
Pilot bezprzewodowy - DEFO OBSŁUGA PILOTA 6.5.3. Przykład ustawienia automatycznego włączania/wyłączania klimatyzatora Uwaga: Przedziały czasu ustawione dla obu funkcji odnoszą się do godzin następujących po bieżącej godzinie. xn xn TIMER TIMER Początek Włącznie Wyłącznie startu timera urzadzenia urzadzenia Przykład: Jeśli aktualny timer to 13:00, aby ustawić... -
Page 12: Wyświetlacz Led
Pilot bezprzewodowy - DEFO OBSŁUGA PILOTA 7.3. Wyświetlacz LED Naciśnij przycisk LED Przyciśnij ten przycisk dłużej niż 5 sekund Należy nacisnąć ten przycisk, aby włączyć lub Należy wcisnąć ten przycisk dłużej niż 5 sekund, wyłączyć wyświetlacz jednostki wewnętrznej. jednostka wewnętrzna wyświetli rzeczywistą temperaturę... -
Page 13: Funkcja Eco Smart Eye
Pilot bezprzewodowy - DEFO OBSŁUGA PILOTA 7.4.2. Funkcja GEAR: Należy nacisnąć przycisk ECO/GEAR, aby przejść do trybu GEAR w następujący sposób: 75% (do 75% zużycia energii elektrycznej) 50% (do 50% zużycia energii elektrycznej) Poprzedni tryb ustawień W trybie GEAR, wyświetlacz pilota zdalnego sterowania będzie na przemian pokazywał zużycie energii elektrycznej i ustawioną... -
Page 14: Funkcja Fp
Pilot bezprzewodowy - DEFO OBSŁUGA PILOTA 7.7. Funkcja FP Aby aktywować funkcję FP należy uruchomić klimatyzator w trybie ogrzewania (HEAT), zadać najniższą dostępną temperaturę (16°C/60°F ), następnie nacisnąć przycisk strzałki w dół 2 razy w ciągu jednej sekundy. Naciśnięcie przycisków ON/OFF, Sleep, Mode, Fan lub przycisków w górę i dół podczas pracy w funkcji AP spowoduje jej anulowanie. - Page 15 Pilot bezprzewodowy - DEFO OBSŁUGA PILOTA • Należy nacisnąć przycisk SET, aby wejść do ustawień funkcji, a następnie nacisnąć ponownie przycisk SET lub przycisk , aby wybrać żądaną funkcję. Wybrany wskaźnik zacznie migać na ekranie pilota, następnie naciśnij przycisk OK, aby potwierdzić. •...
- Page 16 Remote contol - DEFO REMOTE CONTROL - DEFO User manual Content PRECAUTIONS .............................. 17 REMOTE CONTROL SUPPORT ........................18 Technical Specifications.................................18 Quick Start Guide .....................................18 Handling the Remote Controller ..............................19 Buttons and Functions ...................................20 Remote Screen Indicators ................................21 How to Use Basic Functions .................................23 AUTO mode ....................................23 COOL or HEAT mode ...................................23 DRY Mode ......................................23...
-
Page 17: Precautions
Remote contol - DEFO PRECAUTIONS WARNING Only qualified personnel should install and service the equipment. The installation, starting up, and servicing of heating, ventilating, and air-conditioning equipment can be hazardous and requires specific knowledge and training. Improperly installed, adjusted or altered equipment by an unqualified person could result in death or serious injury. -
Page 18: Remote Control Support
Remote contol - DEFO REMOTE CONTROL SUPPORT 1. TECHNICAL SPECIFICATIONS Model DEFO Power 3.0V ( Dry batteries R03/LR03×2) Remote range Working temperature -5°C~60°C(23°F~140°F) 2. QUICK START GUIDE AUTO COOL HEAT Fit batteries Select mode Select temperarute Press power button Point remote toward unit Select fan speed NOT SURE WHAT A FUNCTION DOES? Refer to the How to Use Basic Functions and How to Use Advanced Functions sections of this manual for... -
Page 19: Handling The Remote Controller
Remote contol - DEFO REMOTE CONTROL SUPPORT 3. HANDLING THE REMOTE CONTROLLER 3.1. Inserting and Replacing Batteries Your air conditioning unit may come with two batteries(some units). Put the batteries in the remote control before use. 3. Slide the back cover from the remote control downward, exposing the battery compartment. -
Page 20: Buttons And Functions
Remote contol - DEFO REMOTE CONTROL SUPPORT 4. BUTTONS AND FUNCTIONS Before you begin using your new air conditioner, make sure to familiarize yourself with its remote control. The following is a brief introduction to the remote control itself. For instructions on how to operate your air conditioner, refer to the How to Use Basic Functions section of this manual. -
Page 21: Remote Screen Indicators
Remote contol - DEFO REMOTE CONTROL SUPPORT 12. HUMIDITY Adjust the room humidity during Dry operation in a range of 35%~85%. Press this button to increase the humidity in 5% increments. Note: After setting, the humidity settings will display on the screen. 13. - Page 22 Remote contol - DEFO REMOTE CONTROL SUPPORT Fan speed display Wind flow follow people (some units) Breeze Away display (some units) 1% * Silence 2%-20% Not applicable for this unit 21%-40% * Not applicable for this unit 41%-60% * ECO Smart Eye display 61%-80% * High Active clean feature display...
-
Page 23: How To Use Basic Functions
Remote contol - DEFO REMOTE CONTROL SUPPORT 6. HOW TO USE BASIC FUNCTIONS Information are displayed when the remote controller is power up. ATTENTION Before operation, please ensure the unit is plugged in and power is available. 6.1. AUTO mode Fit Select AUTO mode Set your desired temperature Turn on the air conditioner... -
Page 24: Fan Mode
Remote contol - DEFO REMOTE CONTROL SUPPORT 6.4. FAN Mode Press MODE button Set the fan speed in range of Turn on the air conditioner to select FAN mode AU-100% MODE NOTE: In FAN mode, you can’t set the temperature. As a result , no temperature displays in remote screen. 6.5. -
Page 25: How To Use Advanced Functions
Remote contol - DEFO REMOTE CONTROL SUPPORT 6.5.3. TIMER ON & OFF setting (example) Keep in mind that the time periods you set for both functions refer to hours after the current time. xn xn TIMER TIMER Unit turns Unit turns Timer starts Example: If current timer is 1:00PM, to set the timer as above... -
Page 26: Led Display
Remote contol - DEFO REMOTE CONTROL SUPPORT 7.3. LED display Press LED button Press this button more than 5 seconds (some units) Press this button to turn on and turn off the display Keep pressing this button more than 5 seconds, on the indoor unit. -
Page 27: Eco Smart Eye Function
Remote contol - DEFO REMOTE CONTROL SUPPORT 7.4.2. GEAR operation: Press the ECO/GEAR button to enter the GEAR operation as following: 75% ( up to 75% electrial energy consumption). 50% (up to 50% electrial energy consumption) Previous setting mode Under GEAR operation, the display on the remote controller will alternage between electical energy consumption and set temperature. -
Page 28: Fp Function
Remote contol - DEFO REMOTE CONTROL SUPPORT 7.7. FP function To activate the FP function, start the air conditioner in heating mode, set the lowest available temperature (16°C/60°F), then press the down arrow button 2 times within one second. If you press any buttons: ON/OFF, Sleep, Mode Fan or up/down button while the FP function is working it will be canceled. - Page 29 Remote contol - DEFO REMOTE CONTROL SUPPORT • Press the SET button to enter the function setting, then press SET button or TEMP or TEMP button to select the desired function. The selected symbol will flash on the display area, press the OK button to confirm.
- Page 30 NOTES ......................................................................................................................................................................................................................................................................................................................................................................................................................................................................................................................................................................................................................................................................................................................................................................................................................................................................................................................................................................................................................................................................................................................................................................................
- Page 31 NOTES ......................................................................................................................................................................................................................................................................................................................................................................................................................................................................................................................................................................................................................................................................................................................................................................................................................................................................................................................................................................................................................................................................................................................................................................................
- Page 32 INSTALLER STAMP www.rotenso.com...
Need help?
Do you have a question about the CONTROL Series and is the answer not in the manual?
Questions and answers