Table of Contents
Advertisement
Quick Links
the
dreamee
sleep & nursery monitor system
video sound movement monitor
Getting set up
1. Plug the cable into the Parent unit, then plug it into the mains power socket and switch the socket on.
Note: The first time you use the unit or if you haven't used it for a long time, it may take longer to charge.
2. Leave to charge for 4 hours or until the red light indicator turns o .
3. Place the Baby unit near a power socket in the room where you're going to be monitoring your baby most of
the time. It should be at least one metre away from your baby.
4. Plug the cable into the Baby unit, then plug it into the mains power socket and switch the socket on.
5. Keep the Parent unit at least 3ft/0.9m metre away from the Baby unit to avoid audio feedback.
6. Once the Parent unit has charged, turn it and the Baby unit on and you're ready to start monitoring.
7. To prepare the Movement sensor mat, set the lock lever to "open", slide open the battery door in direction as
shown. Install 3 AA (UM-3) alkaline batteries in the correct orientation. Slide the battery cover back on and set
the lever to lock. Note: The battery life of the movement sensor mat lasts up to 90 days.
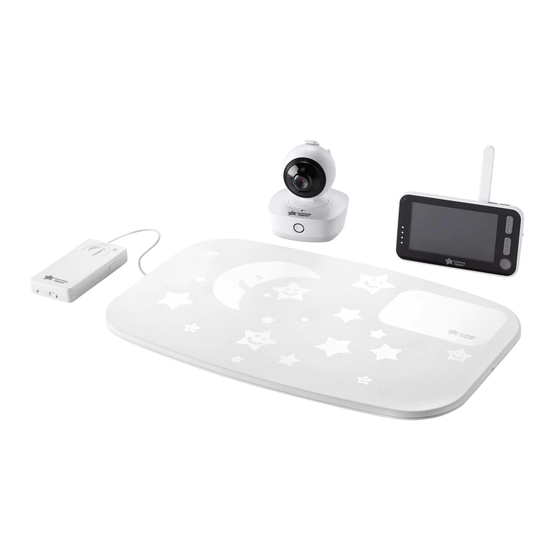
Baby unit
How to use the Baby unit (camera)
3
2
1
4
CAMERA
• Place the camera onto a stable surface or mounted on the wall at least 3ft/0.9m away from baby.
• Press and hold the power button (1) to turn on.
• Adjust the microphone sensitivity to your desirable sound level.
• The camera will only transmit when baby makes a noise.
• Once the camera starts to transmit, the transmit indicator (3) will light up blue. When baby is silent, the
microphone (5) will not pick up any sound, the camera will stop transmitting and go into standby mode.
• The night light can be set to ON, OFF or VOX (when detecting sound) using the Parent Unit.
• The light intensity can be adjusted using +/- buttons (7).
u
ltimate
™
Parent unit
25
5
6
Movement sensor mat
8
7
23
9
CONTROLS
1.
Power ON/OFF button
2.
Power ON indicator
3.
Transmit indicator
4.
Night light
5.
Microphones
6.
USB socket
7.
Night light intensity (up and down)
8.
Speaker
9.
Pairing button
25. Temperature sensor
Advertisement
Table of Contents

Summary of Contents for Tommee Tippee dreamee
- Page 1 ™ sleep & nursery monitor system video sound movement monitor Getting set up 1. Plug the cable into the Parent unit, then plug it into the mains power socket and switch the socket on. Note: The first time you use the unit or if you haven’t used it for a long time, it may take longer to charge.
-
Page 2: Parent Unit
How to use the Parent unit CONTROLS Microphone 10. LED sound level meter Camera pan and tilt Power ON/Charging indicator Talk back button (select/ok button in menu mode) USB socket Power ON/OFF/Vibration switch Volume up/down button Speaker Menu button Parent Unit with Pairing button fold out stand 24. - Page 3 HOW TO USE THE MOVEMENT SENSOR MAT • Place the movement sensor mat underneath the mattress, in a lengthwise direction directly under where your baby sleeps. For optimum performance, there should be no bed clothes tucked between the sensor mat and the mattress.
-
Page 4: Signal Strength
HOW TO PAIR YOUR PARENT UNIT WITH YOUR CAMERA AND MOVEMENT SENSOR MAT Note: The parent unit and camera are already paired when purchased, however this may be required to be re-paired if an additional monitor is purchased (cameras are not sold separately). Only pair the camera with the movement sensor pad after pairing between the parent unit and the camera(s) is complete, otherwise the system will not operate properly. -
Page 5: Battery Icon
Image magnification icon will be displayed when you select the x2 zoom option on the Parent unit. Battery icon This shows the battery level in your Parent unit. Once it drops below 20% this icon will flash and an audio alarm will sound to alert you to charge the battery. - Page 6 VOX on mode In VOX on mode, the screen on your Parent unit will automatically turn on Screen off delay whenever a camera detects a baby’s cry. It will shut down after a delay of Seconds 5-25 secs (as selected by you) once your baby is quiet. This helps save the battery power in the Parent unit and reduces radiation from the camera to a minimum.
- Page 7 Turn the camera light to “On”, “O ” or “VOX”. to select and press OK to confirm. In VOX mode, the night light will be on once the camera detects baby’s cry and go o when the room becomes silent. Automatically track your baby’s movements by turning on to select and press OK to confirm.
- Page 8 You can set high temperature limits between +15°C and +48°C, and low temperature limits between -9°C and +25°C. If you accidentally choose an illogical temperature range, for example setting 20°C as high and 22°C as low, the unit will not accept it and will automatically correct it to a setting 2°C higher or lower, depending on which limit you set first.
-
Page 9: Troubleshooting
Be careful not to position the adaptor where a child might try to step on it. Never use Tommee Tippee monitor adaptors with any other equipment. Nor should you use any other adaptors with your Tommee Tippee monitor. - Page 10 Please remember that your Tommee Tippee monitor is not a medical device, nor a device to prevent a case of Sudden Infant Death Syndrome or ‘cot death’, and you should not rely on it for a baby’s well-being. You should personally check your baby as frequently as necessary.
Need help?
Do you have a question about the dreamee and is the answer not in the manual?
Questions and answers