Advertisement
Quick Links
Download this manual
See also:
Function Manual
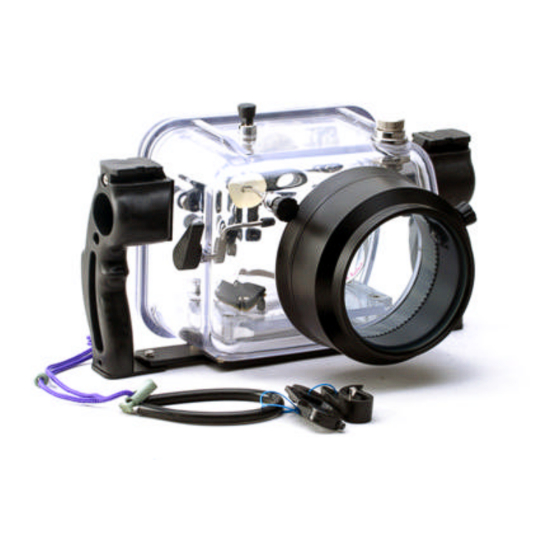
Camera Housing – Model 350D (Canon)
User Manual
Contents: 1. Introduction
2. Specifications
3. Function Controls
4. Set up Instructions
5. Use & Care of Housing
6. Service
7. Warranty
1
8/6/2006
Advertisement

Related Manuals for Canon 350D


Summary of Contents for Canon 350D
- Page 1 Camera Housing – Model 350D (Canon) User Manual Contents: 1. Introduction 2. Specifications 3. Function Controls 4. Set up Instructions 5. Use & Care of Housing 6. Service 7. Warranty 8/6/2006...
- Page 2 Approximately neutral in salt water Visible main O-ring for final pre-dive check Double O-ring design on all controls Bulkhead and hot shoe plug for External e-TTL strobe Standard Zoom Port for Canon EF-S 18~55mm Zoom Lens Universal Lever Silicone O-ring grease Spare main O-ring...
- Page 3 3. Function Controls 350D 1. Mode Dial, Power 2. Bulkhead 3. Main Dial 4. Shutter 5. AE/AF Lock, AF Point 4. Set up Instructions 4.1 Air Lock: The body and lid are designed with the Air Lock system “no clip” closure arrangement.
- Page 4 (Fig. 1) Open Housing Procedure 4.3 Opening levers: After unscrewing and pulling out the pressure release plug, the lid can be opened. To overcome the friction of opening, use lever (Fig. 2) to push against the lid with a cam action. Be sure they are inserted all the way flat to the housing before turning to avoid damaging the protrusions on the lid.
- Page 5 4.4 Special note on responsibility for watertight integrity: Each housing is individually inspected and hydrostatically tested in the factory. The design of the main piston O-ring seal is among the most reliable in the industry and the watertight integrity is excellent. This special O-ring design provides a perfect seal even if there is any movement between the body and lid due to change of ambient pressure.
- Page 6 the outside of the housing is thoroughly toweled dry before opening up. After removing the lid and servicing the camera, replace the lid straight away, rather than leaving it lying around. Before replacing the lid, make sure that no contamination such as dust, hair, salt, sand etc. has fallen onto the O-ring or O-ring recess, as a precaution we recommend to inspect the O- ring every time the lid is opened and to carry out the maintenance if necessary.
- Page 7 4.7 Mounting the camera in the housing: Remove the lens cap and wrist strap. The pressure release plug should be pulled out before inserting the camera. Attach the plastic slide tray to the camera’s tripod mounting fixture with a coin, screwdriver or the end of the universal tool supplied (Fig. 5). Take care not to excessively tighten the screw.
- Page 8 (Fig. 9) (Fig. 11) Replace the lid (Fig. 10). Remember to ensure the pressure release plug is pulled all the way out while closing, otherwise the air cannot escape. Squeeze the lid closed all the way with the hissing of expelled air. Screw home the pressure release plug (Fig. 11). There is no need to excessively tighten this plug.
- Page 9 (Fig. 12) Note: If the O-ring is in good contact, a thin black line, about 0.5 to 1mm in width should be visible, where the O-ring is in contact with the lid. Follow this line all the way round the edge of the seal, as a final check that the seal is good. The housing is now ready for the dive.
- Page 10 5. Use & Care of Housing: 5.1 Pre Dive Function Check. Just before entering the water, make a habit of reviewing that you have carried out the proper steps to close the housing. and the pressure release plug screwed home. Make a visual check of the O-ring seal.
- Page 11 deposits that may have built up. No chemical cleaners should be used. Mild detergents e.g. shampoo and soap based cleaners are permitted. Important !!! Some household chemicals may harm Polycarbonate; the housing should never be exposed to the following classes of chemicals: benzene, toluene, xylene, chlorinated hydrocarbons, methanol, any other solvents, strong acids and bases.
- Page 12 7. Warranty The warranty is valid within two years from the date of first purchase. The warranty applies only to the housing itself. liability either implicit or otherwise for any equipment housed inside, or used together with the housing. within the period of warranty, 10 BAR will repair or replace the housing. Please note that disassembly of the housing will invalidate warranty.
- Page 13 (Copy to be returned to 10 Bar Underwater Housings) The warranty is valid within two years from the date of first purchase. The warranty applies only to the housing itself. liability either implicit or otherwise for any equipment housed inside, or used together with the housing.