Advertisement
Available languages
Available languages
Quick Links
Advertisement

Related Manuals for Ciro Mazzoni LOOP ANTENNA MIDI


Summary of Contents for Ciro Mazzoni LOOP ANTENNA MIDI
- Page 2 Introduction Thank you for purchasing LOOP ANTENNA. You are the owner of the best magnetic loop ever produced worldwide, professional or otherwise. We are certain that, after having carefully read this manual, correctly assembled the antenna and familiarised yourself with the LOOP ANTENNA, this product will bring you a great deal of enjoyment and satisfaction.
- Page 3 INSTALLATION OF THIS PRODUCT NEAR POWER LINES IS DANGEROUS. FOR YOUR SAFETY, FOLLOW THE BELOW INSTALLATION INSTRUCTIONS. Read carefully this instruction manual before installation and use. Ciro Mazzoni Radiocomunicazioni assumes no liability if incorrect or dangerous installation practices are used. ...
-
Page 4: Motor Cable
electric power lines and phone lines look alike. For your safety, assume Assembled BABY LOOP packaging contents that any overhead lines can kill you ensure proper grounding of the mast of the LOOP ANTENNA Art. Description Quantity when installing your antenna, do not use a metal ladder 0101 Antenna assembled ready to install... - Page 5 How to assemble the BABY LOOP unassembled Put the half of the loop with the actuator on the mounting clamp and fasten it with the bolts. Then, remove the steel pin with the supplied hexagonal wrench. This is the BABY LOOP removed from the cardboard box. First, remove the mounting clamp and the small cardboard box.
- Page 6 Put it on the mounting clamp. Carefully slide one of the variable capacitor blades inside the other fully and the junction blade over the half of the loop. Gently insert the steel pin, using a plastic hammer to secure it. When it is fully engaged, fit the washer and the bolt, then tighten them.
- Page 7 Put the actuator end in place, install the bolt and place the self-locking stainless Fit the washer and the bolts. Tighten them with a wrench. nut on it. Tighten the nut until it reaches the surface of the isolated arm. DO NOT FORCE IT Now your BABY LOOP ANTENNA is ready Now connect the loop junction blade.
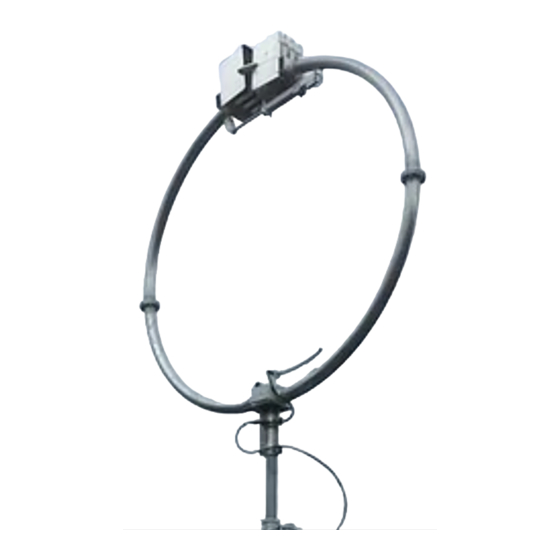
- Page 8 How to assemble the midi LOOP How to install the BABY LOOP MIDI LOOP packaging contents Provide suitable support by using a pole with a diameter from 50mm to 60mm Art. Description Quantity (2.0in– 2.3in) and a height from 1.5m to 2.5m (4,92ft-8,20ft), depending on the 0204 Tubular section with flange and friction bearing surface upon which the mast is mounted.
- Page 9 Spread the provided anti- oxidant paste on the flange. Then fit together the two semi-loop parts, ensuring that the two flanges guides are perfectly matched. The MIDI LOOP removed from the cardboard box. Semi-loop assembly The first step is to join the two arch sections (which will form the semi-loop) by fitting together the two precision flanges.
- Page 10 Pull the full length of the power Tighten the two flanges, using the cable through the tubes, then stainless steel bolts and self-locking push it through the hole in the nut. base, into the distribution box. The box in the picture hosts the cable terminal strip and the RF filter.
- Page 11 Place the bottom section of the semi-loop (with the housed friction bearing) on the Positioning the teflon guide with base plate. Then insert the steel pin, which both hands, fully slide the will allow the loop of the semi-loop to variable capacitor blades into one swing a few degrees.
- Page 12 Now connect the semi-loop junction blade. Spread the anti-oxidant paste before installing the retaining bolts. After the piston-head is in place, install the fix cap head hexagon socket drive screw with self-locking nut. Tighten the nut until it reaches the surface of the isolated arm. Do not force it. The picture shows the assembled Install the washers and bolts, then part.
- Page 13 Now your LOOP ANTENNA is assembled, Connect the power cable from the put it on the mounting clamp. loop controller ATU to the cable from The mounting clamp will be anchored to the actuator. The connecting terminal the mast as shown in the picture. is equipped with an RF suppression toroid.
- Page 14 Electrical and mechanical specifications of BABY loop Mechanical specifications Antenna diameter 1.0m (39.8in) Electrical specifications Aluminum alloy 60/60 T.I.G. welded ( Tungsten Inert Gas Tubular elements Ø 50 x 2mm thickness (1.9in x 0.08in) Continuous frequency coverage 6.6-29.8 MHz All stainless steel hardware and support pin S.W.R.
- Page 15 Electrical and mechanical specifications of MIDI loop Mechanical specifications Antenna diameter 2.0m (78.7in) Aluminium alloy 60/60 T.I.G. welded ( Tungsten Inert Gas Electrical specifications Tubular elements Ø 75 x 2mm thickness (2.9in x 0.08in) All stainless steel hardware and support pin Continuous frequency coverage 3.5-14.5 MHz Stainless steel mounting clamp for a mast of Ø...
- Page 16 - if, when tuning the loop, the blue LED does not light up, this could mean that the AUTOMATIC TUNER UNIT 2.0 motor is not drawing any current. Instructions for correct usage of the A.T.U. 2.0 Possible reasons for this include: plug in the power supply and turn on the device.
- Page 17 FULL AUTO MODE and SEMI AUTO MODE If the minimum level of SWR is > 3, the red LED flashes and The ATU 2.0, with the I/ORS232 plug and play card, can interface via RS232 port with the the message "WARNING: SWR> 3 - PRESS ANY KEY" will show. most popular HF radios on the market: ICOM ...
-
Page 18: Semi Auto Mode
SEMI AUTO MODE UPDATING THE FIRMWARE Press the – key for 3 seconds Scroll through the options using the button + then, choose SET SEMI AUTO? • Disconnect the power connector and the keypad on the device and press ENTER •... -
Page 19: First Turn On
FIRST TURN ON connect the coaxial cable and the motor cable to the ATU At the first turn on, the ATU is in “manual mode” and you can digit the frequency directly from the keyboard. LOOP ANTENNA Now you can try to test the proper functioning of the BABY LOOP place the between 1.5m (4.92ft) and 2.5m (8.20ft) above the... -
Page 20: Troubleshooting
press ENTER to confirm the coaxial cable is check the cable LOOP ANTENNA short-circuited Now we are ready to operate with check the ATU doesn’t find the coaxial connector on the antenna type in connectors aren’t cable AUTO DETECT mode grounded reposition the press * and the display shows: Set Frequency... - Page 21 With a constant concern for improvement, Ciro Mazzoni Radiocomunicazioni reserves the right to modify the technical specifications provided in their manual, at any time, at their discretion. The updated manual is available for download on our website.
- Page 22 ITALIANO...
- Page 23 Realizzazione meccanica Introduzione Speciali macchine ed attrezzature provvedono a sagomare uniformemente il tubo Grazie per aver scelto LOOP ANTENNA. in modo tale da garantire l’integrità strutturale delle LOOP ANTENNA. Una scelta che ti porta a possedere ed usare il miglior loop magnetico mai L’impiego di elettrosaldatura a T.I.G.
- Page 24 TENSIONE E’ PERICOLOSA. SEGUIRE LE ISTRUZIONI PER LA VOSTRA SICUREZZA. Leggere attentamente il manuale prima dell’installazione e dell’utilizzo. Ciro Mazzoni Radiocomunicazioni non si assume alcuna responsabilità se si utilizzano pratiche di installazione pericolose. scegliete il luogo più sicuro per l’installazione ...
- Page 25 Contenuto dell’imballo della LOOP BABY assemblata Come montare la LOOP BABY da assemblare Art. Descrizione Quantità 0101 Antenna assemblata pronta per l’installazione All’apertura dell’imballo, la LOOP BABY non assemblata si presenta come in figura: 0102 Staffa in acciaio inox completa di collari e bulloneria 0106 Scatola accessori con: 1 Loop Controller ATU...
- Page 26 Rimuovere i bulloni dall’altro semi-loop Posizionare il semi-loop con l’attuatore sulla staffa di supporto e fissarlo con i bulloni. Successivamente, rimuovere il perno di acciaio con la chiave a brugola fornita. E posizionarlo sulla staffa di fissaggio...
- Page 27 Posizionare l’attuatore nel supporto isolante, inserire il bullone nell’apposito foro del supporto fissando l’occhiello-perno del pistone dell’attuatore, avvitare il dado inox autobloccante fino ad appoggiarlo al supporto isolato SENZA STRINGERE. Passare ora al fissaggio della lamina di congiunzione del semi-loop. Prima del montaggio dei bulloni, stendere accuratamente la pasta antiossido (fornita) tra la lamina ed il supporto.
- Page 28 Posizionare rondelle e bulloni e serrare a fondo con una chiave. Come installare la LOOP BABY Predisporre idoneo supporto avente un palo di diametro compreso tra i 50 e i 60mm e con altezza compresa tra 1,5 e 2,5m. Il range di altezza dipende dal grado di orizzontalità del piano di terra, sia questo il terreno, un tetto o una terrazza, una superficie riflettente in generale.
- Page 29 Come assemblare la loop midi Contenuto dell’imballo Art. Descrizione Quantità Sezione tubolare con flangia e supporti perno 0204 Sezione tubolare con flangia e pacco lamellare 0206 Sezione tubolare con flangia, pacco lamellare e 0208 attuatore Sezione tubolare con flangia, scatola stagna e 0210 gamma match Staffa in acciaio inox completa di collari e bulloneria...
- Page 30 Spalmare preventivamente Serrare a fondo le due la flangia con la flange con i bulloni autobloccanti inox pasta antiossido che viene in dotazione. fornita in dotazione. Unire quindi le due parti del semi-loop facendo esattamente combaciare le guide di precisione. Procedere in modo analogo per il montaggio dell'altra coppia di archi che formerà...
- Page 31 Porre, nella sede ricavata nella Estrarre il cavo di alimentazione base, il semi-loop con bronzine dell'attuatore per tutta la sua montate e inserire il perno lunghezza utile ed infilarlo, in acciaio che permetterà il attraverso il foro sul lato movimento del pacco lamellare del basamento, nella scatola posto alla sommità.
- Page 32 Posizionare i pattini guida in Inserire a questo punto il bullone-perno teflon per il movimento del nell'apposito foro nel supporto isolante condensatore quindi, aiutandosi fissando nel contempo l'occhiello-perno con entrambe le mani farli del pistone dell'attuatore, avvitare il dado scivolare, senza allargarli lungo le inox autobloccante fino ad appoggiarlo pareti del condensatore fino al supporto isolato (senza stringere).
- Page 33 Passare ora al fissaggio della lamina Ora che la loop è assemblata di congiunzione del semi-loop. facendovi aiutare da una persona Prima dell'operazione stendere ma tutto il lavoro è bene farlo accuratamente la pasta antiossido almeno in due), posizionate (la stessa che avete usato per le flange) la vostra antenna sul "piatto"...
- Page 34 Caratteristiche elettriche e meccaniche LOOP BABY Collegate a questo punto il cavo di alimentazione Caratteristiche elettriche dell'attuatore con quello che va al loop controller ATU, interponendo la Copertura continua da 6.6 – 29.8 MHz morsettiera fornita che è dotata di anello R.O.S.
- Page 35 Caratteristiche meccaniche Caratteristiche elettriche e meccaniche LOOP MIDI Diametro antenna 1.0 m Lega di alluminio 60/60 elettrosaldato a T.I.G. ( Tungsteno ad iniezione di gas Elemento tubolare Ø 50 x 2 mm di spessore Caratteristiche elettriche Bulloneria e perno del semi-loop mobile in acciaio inox su bronzine Staffa di ancoraggio in acciaio inox per mast di Ø...
- Page 36 Caratteristiche meccaniche AUTOMATIC TUNER UNIT A.T.U. 2.0 Diametro antenna 2.0 m Lega di alluminio 60/60 elettrosaldato a T.I.G. ( Tungsteno ad iniezione di gas Istruzioni per il corretto utilizzo dell’ATU 2.0 Elemento tubolare Ø 75 x 2 mm di spessore All’accensione, sul display appare la versione del firmware installata Bulloneria e perno del semi-loop mobile in acciaio inox su bronzine Dopo 3 secondi, il display mostrerà...
- Page 37 Se comandando il motore, il led blu non si accende, significa che il motore non VERIFICA A.T.U. E ANTENNA IN MODO MANUALE assorbe corrente. per controllo cavi e connessioni Le cause possibili: motore non collegato o non correttamente collegato: Premere il tasto / per 3 secondi verificare il cavo comando motore e relative connessioni con Digitare la frequenza in KHz e premere ENTER...
- Page 38 FULL AUTO MODE SEMI AUTO MODE Premere il tasto – per 3 secondi Premere il tasto – per 3 secondi Scorrere le opzioni con il tasto + e selezionare SET SEMI AUTO? e premere Sul display apparirà la scritta SET FULL AUTO? ENTER Premere ENTER Selezionare con il tasto +:...
-
Page 39: Usb Media
PROCEDURA PER L’AGGIORNAMENTO DEL FIRMWARE ALLA PRIMA ACCENSIONE - staccare il connettore di alimentazione ed il tastierino dal dispositivo Alla prima accensione, l’ATU è in “manual mode” e puoi digitare la frequenza direttamente dalla tastiera. - sul sito www.ciromazzoni.com, nella pagina LOOP ANTENNA Ora puoi verificare il corretto funzionamento della LOOP ANTENNA: sezione DOWNLOAD, - FIRMWARE LOOP ATU2.0, scaricare l’ultima versione del firmware (file cml_xxx.tes) e trasferirla su una chiavetta USB da 2/4/8 GB vuota. -
Page 40: Risoluzione Dei Problemi
Ora sei pronto per operare con la LOOP ANTENNA premi * e il display mostrerà: Set Frequency digita sulla tastiera 7050 e premi ENTER sull’ATU si accenderà il LED rosso e successivamente il LED blu non appena il motore comincia a muoversi ... - Page 41 3. riposiziona vicino all’antenna l’antenna 4. l’antenna è troppo Con l'obiettivo di migliorare costantemente i propri prodotti, Ciro Mazzoni Radiocomunicazioni si riserva il diritto di modificare le bassa 4. alza l’antenna specifiche tecniche contenute nel presente manuale senza preavviso. Il manuale aggiornato è sempre disponibile per il download sul nostro sito.
Need help?
Do you have a question about the LOOP ANTENNA MIDI and is the answer not in the manual?
Questions and answers