
Related Manuals for Carbatec TJ-250P


Summary of Contents for Carbatec TJ-250P
- Page 1 WARRANTY OWNERS MANUAL PROFESSIONAL COMBINATION THICKNESSER / JOINTER TJ-250P / TJ-X250P...
- Page 2 An economy version of a European style planer/thicknesser. A real space saver in the workshop. Features flip-up tables for conversion to thicknesser. Tables have noise-dampening slots. Serrated steel infeed roller is standard. Comes with spiral cutter head. Spiral cutterheads revolutionise your woodwork! Offering silent cutting as well as less chatter and tear-out in curly or highly figured wood, these cutterheads save hours of cleanup work after dressing timber.
-
Page 3: What's Included
What’s Included Model Numbers: QTY1 AW106PTX / Planer Thicknesser (95% assembled) QTY1 Planer Fence QTY1 Planer Fence Mounting Base QTY1 Fence Securing Bracket QTY1 Overhand Planer Guard Mounting Bracket QTY1 Overhand Planer Guard QTY1 Overhand Planer Guard Locking Plate QTY1 Spring Metal Plate QTY2 M10 Washers... - Page 4 General Instructions for 230V Machines Keep the work area as uncluttered as is sweatband, will minimise the possibility of your hair practical, this includes personnel as well being caught up in the rotating parts of the machine, as material. Under no circumstances should likewise, consideration should be given to the removal CHILDREN be allowed in work areas.
- Page 5 Specific Precautions Using Planer Thicknessers pressure on the ‘front’ of the material i.e., that portion foul any stuff being passed through the machine. of the stuff that has passed over the block, but use a push stick or a pusher shoe to clear the end of the Check the height of the thicknessing table.
- Page 6 Initial Assembly and Setting Up Your machine comes enclosed in a packing case with Before adding the fence and the guarding (i.e. with the the accessories packed on top of the tables.Having machine ‘clean’) it is a good idea to remove the removed the top and the sides of the packing case, protective grease film that is coating all the unpainted remove all the components from the top of the...
- Page 7 Initial Assembly and Setting Up Typ.2 small eye bolts Fig 1 Typ.2 M6 x 12mm caphead bolt Fig 2 Fence mounting bracket Typ. 2 elongated fence support brackets Planer fence base Typ. 2 handled clamp nuts Fig 3 Fence mounting bracket Fence securing clamp...
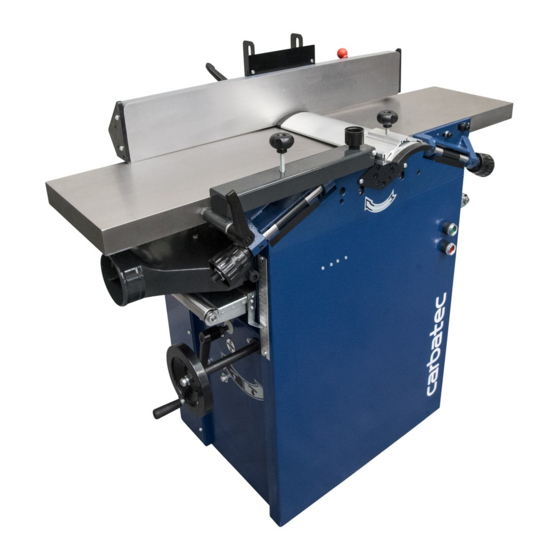
- Page 8 Machine Illustration and Parts Description Infeed table Main chassis Fig 4 adjustor Cutter block Fence assembly guard clamp Mounting arm height adjustor Cutter block knob guard angle adjustor Infeed table Outfeed table Table extension Start/Stop switches Thicknessing table rise and fall control Spring metal plate...
- Page 9 Machine Illustration and Parts Description Cutter block Cutter block guard clamp Cutter block guard angle Fence securing adjustor clamp Mounting arm height adjustor knob Cutter block Fig 5 guard Outfeed table lock Start/Stop switches Cutter block guard mounting arm lock handle Autofeed engage control...
- Page 10 Machine Illustration and Parts Description Cutter block guard angle Mounting arm Cutter block adjustor height adjustor Fig 6 guard clamp knob Cutter block guard Infeed table adjustor mounting arm lock handle Infeed scale for overhand Infeed table lock Fig 7a Fig 7 Infeed table adjustor...
- Page 11 Machine Illustration and Parts Description Fig 8 Limiting bar for Rise and fall material removal scale Anti-kick back fingers Infeed table Fig 9 lock Infeed table Outfeed table lock Table lock stud Table position studs Outfeed Outfeed table Thicknessing adjustor...
- Page 12 Fig 10 Fig 11 Operating Instructions (Overhand Planer or Jointer) 1. Make sure you have read and fully understood the General Instructions and safety precautions that are printed in the preceding pages of this manual. 2. Before connecting the machine to the supply; check for obvious signs of damage, paying particular attention to the plug and the power cable.
- Page 13 9. Put the workpiece onto the infeed table and advance it to the stationary cutter block, and set the cutterhead guard to ‘just’ clear the workpiece, covering the whole of the exposed part of the cutter block. (Fig 10) 10. Wide, thin boards can be machined using a completely covered cutterhead, raising the height and angle of the cutterhead guard to be slightly above the thickest part of the workpiece (Fig 11a).
- Page 14 Loosen the cutterhead guard mounting swing arm and swing up and completely to the left (or completely remove if desired) 6. Loosen the Fence Securing Clamp, pull Fence Assembly towards the front of the machine and completely remove it. 7. Loosen and slightly pull out the captive Infeed and Outfeed Table Locks on the rear of the machine. 8.
- Page 15 Changing the Planer Blades MAKE SURE THAT THE MACHINE IS DISCONNECTED FROM THE POWER SUPPLY! This machine has 64 four-sided cutter knives are made of fine grain tungsten carbide and are held in place by a Torx style screw. These knives can be turned to offer a new cutting edge in seconds. Tool for changing knives Fig 14...
-
Page 16: Wiring Diagram
Wiring diagram S B 0 S Q 1 SQ 2 S B 1 SB 2 S B3 S B 4 Fig 15... -
Page 17: Routine Maintenance
Routine Maintenance DISCONNECT THE PLANER THICKNESSER FROM THE MAINS SUPPLY. Your machine requires minimum maintenance, but it is essential that it is carried out to ensure the longevity and correct function of the machine. Daily Check the infeed and take off pressure rollers are not clogged, clean as necessary. - Page 18 Routine Maintenance Drive belt pulley Drive chain Bearing Fig 16 Table position studs Table lock stud Autofeed engage Drive belt and---- disengage control Motor Motor pulley...
- Page 19 Routine Maintenance OIL POINTS Fig 17 Light coat of oil on bearing Light coat of oil on the chain...
-
Page 20: Parts List/Drawing
Parts List/Drawing 1... - Page 21 Parts List/Drawing 1 DESCRIPTION DESCRIPTION QTY NO. Base stand Oriented body Small cover plate splint Right cover plate Gear case assembly Support sleeve mandril Support base Block Right cutter block support Block Left cutter block support Locking bar assembly Front adjusting block Wheel assembly Back adjusting block Ring...
- Page 22 Parts List/Drawing 2...
- Page 23 Parts List/Drawing 2 DESCRIPTION DESCRIPTION QTY NO. Spring Spring washer 6 Guiding fence Nut M10 Cutter block protective fence Flat cap screw M5X6 Fence plate HP screw M5X8 Supporting plate Hex cap bolt M6X20 Guiding board Washer 6 Right support Washer 5 Left support Washer 8...
- Page 24 Parts List/Drawing 3...
- Page 25 Parts List/Drawing 3 DESCRIPTION DESCRIPTION QTY NO. Screw M6X10 Nut M8 549 Socket hex cap bolt M6X35 Nut M5 550 PH screw M4X6 Hex cap bolt M8X16 PH screw M4X6 Socket hex cap screw M6X12 Special nut M12 PH screw M5x8 Nut M6 Washer 5 Pin 5X12...
- Page 26 Parts List/Drawing 4 DESCRIPTION THICKNESS TABLE SCREW 4X10 PLATE ROLLER NUT m10 WASHWER M10 BEARING 628 RING 6 U SUPPORT BOLT M8X10 SCREW M6X10...
- Page 27 Notes...
- Page 28 Please dispose of packaging for the product in a responsible manner. It is suitable for recycling. Help to protect the environment, take the packaging to the local recycling centre and place into the appropriate recycling bin. Only for EU countries Do not dispose of electric tools together with household waste material.
- Page 30 Carbatec Pty Ltd ABN 84 010 706 242 info@carbatec.com.au | Phone 1800 658 111 | www.carbatec.com.au...
- Page 31 Carbatec Pty Ltd ABN 84 010 706 242 info@carbatec.com.au Phone: 1800 658 111 128 Ingleston Road, Wakerley Queensland Australia 4154 www.carbatec.com.au...
Need help?
Do you have a question about the TJ-250P and is the answer not in the manual?
Questions and answers