Table of Contents
Advertisement
Quick Links
Advertisement
Table of Contents

Related Manuals for Charge XC


Summary of Contents for Charge XC
- Page 1 Quick start guide...
- Page 2 This risk cannot be eliminated. You can minimize the risk in many ways. Begin by reading the complete Charge Bicycle Owner’s manual accompanying this bike and available online at www.chargebikes.com,...
- Page 3 The 4 major steps to gett ing your bike ready to ride: 1. Adjust Handlebars 2. Install Front Wheel 3. Flip Down Pedals 4. Adjust Seat Height...
- Page 4 Getting your bike ready for assembly. 1. Remove the protective cardboard packaging that is on top of the bike and any that may be on the frame. 2. Remove the front wheel and set aside. 3. Leave bike in tray for now. 4.
- Page 5 6. Ensure that the power is OFF before continuing assembly by checking the handlebar display is blank. If power is on, press and hold the power button on the bike until the display shuts off. Power Button OFF (ready for Assembly)
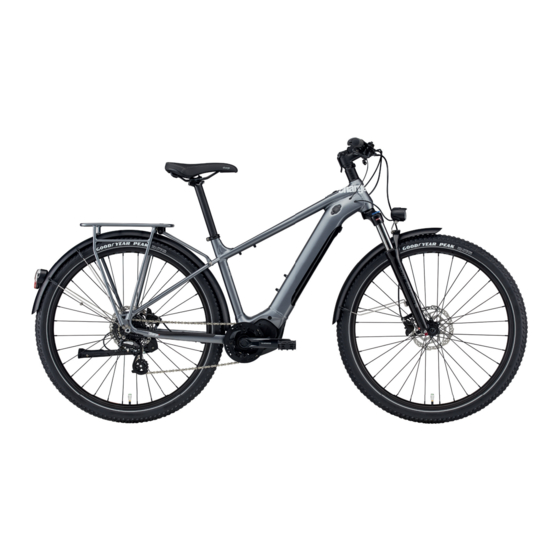
- Page 6 Key part s of the bike referenced in this guide Handlebars Rear Rack Seat Stem Front Light Seatpost Fender Stays Front Fork Fender Battery Pedal Kickstand Brake Disc Rotor Front Axle Pedal Assist Selectors Display Horn Gear Shift Power Button...
- Page 7 Please see the assembly video at help.chargebikes.com as well as ADJUSTMENT INSTRUCTIONS: Adjustable Stem Instructions, in your Charge Bicycle Owner’s Manual. 1. Locate the safety release button atop the handlebar stem. Using your thumb, slide the safety release button FORWARD.
- Page 8 Step 1: Continued 3. Standing alongside the bike, put one foot against the bike box tray to help keep the box (and bike fork) stationary as you turn the handlebars. 4. Rotate the handlebar 90 degrees clockwise until the handlebars are perpendicular to the bike frame.
-
Page 9: Step 2: Install The Front Wheel
Step 2: Install the front wheel This step is particularly important to your safety. Please see the assembly video at help.chargebikes.com as well as this Quick Start Guide. 1. Lay the cardboard block that says “Temporary Wheel Stand” flat on the ground with the printed side facing up. - Page 10 NOTE: Ooops, I squeezed the brakes before installing the wheel, now what? If you accidentally squeezed the brakes before installing the wheel, the brakes will lock up. To unlock the brakes see the “How to separate brake pads on XC” article at help.chargebikes.com.
- Page 11 8. Move the wheel and the wheel stand in front of the front bike. Check the disc brake rotor is on the same side as the kickstand. 9. Roll the bike over to the front wheel. 10. Lower the fork onto the front wheel until the axle is fully engaged in the fork end.
- Page 12 Step 2: Continued 12. Locate the metal axle rod you removed earlier. 13. While holding the bike upright with one hand, use your free hand to insert the metal rod through the axle from the side opposite the brake disc. 14.
- Page 13 15. Locate the Torque Wrench. 16. With one hand, hold the bike upright and centered (perpendicular to the floor). 17. With your free hand, insert the Torque Wrench into the axle (the side opposite from the brake disc) and turn clockwise until you hear and feel a click.
- Page 14 Step 3: Flip down the pedals 1. Flip each pedal down (or up) until it clicks. NOTE: You can always flip up the pedals by pulling on the lever with your fingers as you move the pedal to the upright position. CLICK! Pull lever to flip closed...
- Page 15 Step 4: Adjust the seat height 1. Using the torque wrench, loosen the seat post clamp bolt (turning counterclockwise) until the seat post can move. NOTE: You do not need to remove the bolt from the clamp. 2. Slide the seat to your desired position.
- Page 16 CLICK! The fi nishing touch Charge Bikes feature a valve cap sensor, so you always know when it’s time to add air. The sensors are included in your parts box. Simply screw the sensors onto the valve stems to quickly verify air pressure.
- Page 17 (marked with the [power symbol]) to power on the bike. The LCD display will come to life. • Verify battery charge – The Charge display will not only tell you how much battery power is left as a percentage, but will also estimate range in miles/km, so you can always be sure...
- Page 18 Shifting gears and controlling the pedal assist: • The XC comes equipped with 3 pedal assist levels, ECO, TRAIL and BOOST. Set the level of pedal assist with your thumb by using the ergonomic 2 button controller located near the left grip on your handlebars.
-
Page 19: Battery Range
Battery range Charge Bikes have a range of 30-50+ miles on a single charge. The actual range depends on a number of factors, including assist level (more assist uses more battery), terrain (hills uses more battery) and rider weight. •... -
Page 20: Charging The Battery
Charging port when on the bike 4. After charging, firmly close the charging port cap. NOTE: It is possible to charge your battery off the bike. However, to do so you will need to purchase the Shimano SM- BTE80 adaptor which is available in the Accessories section of chargebikes.com. -
Page 21: Removing The Battery
Removing the battery 1. Turn the power off by pressing the power button on the bike until the display goes blank. 2. Twist the latch on the battery cap, located under the tube with the battery port. 3. Remove the battery cap. 4. - Page 22 Eco-friendly packaging At Charge we care about the environment. It’s one of the reasons we’re in the bike business! Most bike boxes come loaded with protective foam and plastic ties. We’ve chosen to eliminate all the foam and just use cardboard and biodegradable film.
-
Page 23: Our Story
Our story For 15 years and counting, Charge Bikes has pursued a mission to make cycling accessible and enjoyable for riders of every age and experience level. We design and produce bicycles that are simple to understand, easy to own, and so much fun to ride. - Page 24 Register your bike Visit chargebikes.com to register your bike and activate your warranty. www.chargebikes.com...
Need help?
Do you have a question about the XC and is the answer not in the manual?
Questions and answers