Table of Contents
Advertisement
Quick Links
34in Striping Kit
Zero-Turn-Radius Riding Mower
Model No. 131-4167
This product contains a chemical or chemicals known to the State of California to
Installation
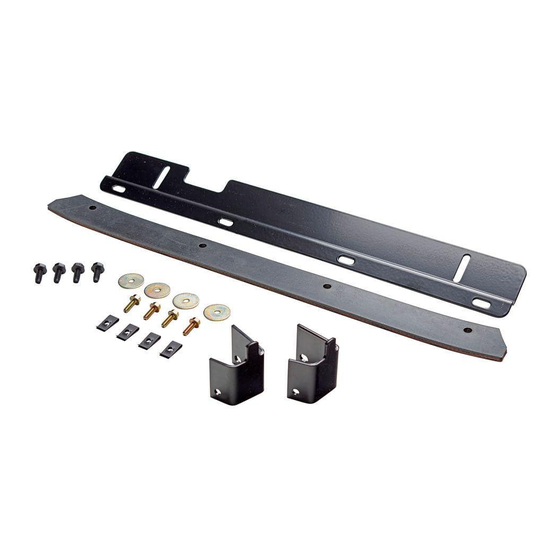
Loose Parts
Use the chart below to verify that all parts have been shipped.
Description
Washer-head screw (5/16 x 3/4 inch,
self-threading)
Mounting bracket
Striping bracket
Hex-head screw (5/16 x 3/4 inch)
Washer
Clip nut
Wiper
Removing the Mower Deck
1. Park the machine on a level surface and disengage the
blade-control switch.
2. Engage the parking brake, stop the engine, remove the
key, and wait for all moving parts to stop before leaving
the operating position.
3. Remove the mower deck from the machine. Refer
to the Removing the Mower section in the Operator's
Manual or the appropriate section of the Service Manual.
WARNING
The belt tension spring is under tension when
installed and can cause personal injury.
Be careful when removing the mower belt and
deck.
4. Slide the mower deck out from underneath the
machine.
5. Clean the back of the mower deck.
Original Instructions (EN)
WARNING
CALIFORNIA
Proposition 65 Warning
cause cancer, birth defects, or reproductive harm.
Qty.
4
2
1
4
4
4
1
Install the striping kit bracket assembly.
Installing the striping kit wiper.
Printed in the USA
All Rights Reserved
Form No. 3392-387 Rev B
Installation Instructions
Use
*3392-387* B
Advertisement
Table of Contents

Related Manuals for Toro 131-4167


Summary of Contents for Toro 131-4167
- Page 1 Form No. 3392-387 Rev B 34in Striping Kit Zero-Turn-Radius Riding Mower Model No. 131-4167 Installation Instructions WARNING CALIFORNIA Proposition 65 Warning This product contains a chemical or chemicals known to the State of California to cause cancer, birth defects, or reproductive harm.
-
Page 2: Installing The Mounting Brackets
Installing the Striping Kit Note: Align the left edge of the mounting bracket with the left edge of skid and the top edge of the mounting Brackets bracket with the top edge of the skid. 3. Mark the outline of the mounting bracket hole onto Installing the Mounting Brackets the skid (Figure... -
Page 3: Installing The Mower
Installing the Wiper Installing the Mower Note: Squealing when the belt is rotating, blades slipping Installing the Wiper when cutting grass, frayed belt edges, burn marks, and cracks are signs of a worn mower belt. Replace the mower belt if any 1. -
Page 4: Operation
Operation Adjusting the Height Important: Applying excessive downward pressure with the striping bar may damage turf and the striping kit. To avoid damage to landscaping and the striping bar, avoid close trimming with the striping kit installed. Replace the wiper yearly, or more often as wear requires. Avoid obstacles that can damage the kit. - Page 5 Training the Lawn for Striping Viewing Position • On a new property during weeks 1 and 2, you may need The grass that is bent toward you appears darker, and the to follow the exact same pattern and direction in the same grass that is bent away from you appears lighter.
- Page 6 Notes:...
- Page 7 Notes:...
- Page 8 Notes:...