Table of Contents
Advertisement
Advertisement
Table of Contents

Related Manuals for WARRIOR 45SPS12


Summary of Contents for WARRIOR 45SPS12
- Page 1 4500 ELECTRICAL WINCH 45SPS12, 45SPS24 45SPA12 Assembly & Operating Instructions...
-
Page 2: Table Of Contents
CONTENTS INTRODUCTION ..................1 GETTING TO KNOW YOUR WINCH ............2 SAFETY PRECAUTIONS .................3 GENERAL TIPS FOR SAFE OPERATION ..........5 WINCHING TECHNIQUES A-Z ..............6 WINCH ASSEMBLY AND MOUNTING ............8 MOUNTING DRAWING ................9 WINCH ACCESSORIES YOU WILL NEED ..........9 RIGGING TECHNIQUES ................ . 9 WINCH WORKING DEMONSTRATION .......... -
Page 3: Introduction
INTRODUCTION Congratulations on your purchase of a high quality winch. We design and build winches to strict specifications and with proper use and maintenance they should bring you years of satisfying service. WARNING - Read, study and follow all instructions before operating this device. -
Page 4: Getting To Know Your Winch
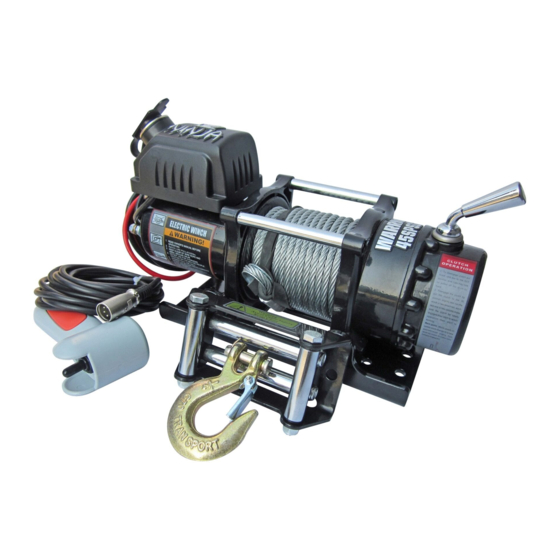
GETTING TO KNOW YOUR WINCH Your winch is a powerful piece of machinery. It is important that you understand the basics of its operation and specifications so that when you need to use it, you can use it with confidence and safety. Below is a list of components for your winch and their use. -
Page 5: Safety Precautions
11. Remote Switch: The Power switch leads have a dual switch for powering in or powering out your winch drum. The remote control allows you to stand clear of the wire rope when the winch is under load. 12. Universal Flat Bed Mounting Channel: Your winch could have been optionally supplied with a flat bed mounting channel that can be mounted to most flat surfaces such as trailers, step bumpers, truck beds, etc. - Page 6 WARNING – The wire rope may break before the motor stalls. For heavy loads at or near rated capacity, use a pulley block/snatch block to reduce the load on the wire rope. WARNING – Never step over a cable, or go near a cable under load. WARNING –...
-
Page 7: General Tips For Safe Operation
CAUTION – If the motor stalls do not maintain power to the winch. Electric winches are designed and made for intermittent use and should not be used in constant duty applications. CAUTION – Never disengage the clutch when there is a load on the winch. CAUTION –... -
Page 8: Winching Techniques A-Z
Any winch that appears to be damaged in any way, is found to be worn, or operates abnormally shall be removed from service. Only pull on parts of the vehicle as are specified by the vehicle manufacturer. Only attachments and/or adapters supplied by the manufacturer shall be used. -
Page 9: Winch Assembly And Mounting
p. The vehicle to be winched should be placed in neutral and the emergency brake released. Only release the brake pedal when under full tension. Avoid shock loads to the winch. This can damage the winch, rope and vehicle. q. The winch is meant for intermittent use. Under full load with a single line rig do not power in for more than a minute without letting the motor cool down for a few minutes and then resume the winching operation. -
Page 10: Mounting Drawing
(motor, drum and gear housing) are properly aligned. Proper alignment of the winch will allow even distribution of the full rated load. 2. Start by connecting the roller fairlead (Part# X450800) to the mounting channel using 2 each of the cap screw M8 X 20 (Part# X450025), flat washer (Part# X450002), lock washer (Part# X450003) and securing with Nut M8 (Part# X450024). -
Page 11: Winch Accessories You Will Need
C4500EWX Red Battery + Black Battery - (5.9') Switch WINCH ACCESSORIES YOU WILL NEED NOT INCLUDED WITH YOUR WINCH Gloves – For handling the wire rope and hook strap. Anchor Strap/Chain – Tree saver anchor straps are made of high quality nylon with high tensile strengths from 5,000lbs to 10,000lbs. -
Page 12: Winch Working Demonstration
CAUTION Do not winch from an acute angle as the wire rope will pile up on one side of the drum causing damage to wire rope and the winch. Fig 3.2 Fig 3.2 Short pulls from an angle can be used to straighten the vehicle. Long pulls should be done with the wire rope at a 90°... -
Page 13: Replacing The Wire Rope
7. When the pulling is complete, remove the switch assembly (Part# X450700). From the female connector of the directional valve and replace the female connectors cover. REPLACING THE WIRE ROPE If the wire rope has become worn or is beginning to show signs of strands breaking, it must be replaced before being used again. -
Page 14: Trouble Shooting
TROUBLE SHOOTING SYMPTOM POSSIBLE CAUSE SUGGESTED ACTION -Switch Assembly not -Insert switch assembly all the way into the connected properly connector. -Loose battery cable -Tighten nuts on all cable connections. connections Motor does not -Replace switch assembly. -Defective switch turn on -Check for voltage at armature port with Switch assembly pressed. -
Page 15: Assembly Drawing
WINCH ASSEMBLY DRAWING C4500EWX... - Page 16 WINCH PARTS LIST Part # Description Remark X450001 Terminal Protector X450100-U Motor Assembly Thick Flat Washer Φ8 X450002 Locking Washer Φ8 X450003 X450004 Cap Screw M8 x 25 X450005 Locknut M8 X450006 Cap Screw M6 x 20 X450007 Tie Bar X450200 Break/Shaft Assembly X450008...
-
Page 17: Specification
SPECIFICATION Rated line pull 4500 lbs (2041 kgs) 12V:Input: 2.4 kW/ 3.2hp; Output: 1.0 kW/ 1.3hp Motor: permanent magnet 24V:Input: 2.9 kW / 3.9hp; Output: 1.3kW / 1.7hp Gear reduction ratio 172:1 Cable (Dia.× L) Ø1/4"×47.6' (Ø 6.4mm×14.5m) Drum size (Dia.× L) Ø1.77"×3.7"... - Page 18 Winch solutions are the sole distributors of WARRIOR WINCHES. Winch solutions (“seller” or winch solutions) warrants to the original retail buyer only (“Buyer”) that any mechanical component of a genuine WARRIOR WINCH (“product”) is free of defects in material and workmanship for the lifetime of the winch.
- Page 19 Please ensure you record the information below: Distributor Date of Purchase Invoice No Serial No Please register your Winch at www.warriorwinch.co.uk , any product that is not registered will not be covered by the lifetime warranty. In the unlikely event you experience problems, contact the distributor with this information.
Need help?
Do you have a question about the 45SPS12 and is the answer not in the manual?
Questions and answers