Table of Contents
Advertisement
Advertisement
Table of Contents

Subscribe to Our Youtube Channel
Related Manuals for US Shift Quick 6 GEN2


Summary of Contents for US Shift Quick 6 GEN2
- Page 1 Installation and Operation Manual for the Ford 6R80 Transmission...
- Page 2 For more information, visit www.P65Warnings.ca.gov. APPLICATION COVERAGE This system works with all 6R80 automatic transmissions from model year 2011 and later. It is recommended that you use the US Shift wiring harness with this system.
-
Page 3: Table Of Contents
CONTENTS Connecting the Essentials Page 4 Setting up the Quick 6 Page 9 Notes on Installation Page 12 Transmission Diagrams Page 14 Optional Features Page 18 Manual Shift Connections Page 24 Built-In Display Page 30 Shiftware Page 35 Important Information Page 38 Troubleshooting Error Messages Page 40... -
Page 4: Connecting The Essentials
CONNECTING THE ESSENTIALS (ELECTRONIC FUEL INJECTION) Step 1: Ground Splice the ground wires (Pins 15 & 16 Black) from the Quick 6 into the main ECU (Engine Control Unit) ground wire. Do NOT connect the ground wires to sheet metal or other ground sources. - Page 5 CONNECTING THE ESSENTIALS (CARBURETED AND MECHANICALLY-INJECTED DIESEL) Step 1: Ground Connect the ground wire (Pin 15 Black) from the Quick 6 directly to the battery ground post or negative battery cable. Do NOT connect the ground wire to sheet metal or other ground sources.
- Page 7 Step 4: Transmission Connectors Connect the transmission connector to the transmission.
- Page 8 Step 5: Final Connections Engine RPM Signal Input Connect the yellow lead (pin 7) from the vehicle harness to your tachometer signal output. This is required for the learning procedure to work. The engine RPM input can be connected to a digital tachometer output from an engine computer or the tachometer output from an MSD ignition or similar CDI (Capacitive Discharge Ignition) system, but NEVER to the coil outputs of a CDI system like MSD.
-
Page 9: Setting Up The Quick 6
SETTING UP THE QUICK 6 Step 6: Calibration Verify that the correct calibration is loaded on the Quick 6. A standard calibration specific to your order is loaded before shipment. However, if the transmission configuration has changed since the order was placed, you'll need to connect the Quick 6 to a Windows PC and install the Shiftware Tuning Software, which can be... - Page 10 If needed, you can manually adjust TPS values by choosing “Adjust Idle” or “Adjust WOT” in the TPS setup menu. Once the TPS calibration procedure is completed, the values are permanently stored in the controller and will be active for every tune written. TPS values displayed within individual tunes are then irrelevant.
- Page 11 Step 8: Dynamic Shift Learning Procedure The next step is to carefully drive the vehicle, allowing the controller to learn shift patterns. Before beginning, make sure the conditions of the checklist below are met. o Check for Errors Check the controller display to see if there are any error messages shown.
-
Page 12: Notes On Installation
NOTES ON INSTALLATION If any error messages or unexpected characters are displayed, refer to the troubleshooting section at the end of this manual for detailed explanations. General Installation The Quick 6 unit should be mounted within the passenger compartment of the vehicle in a protected location. - Page 13 Adaptation for Factory-Equipped Transmissions It is possible to use the Quick 6 controller in a vehicle which was originally equipped with one of the intended transmissions. This could be done in conjunction with an engine management system upgrade that no longer supports the transmission.
-
Page 14: Transmission Diagrams
Fail-Safe Mode Fail-Safe mode is intended to prevent unsafe conditions that could be caused by the failure of a component or the controller, where the transmission could lock up or enter too low of a gear and cause engine damage or loss of vehicle control. -
Page 18: Optional Features
OPTIONAL FEATURES TRANSBRAKE (QUICK 6 PRO ONLY) In order to use the Transbrake feature, you will first need to connect a switch to pin 5 (purple) of the vehicle connector. Our Shiftware tuning software provides options for transbrake activation by grounding or supplying 12v when the switch is pressed. - Page 19 MULTI-TUNE This feature allows completely different calibrations to be used for the transmission at any time. The table selection switch can be a latching type switch (maintained toggle switch, latching push-button, etc.) or a momentary type switch (spring-loaded push-button switch, spring-loaded toggle switch, etc.) which applies ground to the table select input at Vehicle connector pin 5 when turned on.
- Page 20 4x4 Low Range Detection Low range detection can be enabled if you want the controller to switch to an alternate calibration table when 4x4 low range is engaged. Configure the options in Shiftware under the “2WD/4WD Options” and “Table Select” tabs in the settings window.
- Page 21 In some cases, such as driving the input of an engine control ECU, the 0-12 Volt square wave signal will not be able to properly drive the device that it is connected to. This is because some devices are only designed to accept an input signal from a variable reluctance (magnetic coil) sensor.
- Page 22 In some cases, a "pull-up" resistor to 5V or 12V may be needed to provide the proper input to the controlled device. Please contact US Shift tech support if you have any questions regarding the connection of this signal.
-
Page 24: Manual Shift Connections
MANUAL SHIFT CONNECTIONS Manutronic Overview If connected and enabled the ManuTronic feature will allow manual selection of all forward gears using paddles, buttons, or another type of switch. With ManuTronic engaged, a brief press of the UPSHIFT button will change to the next higher gear, while DOWNSHIFT will change to the next lower gear. - Page 25 Ford Cruise Buttons without Cruise Module For this configuration, you will need to connect the Dark Blue wire (Pin 14 on the Vehicle Connector) to the steering wheel buttons. (Follow the guidelines for soldering found in the “General Installation” section.) The Light Blue wire is not needed for this configuration.
- Page 26 Shift Buttons with Latching On / Off Switch For this configuration, you will need to connect the Dark Blue wire (Pin 14 on the Vehicle Connector) to your down-shift button (momentary) and connect the Light Blue wire (Pin 6 on the Vehicle Connector) to your up-shift button (momentary). To connect the on / off switch (latching), solder the switch's wire onto the Dark Blue down-shift wire with the included 680 Ohm resistor between them.
- Page 27 Shift Buttons with Momentary On / Off Switch For this configuration, you will need to connect the Dark Blue wire (Pin 14 on the Vehicle Connector) to your down-shift button (momentary) and connect the Light Blue wire (Pin 6 on the Vehicle Connector) to your up-shift button (momentary). To connect the on / off switch (momentary), solder one side of the switch onto the Dark Blue down-shift wire and the other side to the Light Blue up-shift wire.
- Page 28 Twist Machine Shrifter For this configuration, you will need to connect the Dark Blue wire (Pin 14 on the Vehicle Connector) to channel 2 of the receiver and connect the Light Blue wire (Pin 6 on the Vehicle Connector) to channel 1 of the receiver. You can use either a momentary push-button on / off switch or a latching toggle on / off switch.
- Page 29 Lokar Shifter For this configuration, you will need to connect the Dark Blue wire (Pin 14 on the Vehicle Connector) to the blue down-shift wire and connect the Light Blue wire (Pin 6 on the Vehicle Connector) to the blue up-shift wire. To connect the sport mode switch, solder the sport mode switch's red wire onto the Dark Blue down- shift wire with the included 680 Ohm resistor between them.
-
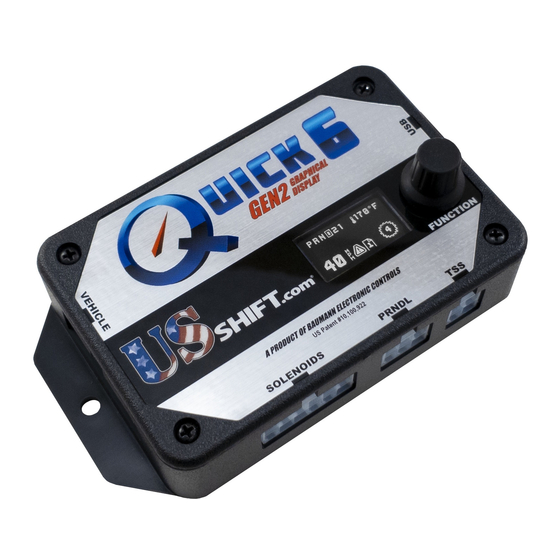
Page 30: Built-In Display
BUILT-IN DISPLAY The second generation built-in display of the Quick 6 is easier to use and more intuitive. It provides useful information, such as current speed, gear, transmission temperature, and TCC lock status, along with any fault messages. Using the menus, you’ll be able to access many of the same options found in Shiftware. - Page 31 Home Screen Normal Mode Home Screen Enlarged Mode...
- Page 32 MAIN MENU Home Screen = Chooses the home screen as your default view. Info Screen = Shows current sensor values, replacing the home screen as default view. Info includes TPS voltage and percentage, battery voltage, commanded pressure in PSI, and engine RPM.
- Page 33 SETUP MENU TPS Setup = Clicking this will take you to the TPS Setup menu, which shows the idle and WOT settings as well as the current voltage of the TPS. Clicking once will open the menu. Clicking AutoSet TPS will take you through the steps to calibrate your throttle position sensor settings.
- Page 34 DIAGNOSTICS Dyno Mode = Enable this mode if you are doing a dyno test. While enabled, you can use the knob to shift gears. Push the knob to access options, such as enabling torque converter clutch (TCC) activation above 1800 RPM, disabling the TCC, and exiting dyno mode.
-
Page 35: Shiftware
SHIFTWARE Introduction In most cases, the Quick 6’s built-in tuning menu will allow users to make all the modifications they’ll need without connecting to a PC. However, using the Shiftware software allows you to modify the way your Quick 6 Transmission Control System behaves in greater detail. - Page 36 Customize The main window is where all of the shift points and line pressure editing is done. The graph displays the up-shift and down-shift speeds in relation to throttle position for each shift. It also displays the line pressure & firmness curve in relation to throttle position.
- Page 37 If Select Pairs Together is enabled, then the corresponding down-shift point will be automatically selected along with the up-shift point. This can be turned off by clicking the checkbox on the right. You can select multiple points by holding CTRL while clicking the points or a range of points by holding SHIFT and clicking the two points on each end.
-
Page 38: Important Information
Save & Load Once you have created your calibration, you can save the file to your hard drive or an external storage device. To save, click the Save button on the toolbar. Then, browse to the location where you want it saved and click Save. Use “Save As”... - Page 39 Pay close attention to the interaction between different shifts. Overlapping the 1-2 and 2-3 shifts can cause skipped gears and other drivability problems. Also note that torque converter slip at low speeds renders engine RPM values meaningless. It is usually desirable to have light-throttle shift points within a low RPM range.
-
Page 40: Troubleshooting Error Messages
TROUBLESHOOTING ERROR MESSAGES WARNING! If the transmission does not begin to operate correctly within the first few feet of the road test, STOP immediately, check the troubleshooting guide, and call Baumann Electronic Controls if you need assistance. In some cases, just a few blocks of operation with low fluid pressure can destroy a transmission. - Page 41 Shift Solenoid X undercurrent error (Can be A-E) Current measured on the indicated shift solenoid was too low, indicating that the solenoid circuit may be open. TCC Solenoid undercurrent error Current measured on the torque converter clutch solenoid was too low, indicating that the solenoid circuit may be open.
- Page 42 EPC (PCS) Solenoid circuit open Line Pressure Control Solenoid resistance measured too high during the power- on solenoid check. Refer to the data display screen in the diagnostic menu to see the measured solenoid resistance. TPS Voltage Low; run TPS Setup The Throttle Position Sensor is in fault mode due to the voltage being below the idle threshold value that was set.
- Page 43 Checksum error in table (Can be table 1-4) A Checksum error has been found in the table corresponding to the number shown. On Quick 6, this error will force a hard failsafe mode until it is fixed. It will also disable the tuning menu for the bad table. Connect the controller to a PC and load a calibration using Shiftware.
-
Page 44: Contact
High-Side Driver Shorted The high-side output driver appeared to be shorted on during power-on solenoid check. Fail-safe mode engaged. Contact Baumann Electronic Controls technical support for assistance. Low-Side Driver Shorted A low-side output driver appeared to be shorted on during power-on solenoid check.
Need help?
Do you have a question about the Quick 6 GEN2 and is the answer not in the manual?
Questions and answers