
Related Manuals for PRESONUS Studio 26c


Summary of Contents for PRESONUS Studio 26c
- Page 1 Studio 26c and Studio 68c 24-Bit, 192 kHz USB-C Audio Interfaces Owner’s Manual ® English www.presonus.com...
-
Page 2: Table Of Contents
What is in the Box — 3 Hookup — 4 Front-Panel Connections — 4 Back Panel Connections — 6 Connection Diagrams — 8 Studio 26c — 8 2.3.1 2.3.2 Studio 68c — 9 Connecting to a Computer — 10 Installation for Windows — 10 Universal Control (Windows) —... -
Page 3: Overview
Many of the features and functions of the both Studio-series interface models are the same. When differences occur, the Studio 26c will be listed first, followed by the Studio 68c. Throughout this manual you will find Power User Tips that can... - Page 4 Companion PreSonus Products Companion PreSonus Products Thanks for choosing PreSonus! As a solutions company, we believe the best way to take care of our customers (that’s you) is to ensure that you have the best possible experience from the beginning of your signal chain to the end. To achieve this goal, we’ve prioritized seamless integration throughout every design phase of these...
-
Page 5: What Is In The Box
Manual de usuario para obtener más instrucciones. Louisiana 70809 USA• 1-225-216-7887 PreSonus Audio Electronics, Inc.. Studio One is a registered trademark of PreSonus Software, Ltd. Mac and Mac OS are registered trademarks of www.presonus.com Apple, Inc., in the U.S. and other countries. Windows is a registered trademark of Microsoft, Inc., in the U.S. and other countries. Other product names mentioned herein may be trademarks of their respective companies. -
Page 6: Hookup
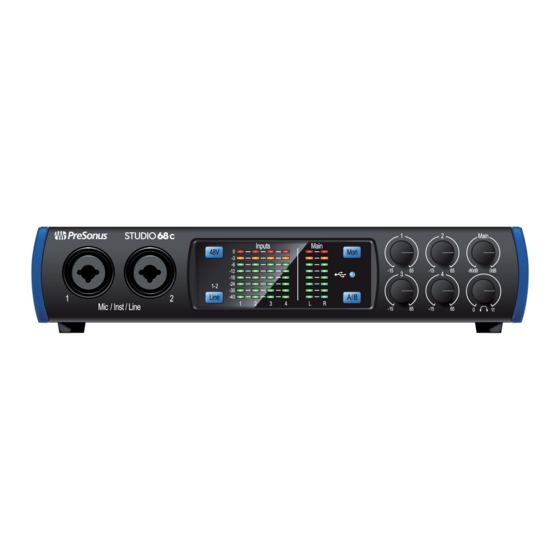
Microphone Inputs. Your Studio-series interface is equipped with high- quality microphone preamplifiers for use with all types of microphones. The Studio 26c features XMAX-L solid-state microphone preamps that are optimized for bus powering. The Studio 68c features XMAX microphone preamps with a Class A input buffer, followed by a dual-servo gain stage. - Page 7 Studio 26c and Studio 68c Hookup Owner’s Manual Front-Panel Connections 48 Volt Phantom Power. Studio-series interfaces provide 48V phantom power for the microphone inputs. Pressing the 48V button switches phantom power on and off for all microphone inputs; the button will illuminate in blue when phantom power is available on the microphone preamplifiers.
-
Page 8: Back Panel Connections
Studio 26c and Studio 68c Hookup Owner’s Manual Back Panel Connections Back Panel Connections Headphone Output. The rear-panel headphone output can be switched between playback streams 1/2 and 3/4, the same streams as the Main left/right outputs and Outputs 3/4. These streams are switched via the Cue A/B button. - Page 9 Power Switch (Studio 68c). This is the power switch for your Studio 68c. USB-C Port. Use this port to connect your Studio 26c or 68c to your computer. While the Studio 26c and 68c connect using USB-C, both are fully compatible with USB 2.0 and 3.0 connections.
-
Page 10: Studio 26C
Studio 26c and Studio 68c Hookup Owner’s Manual Connection Diagrams Connection Diagrams 2.3.1 Studio 26c See Studio 26 box for computer requirements Vea los requerimientos de hardware en la caja de Studio 26 Systemvoraussetzungen siehe Studio 26 Packungsaufdruck Voir la boîte de la Studio 26... -
Page 11: Connection Diagrams
Studio 26c and Studio 68c Hookup Owner’s Manual Connection Diagrams 2.3.2 Studio 68c See Studio 68 box for computer requirements Vea los requerimientos de hardware en la caja de Studio 68 Systemvoraussetzungen siehe Studio 68 Packungsaufdruck Voir la boîte de la Studio 68... -
Page 12: Connecting To A Computer
The Windows ASIO driver and Universal Control installer for macOS and Windows are available for download from your My PreSonus user account. To begin, you must first visit http://my.presonus.com, create or log into your user account, and register your Studio-series interface. Once registered, all software downloads will be available from within your My PreSonus user account, including Studio One Artist and the Studio Magic bundle. - Page 13 • Close All Devices. Closes all open control windows. • Sign Out. Signs out of your My PreSonus user account. • Check for Updates... Connects to your My PreSonus user account to check for updates for Universal Control.
-
Page 14: Loopback Recording (Windows Only)
Studio 26c and Studio 68c Connecting to a Computer Owner’s Manual Installation for Windows 3.1.2 Loopback Recording (Windows only) The windows drivers for the Studio-series interfaces provide two virtual streams that allow you to record the output of on audio application in another application. -
Page 15: Installation For Macos
Studio 26c and Studio 68c Connecting to a Computer Owner’s Manual Installation for macOS Installation for macOS Your Studio-series interface is a class-compliant Core Audio device in macOS. No driver installation is necessary for any Studio-series device. Power User Tip: When installation is complete, you will find the Universal Control application in your Applications folder. - Page 16 Studio 26c and Studio 68c Connecting to a Computer Owner’s Manual Using the Studio-series interfaces with Popular Audio Applications 6. You will be asked if you’d like to relaunch Logic. Click “try (re)launch. ” 7. Your Studio-series interface features custom I/O labels for faster work flow.
-
Page 17: Studio One Artist Quick Start
Power User Tip: As a valued PreSonus customer, you are eligible for a discount upgrade to Studio One Professional. For more details on the Studio One upgrade program for PreSonus customers, please visit https://shop.presonus.com/products/software/studio-... -
Page 18: Setting Up Studio One
“Install. ” The content will automatically begin to download and install from your My PreSonus user account. Power User Tip: You may be prompted to enter your My PreSonus user account information. Clicking “Remember Credentials” will allow you to have immediate access to any content you purchase from the PreSonus Marketplace. -
Page 19: Configuring Audio Devices
In the middle of the Start page, you will see the Setup area. Studio One Artist automatically scans your system for all available drivers and selects a driver. By default, it will choose a PreSonus driver if one is available. If you do not see your device listed on the Start page when you launch Studio One, click on the Configure Audio Devices link in the Setup area to open the Options window. - Page 20 Make sure you have connected the MIDI Out of your external MIDI controller to a MIDI In on your PreSonus audio interface (if available) or other MIDI interface. If you are using a USB MIDI controller, connect it to your computer and power it on.
- Page 21 Studio 26c and Studio 68c Studio One Artist Quick Start Owner’s Manual Setting Up Studio One 3. From the menu on the left, select your MIDI controller from the list of manufacturers and models. If you do not see your MIDI controller listed, select New Keyboard.
- Page 22 Studio 26c and Studio 68c Studio One Artist Quick Start Owner’s Manual Setting Up Studio One 1. In the External Devices window, click the Add button. 2. Select your device in the menu on the left. If your device is not listed, select New Instrument.
-
Page 23: Creating A New Song
Studio 26c and Studio 68c Studio One Artist Quick Start Owner’s Manual Creating a New Song Creating a New Song Now that you’ve configured your audio and MIDI devices, let’s create a new Song. We’ll start by setting up your default audio I/O. -
Page 24: Configuring Your I/O
I/O. 2. Click on the Audio I/O Setup tab. 3. From the Inputs tab, you can enable any or all of the inputs on your PreSonus Studio-series audio interface that you’d like to have available. We recommend that you create a mono input for each of the inputs on your interface. -
Page 25: Creating Audio And Instrument Tracks
Studio 26c and Studio 68c Studio One Artist Quick Start Owner’s Manual Creating a New Song 4. Click on the Outputs tabs to enable any or all of the outputs on your Studio-series audio interface. In the lower right corner, you will see the Audition Select menu. -
Page 26: Recording An Audio Track
Studio 26c and Studio 68c Studio One Artist Quick Start Owner’s Manual Creating a New Song • Audio. Use this track type to record and playback audio files. • Instrument. Use this track to record and playback MIDI data to control external MIDI devices or virtual instrument plug-ins. -
Page 27: Adding Virtual Instruments And Effects
Studio 26c and Studio 68c Studio One Artist Quick Start Owner’s Manual Creating a New Song 4.3.4 Adding Virtual Instruments and Effects You can add plug-ins and instruments to your Song by dragging-and-dropping them from the browser. You can also drag an effect or group of effects from one channel to another, drag in customized effects chains, and instantly load your favorite virtual-instrument preset without ever scrolling through a menu. - Page 28 Studio 26c and Studio 68c Studio One Artist Quick Start Owner’s Manual Creating a New Song Drag-and-Drop Audio and MIDI Files Audio and MIDI files can be quickly located, auditioned, and imported into your Song by dragging them from the file browser into the Arrange view.
- Page 29 Studio 26c and Studio 68c Technical Information Owner’s Manual Specifications Technical Information Specifications Studio 26 Studio 68 General Sample Rates 44.1, 48, 88.2, 96, 176.4, or 192 kHz 44.1, 48, 88.2, 96, 176.4, or 192 kHz Converter Resolution 24 bit...
- Page 30 Studio 26c and Studio 68c Technical Information Owner’s Manual Specifications Studio 26 Studio 68 Line Outputs (3/4) Maximum Level +10 dBu (balanced) +18 dBu (balanced) Frequency Response 20Hz - 20kHz (+/- 0.1dB, unity gain, 48kHz) 20Hz - 20kHz (+/- 0.2dB, unity gain, 48kHz)
- Page 31 PreSonus-branded products under normal use. This Limited Warranty applies only to hardware products manufactured by or for PreSonus that can be identified by the PreSonus trademark, trade name, or logo affixed to them. Exclusions and Limitations: This warranty does not cover the following: 1.
- Page 32 PreSonus will repair or replace, at our sole and absolute option, products covered by this warranty at no charge for labor or materials. If the product must be shipped to PreSonus for warranty service, the customer must pay the initial shipping charges. PreSonus will pay the return shipping charges.
- Page 33 Warranty Information How to Get Warranty Service (outside of USA): 1. You must have an active user account with PreSonus and your hardware must be on file with your account. If you do not have an account, please go to: http:// www.presonus.com/registration...
- Page 34 © 2019 PreSonus Audio Electronics, Inc. All Rights Reserved. AudioBox, Nimbit, PreSonus, QMix, StudioLive, and XMAX are trademarks or registered trademarks of PreSonus Audio Electronics, Inc. Capture and Studio One are trademarks or registered trademarks of PreSonus Software Ltd. Mac and Mac OS are registered trademarks of Apple, Inc., in the U.S. and other countries.
- Page 35 Studio 26c and Studio 68c 24-Bit, 192 kHz USB-C Audio Interfaces Owner’s Manual 18011 Grand Bay Ct. • Baton Rouge, ® Louisiana 70809 USA• 1-225-216-7887 Part# 70-12000125-A www.presonus.com...
Need help?
Do you have a question about the Studio 26c and is the answer not in the manual?
Questions and answers