Table of Contents
Advertisement
Quick Links
Advertisement
Table of Contents

Related Manuals for Zte MF633


Summary of Contents for Zte MF633
- Page 1 ZTE USB Modem User Manual...
-
Page 2: Table Of Contents
Contents 1 Modem Introduction ............ 4 1.1 Introduction ............4 1.2 Warning and Notice ..........4 1.3 Declaration ............5 1.4 Applicability Scope ..........8 1.5 System requirements ........... 8 1.6 Functions .............. 8 1.7 Specification ............8 2 Installation ..............10 2.1 Outline and Parts .......... - Page 3 3.5 Settings .............. 35 3.5.1 Connection Settings ..........36 3.5.2 Security Settings............ 38 3.5.3 Network Settings ........... 39 3.5.4 Message Settings ........... 41 3.5.5 Alert settings ............43 3.6 MicroSD card ............43 3.7 Help ..............44 4 FAQ & Answers ............45...
-
Page 4: Modem Introduction
The ZTE MF633 USB modem is a multi-mode 3G USB modem, working in HSPA/UMTS/EDGE/GPRS/GSM networks. With USB interface connecting to a laptop or a desktop PC, it... -
Page 5: Declaration
1.3 Declaration Radio Frequency (RF) Energy This model MF633 meets the government’s requirements for exposure to radio waves. This device is designed and manufactured not to exceed the emission limits for exposure to radio frequency (RF) energy set by the Federal Communications Commission of the U.S. - Page 6 The FCC has granted an Equipment Authorization for this model MF633 with all reported SAR levels evaluated as in compliance with the FCC RF exposure guidelines. SAR information on this model is on file with the FCC and can be found under the Display Grant section of http://www.fcc.gov/oet/fccid after searching on...
- Page 7 FCC Compliance This device complies with part 15 of the FCC Rules. Operation is subject to the following two conditions: (1) This device may not cause harmful interference, and (2) this device must accept any interference received, including interference that may cause undesired operation.
-
Page 8: Applicability Scope
1.4 Applicability Scope ZTE USB Modem supports the present mainstream types of laptops and desktop PCs, such as HP, IBM, Toshiba, Lenovo, Dell, Sony, etc. 1.5 System requirements Operating System:Windows 2000 / XP / Vista... - Page 9 SMS service, Data service, Applications Functions management, Data concurrent, support MicroSD card, etc. Network Standards HSPA/UMTS/EDGE/GPRS/GSM HSUPA 2.0Mbps UL Transmission speed (Max) HSDPA 7.2Mbps DL Storage: -20°C ~ +60°C Temperature Operation: -10°C ~ +55°C Dimension 85 mm×25 mm×9.6 mm Weight About 30g T-Flash capability Support up to 4GB MicroSD card...
-
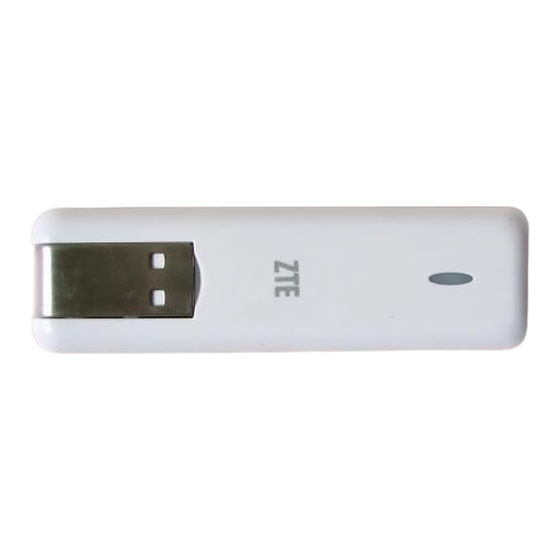
Page 10: Installation
2 Installation 2.1 Outline and Parts The following figure shows the appearance of the MF633. It is only for your reference. The actual product may be different. 1. USB Connector 2. Indicator 3. Back Cover 4. MicroSD card slot 5. SIM/USIM card slot 2.2 Hardware Installation... - Page 11 2. Insert the SIM/USIM card into the SIM/USIM card slot Insert the SIM/USIM card with the metal contact area facing downwards into the slot, shown as the following picture. 3. Insert the MicroSD card into the MicroSD card slot Note: Only MicroSD card is supported by the modem and do not use other memory card in the modem.
-
Page 12: Software Installation
5. Connect the Modem to your laptop or desktop PC Rotate the USB connector and plug the USB connector into your computer’s USB port. Make sure that it is tightly inserted. The OS automatically detects and recognizes new hardware and starts the installation wizard. 2.3 Software Installation The system will automatically detect and recognize the new hardware and display the new icon in the desktop status bar,... - Page 13 Recommend you to exit other programs, and then click “Next”. Read the agreement carefully. If you agree, choose “I accept the terms of the license agreement”, and then click “Next”.
- Page 14 Select the folder that you want to install the software by pressing “Change”, and then click “Next”. The system show the installation progress, wait a minute and the following screen will show up:...
-
Page 15: Run The Application Software
Click “Finish” to complete the installation. Note:If you have problems with installation after the upper operation, please contact the service provider. After the installation, select the “Start → Programs” and there will be a “MODEM Mobile Connection” program group,which includes “MODEM Mobile Connection” and “Uninstall”. There will be a Shortcut icon like below on the desktop. -
Page 16: Hardware Uninstall
Or double click the shortcut icon, to run the application software. After modem initialized, main interface appears. When the standby icon appears in the taskbar, the modem can work properly. 2.5 Hardware Uninstall Close the software application then remove the hardware following the procedure below. -
Page 17: Software Uninstall
2.6 Software Uninstall Close the application program before the software uninstalls. Click “Start→ Programs → MODEM Mobile Connection → Uninstall” menu on the laptop or desktop PC. Click “Yes” according to the indication, then the system begins to uninstall programs. - Page 18 Click “Finish” to complete the application software uninstall.
-
Page 19: Functions & Operation
3 Functions & Operation 3.1 Interface introduction 3.1.1 Main Interface The starting screen of the USB Modem software is shown as the following: The whole interface is divided into three parts. Related functions can be executed by operation in the related areas. 1. - Page 20 Internet: Connect to the Internet. Short Message (SMS): Send SMS or read SMS. PhoneBook: Save and view the different information of the contacts. Settings: Set normal relative information for the modem. Help: Show the help information. 2. System information area: Show the system status and different kinds of tips.
- Page 21 Icon Explanations The icon indicates insert status of the modem. Green means it has been inserted into the computer. The icon indicates insert status of the modem. Red means it has not been inserted into the computer. The icon indicates insert status of the modem.
-
Page 22: Description Of Mini Icons
3.1.2 Description of Mini Icons When click the mini button, the software will minimize as an icon on the system taskbar. If connected to the Internet, the minimized software won’t influence the download of data or receiving SMS. When the application window is minimized, the system icons will display on the taskbar. -
Page 23: Connecting Internet
Device Offline/ Device Online: Pause/reusing the working of the modem. If connected Internet, you need disconnect the Internet first, and then select the Device Offline. Factory Settings: Restore all the settings to the original values in the USB modem. This operation just affects the settings in the USB modem and do not change any software settings in the laptop or desktop PC. - Page 24 When connected, there is a status bar in the bottom of the user area which shows “State: connected to …”, and the user area will show data amount, connected time and so on. Then you can access Internet and receive email etc through network.
- Page 25 You can click “Disconnect” to stop the connection when the “Connect” 'button becomes “Disconnect” button, 2. Internet connection records: Click “Internet connection records” to check the log of Internet connection history.
-
Page 26: Sms
3.3 SMS Note: To ensure that the Short Message can be used properly, at first, you should setup the correct Short Message center number. Refer to section “3.5.4 Message Settings”. Click the “Short Message” icon to switch to the SMS interface and it will show the number of messages in the inbox, outbox and draftbox. - Page 27 Inbox: Save the received messages. Outbox: Save the successfully sent messages. Draftbox: Save the editing SMS which haven’t been sent. The drafts can only be saved in computer, not USIM/SIM. New Message: Write a new message. For example: “Message in Inbox PC : 1 Item(s) (U)SIM Card: 4 Item(s)”...
-
Page 28: Read Short Message
3.3.1 Read Short Message Click the “Inbox” button on the main interface or click new message icon on the system taskbar to read the SMS saved in the box. You can use the buttons under the menu to execute reading, forwarding, deleting, saving contact functions and so on. - Page 29 The recipient’s number can be input directly or by entering the phonebook to select one/more/group records. The recipient’s amount can be one or more. Please use “;” to separate recipients. The SMS content can include 160 individual English characters (including English symbols). There will show total characters on the interface.
-
Page 30: Operating Guide
Click Yes, and then the edited short messages will be sent. After sent successfully, the SMS will be saved into outbox automatically. If send fails, it will be saved to the draft box automatically. Send SMS while browse the web: When surfing the Internet, if your network supports, you can send short messages at the same time. - Page 31 Read: Read all the information of short messages. (The content of short messages, sender’s phone number, delivered date and time) Reply: Reply short messages to the sender (Can not be executed in OutBox / DraftBox). Forward: Send the short message to other recipients (Can not be executed in DraftBox)..
-
Page 32: Phonebook
New message can not be received when the USIM/SIM card is full of short messages (Different USIM/SIM cards have different capacities). While new message can not be saved, the system will indicate the inbox is full and prompt user to clear the inbox at USIM/SIM card side. -
Page 33: Creating A New Contact
3.4.1 Creating a new contact 1) Click New → New Contact. 2) Select Save position to decide where you want to save your contact, PC or (U)SIM card. 3) Input the name, phone number, Email address, etc. Then click OK. -
Page 34: Modifying Contacts
3.4.2 Modifying contacts 1) Select a contact and then double-click it or click “Edit”. 2) After the modification, click “OK”. 3.4.3 Deleting contacts 1) Select one or more contacts and then click “Delete”. 2) At the prompt, click “Yes”. -
Page 35: Sending Sms To A Contact
3.4.4 Sending SMS to a contact 1) Select one or more contacts and then click “SMS”. 2) You will access in the writing SMS window automatically, the selected contact mobile phone numbers will be listed in the receiver column. 3) Enter the contents of the message and then click “Send”. 4) At the prompt, click “Yes”... -
Page 36: Connection Settings
3.5.1 Connection Settings To ensure that the modem can connect the Internet properly, you should configure the connection information first. 1. Button description Add: Add new configuration file. Delete: Delete the selected configuration file. Edit: Edit the selected configuration file. Set default: Select one configuration file from the list, and set it as the current using files. - Page 37 2. Config File Click “Add” to add new connection information to the system. The “Config File” interface will appear: The configuration information includes: Config Filename, Dial Number, User name, Password, APN, DNS, and PDP address. If network supports “Obtain server address automatically”, the modem can obtain the assigned IP information automatically.
-
Page 38: Security Settings
3.5.2 Security Settings 1. Enable the PIN Code When “PIN enable” item is selected, please enter PIN code to use the modem and you can click “Change PIN” to modify the number. 2. Backup Phonebook, Internet connection records and SMS of PC Click “Backup”... -
Page 39: Network Settings
3.5.3 Network Settings 1. Select Network Automatic: The system selects the network automatically by the user’s selected rules and the network status. Manual: The network is selected by users themselves. 2. Network Mode Select Automatic: The system will search valid network automatically. UMTS Only: The system will only search UMTS network. - Page 40 3. Manual Select When the “Manual” is selected, click the “Apply” button, pop-up the following window: Wait a minute, the supplier list will show in the window and the suppliers with the blue or green icon can be selected. Select a proper network to connect.
-
Page 41: Message Settings
Select the network that the supplier is utilized to serve your USIM/SIM and press “Select” to attach the network. 3.5.4 Message Settings... - Page 42 Message Center: Set the corresponding SMS center number. You must input the correct SMS center number to use the SMS properly and the number will be provided by the network supplier. Please enter the country code before the number. Validity period: Set the time limit for saving SMS in the network side.
-
Page 43: Alert Settings
3.5.5 Alert settings You can set “Connect alert, Disconnect alert and Incoming SMS alert” by yourself. These alerts will sound on the PC side. The audio file supports MP3、WAV、WMA and MIDI format. If you select “Mute”, you cannot hear corresponding alert. 3.6 MicroSD card If you use MicroSD card in your modem, your computer will display a removable disk related to the MicroSD card. -
Page 44: Help
removable disk first. For more details, please refer to section “Hardware Uninstall”. 3.7 Help Click “Help” icon, and switch to the help interface. Under the help topic, you can get the USB Modem information about function introductions, installation and usage guide, etc... -
Page 45: Faq & Answers
C:\Program Files\ MODEM Mobile Connection\drivers The ZTE The configurations Run the installation application have some errors. again. Select software can not Modify or Repair to run normally... - Page 46 Problem Possible Causes Problem Solving Description After the modem The system Please open the is plugged in, the configuration is not modem program modem program proper. manually. You can doesn’t run find it in the Start→ automatically. Program menu or the shortcut on the desktop.
- Page 47 Problem Possible Causes Problem Solving Description 3. The USIM/SIM 3. Insert the card isn’t inserted USIM/SIM card well, such as correctly again. inserted in reverse. Message sent 1. The SMS center 1. Consult your failed. number isn’t service provider for correct.
- Page 48 Problem Possible Causes Problem Solving Description 4. The modem data 4. It is perhaps the is error. GPRS or UMTS network problem and please contact with the local supplier in time. 5. The network type 5. Select the correct selected by manual network according is wrong.
- Page 49 Problem Possible Causes Problem Solving Description 3. The operating 3. Use the system is infected professional by virus (Such as anti-virus software Worm Blaster to check and kill the which can take up a virus in the quantity of upload operating system data flow and result completely.
- Page 50 Problem Possible Causes Problem Solving Description My MicroSD card Check the MicroSD Use another can not read or card capacity, the MicroSD card with not found maximum a maximum supported capacity capacity of 4GB is 4GB...
Need help?
Do you have a question about the MF633 and is the answer not in the manual?
Questions and answers