
Summary of Contents for Hamlet Wireless Access Point 150
- Page 1 Wireless Access Point 150 802.11n Wireless with 4 Port 10/100 Switch User Manual HNW150AP www.hamletcom.com...
-
Page 2: Table Of Contents
Wireless Access Point HNW150AP INDEX 1. Introduction ..................6 1.1 System Requirements........................6 1.2 Package Contents ..........................6 2. Specification ..................7 2.1 LED Meaning ............................. 7 2.2 Connectors............................8 3. Installation & Setup ................9 3.1 Connection of Access Point......................9 4. - Page 3 Wireless Access Point HNW150AP 13.2 Port filtering for UDP port 53 ...................... 122 14. IP Filtering ..................123 14.1 IP filtering for TCP with specified IP................... 124 14.2 IP filtering for UDP with specified IP ..................125 14.3 IP filtering for both TCP and UDP with specified IP..............126 15.
- Page 4 Wireless Access Point HNW150AP D Troubleshooting................164 Troubleshooting Suggestions ......................164 Diagnosing Problem using IP Utilities ....................165 E Glossary ..................167 User Manual...
- Page 5 The material in this document is for information only and subject to change without notice. While reasonable efforts have been made in the preparation of this document to assure its accuracy, Hamlet assumes no liability resulting from errors or omissions in this document, or from the use of the information contained herein.
-
Page 6: Introduction
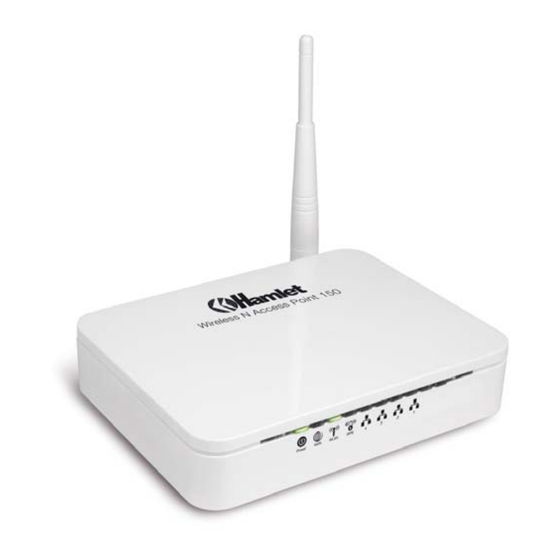
HNW150AP 1. Introduction The Hamlet HNW150AP is a 150Mbit Wireless Access Point based on IEEE 802.11n Wi-Fi standard with a built in 4-port fast Ethernet Switch. It offers the easiest way to share and extend your high-speed DSL/Cable Modem Internet connection, either with or without wires. Network Address Translation (NAT) and VPN pass-through provide your network protection from hackers, while WEP and WPA encryption guard your wireless network for maximum privacy. -
Page 7: Specification
Wireless Access Point HNW150AP 2. Specification 2.1 LED Meaning The Access Point has indicator lights on the front side. Please see below for an explanation of the function of each indicator light. Power indicator WPS Active indicator WAN Active indicator Ethernet Active indicator Wireless Active indicator Table 1. -
Page 8: Connectors
Wireless Access Point HNW150AP 2.2 Connectors The below table shows the function of each connector and switch of the device. CONNECTOR DESCRIPTION ANTENNA ANTENNA ON/OFF Power on/off the device SWITCH POWER Connects to the supplied power cable LAN 4/3/2/1 Connects the device via Ethernet to up to four PCs on your LAN Connects the device via Ethernet to xDSL / Cable Modem WLAN Press this button for at least two full second to turn off/on wireless signals... -
Page 9: Installation & Setup
Wireless Access Point HNW150AP 3. Installation & Setup Follow each step carefully and only go to the next step once you have completed the previous one. Note: Be sure that you are well insulated from any power source to avoid electricity shock. Note: Use only the manufacturer-approved power supply that shipped with the Access point. -
Page 10: Configuration Procedures
Wireless Access Point HNW150AP 4. Configuration Procedures Before starting the Access Point configuration, please kindly configure the PC computer as below, to have automatic IP address / DNS Server. 4.1 Windows 98SE/ME/2000/XP 1. Click on “Start” > “Control Panel” (in Classic View). In the Control Panel; double click on “Network Connections”... - Page 11 Wireless Access Point HNW150AP 3. Double click on “Internet Protocol (TCP/IP)”. 4. Check “Obtain an IP address automatically” and “Obtain DNS server address automatically” then click on “OK” to continue. 5. Click “Show icon in notification area when connected” (see screen image in 3. above) then click on “OK”...
-
Page 12: Windows Vista 32/64
Wireless Access Point HNW150AP 4.2 Windows Vista 32/64 1. Click on “Start” > “Control Panel” > “Network and Sharing Center”. 2. In the Manage network connections, click on “Manage network connections” to continue. User Manual... - Page 13 Wireless Access Point HNW150AP 3. Single right click on “Local Area connection”, then click “Properties”. 4. The screen will display the information “User Account Control” and click “Continue” to continue. 5. Double click on “Internet Protocol Version 4 (TCP/IPv4)”. User Manual...
- Page 14 Wireless Access Point HNW150AP 6. Check “Obtain an IP address automatically” and “Obtain DNS server address automatically” then click on “OK” to continue. User Manual...
-
Page 15: Windows 7 32/64
Wireless Access Point HNW150AP 4.3 Windows 7 32/64 1. Click on “Start” > “Control Panel” (in Category View) > “View network status and tasks”. 2. In the Control Panel Home, click on “Change adapter settings” to continue. 3. Single right click on “Local Area Connection”, then click “Properties”. 4. - Page 16 Wireless Access Point HNW150AP 5. Check “Obtain an IP address automatically” and “Obtain DNS server address automatically” then click on “OK” to continue. User Manual...
-
Page 17: Access Point Configuration
Wireless Access Point HNW150AP 5. Access Point Configuration 1. Please insert the supplied CD into your CD-ROM drive. 2. The CD should auto-start, displaying the window shown in 3 below. If your CD does not start automatically, go to Windows Explorer, Select your CD drive and double click “autorun.exe”. 3. - Page 18 Configuration“. 7. Please enter the “ESSID” if you want to change the default settings (Network= Enable, ESSID = Hamlet). 8. Choose the Encryption type if necessary, as Off – No Encryption (Default) / 64 Bit Encryption / 128 Bit Encryption / Wi-Fi Protected Access (TKIP) / Wi-Fi Protected Access2 (AES-CCMP) and WPA Mixed Mode.
- Page 19 Wireless Access Point HNW150AP 10. Please click “Setup” button, when the procedure is completed, it will start to configure the device for a while. 11. Now, checking Access Point hardware connection, Internet settings, WLAN settings, and connection status. 12. Easy setup configuration completed. Click on "Close" to exit this program. User Manual...
- Page 20 Wireless Access Point HNW150AP 13. Click on "Exit" to exit this program. 14. Now, the Access Point has been configured completely, and suitable for Wireless and Internet Connections. User Manual...
-
Page 21: Connect Wirelessly
Wireless Access Point HNW150AP 6. Connect Wirelessly Now that the Easy configuration setup is completed, you can connect wirelessly to your Wireless Access Point. Follow the steps below to create a new wireless connection. 1. Double click on the wireless icon on your computer and search for the wireless network that you enter ESSID name. - Page 22 Wireless Access Point HNW150AP 4. If the wireless network is encrypted, enter the network key that belongs to your Encryption type and Passphrase. You can later change this network key via the wireless configuration menu. 5. Click on "Connect" or "Apply". Now, your wireless connection to the Access Point has been configured and you are able to connect to ISP / Website.
-
Page 23: Web Configuration
3. Launch your web browser and type “http://192.168.1.254” in the address bar. 4. An Enter Network Password window displays. Enter the user name (“admin” is the default), password (“hamlet” is the default) and click OK. 5. You should now see the Status page of the Router. -
Page 24: Quick Setup
Wireless Access Point HNW150AP 8. Quick Setup You can use “Quick Setup” to setup the Access Point as follows, and the Access Point will connect to the Internet. From the left-hand menu, click on Quick Setup. The following page is displayed: Figure 1: Quick Setup page User Manual... -
Page 25: Operation Mode Setup
Wireless Access Point HNW150AP 8.1 Operation Mode Setup You can setup different modes to LAN and WLAN interface for NAT function. Gateway In this mode, the device is supposed to connect to internet via ADSL/Cable Modem. The NAT is enabled and PCs in four LAN ports share the same IP to ISP through WAN port. - Page 26 Wireless Access Point HNW150AP Wireless ISP In this mode, all Ethernet ports are bridged together and the wireless client will connect to ISP access point. The NAT is enabled and PCs in Ethernet ports share the same IP to ISP through wireless LAN. You must set the wireless to client mode first and connect to the ISP AP in Site-Survey page.
-
Page 27: Wan Interface Setup
Wireless Access Point HNW150AP 8.2 WAN Interface Setup This page is used to configure the parameters for Internet network which connects to the WAN port of your Access Point. Here you may change the access method to static IP, DHCP, or PPPoE by click the item value of WAN Access type. - Page 28 Wireless Access Point HNW150AP Static IP In this mode, the device is supposed to connect to internet via ADSL/Cable Modem. The NAT is enabled and PCs in four LAN ports share the same IP to ISP through WAN port. The connection type can be setup in WAN page by using static IP.
- Page 29 Wireless Access Point HNW150AP DHCP Client 1. From the WAN Access Type drop-down list, select DHCP Client setting determined by your Network Administrator or ISP. 2. Click Next>>. PPPoE 1. From the WAN Access Type drop-down list, select PPPoE setting determined by your Network Administrator or ISP.
- Page 30 Wireless Access Point HNW150AP PPTP 1. From the WAN Access Type drop-down list, select PPTP setting determined by your Network Administrator or ISP. 2. Enter Server IP Address for example 172.1.1.1 determined by your Network Administrator or ISP. 3. Enter User Name for example 1234 determined by your Network Administrator or ISP. 4.
- Page 31 Wireless Access Point HNW150AP User Manual...
-
Page 32: Wireless Basic Setup
Wireless Access Point HNW150AP 8.3 Wireless Basic Setup This page is used to configure the parameters for wireless LAN clients which may connect to your Access Point. User Manual... - Page 33 Wireless Access Point HNW150AP AP (Access Point) Access Point is used to configure the parameters for wireless LAN clients who may connect to your Access Point. 1. From the Band drop-down list, select a Band. 2. From the Mode drop-down list, select AP setting. 3.
- Page 34 Wireless Access Point HNW150AP Client This page is used to configure the parameters for wireless LAN clients which may connect to your Access Point. 1. From the Band drop-down list, select a Band. 2. From the Mode drop-down list, select Client setting. 3.
- Page 35 Wireless Access Point HNW150AP WDS (Wireless Distribution System) WDS stands for Wireless Distribution System. It enables the access points (APs) to be connected wirelessly. Integrated Access Device can also provide you services of WDS. Note: Integrated Access Device that supports WDS does not support security systems like WEP, WPA or WPA-Enterprise on a WDS network: Sometimes you want to establish a multi-access point wireless network in your home or office, but you don’t have Ethernet cabling running to the locations where you want to add the extra AP.
- Page 36 Wireless Access Point HNW150AP Main WDS station: One of your WDS stations is the main base station for the WDS network. This AP is connected directly to your Internet connection, or connected to your router via a wired connection. The main station is the bridge to your Internet connection that all wireless traffic eventually flows through.
- Page 37 Wireless Access Point HNW150AP WDS (Wireless Distribution System) only 1. From the Band drop-down list, select a Band. 2. From the Mode drop-down list, select WDS setting. 3. From the Channel Width drop-down list, select a Channel Width. 4. From the ControlSideband drop-down list, select a ControlSideband. 5.
- Page 38 Wireless Access Point HNW150AP AP (Access Point) + WDS (Wireless Distribution System) Access Point is used to configure the parameters for wireless LAN clients which may connect to your Access Point. 1. From the Band drop-down list, select a Band. 2.
- Page 39 Wireless Access Point HNW150AP MESH only 1. From the Band drop-down list, select a Band. 2. From the Mode drop-down list, select MESH setting. 3. From the Channel Width drop-down list, select a Channel Width. 4. From the ControlSideband drop-down list, select a ControlSideband. 5.
- Page 40 Wireless Access Point HNW150AP AP (Access Point) + MESH Access Point is used to configure the parameters for wireless LAN clients which may connect to your Access Point. 1. From the Band drop-down list, select a Band. 2. From the Mode drop-down list, select AP+MESH setting. 3.
-
Page 41: Wireless Security Setup
Wireless Access Point HNW150AP 8.4 Wireless Security Setup This page allows you setup the wireless security. Turn on WEP or WPA by using Encryption Keys could prevent any unauthorized access to your wireless network. You can protect your wireless data from potential eavesdroppers by encrypting wireless data transmissions. An eavesdropper might set up a compatible wireless adapter within range of your device and attempt to access your network. - Page 42 Wireless Access Point HNW150AP If you want to use WPA2 (AES) - Wi-Fi Protected Access 2 (AES) Passphrase encryption, follow the • instructions in Configuring WPA2 (AES) Passphrase security. If you want to use WPA2 (AES) - Wi-Fi Protected Access 2 (AES) HEX (64 characters) encryption, •...
- Page 43 Wireless Access Point HNW150AP Configuring WEP 64bit ASCII (5 characters) security The example set in this section is for 64bit encryption. 1. From the Encryption drop-down list, select WEP setting. 2. From the Key Length drop-down list, select 64-bit setting. 3.
- Page 44 Wireless Access Point HNW150AP Configuring WEP 64bit Hex (10 characters) security The example set in this section is for 64bit encryption. 1. From the Encryption drop-down list, select WEP setting. 2. From the Key Length drop-down list, select 64-bit setting. 3.
- Page 45 Wireless Access Point HNW150AP Configuring WEP 128bit ASCII (13 characters) security The example set in this section is for 128bit encryption. 1. From the Encryption drop-down list, select WEP setting. 2. From the Key Length drop-down list, select 128-bit setting. 3.
- Page 46 Wireless Access Point HNW150AP Configuring WEP 128bit Hex (26 characters) security The example set in this section is for 128bit encryption. 1. From the Encryption drop-down list, select WEP setting. 2. From the Key Length drop-down list, select 128-bit setting. 3.
- Page 47 Wireless Access Point HNW150AP Configuring WPA (TKIP) Passphrase security The example set in this section is for WPA (TKIP) Passphrase encryption. 1. From the Encryption drop-down list, select WPA (TKIP) setting. 2. From the Pre-Shared Key Format drop-down list, select Passphrase setting. 3.
- Page 48 Wireless Access Point HNW150AP Configuring WPA (TKIP) HEX (64 characters) security The example set in this section is for WPA (TKIP) HEX (64 characters) encryption. 1. From the Encryption drop-down list, select WPA (TKIP) setting. 2. From the Pre-Shared Key Format drop-down list, select HEX (64 characters) setting. 3.
- Page 49 Wireless Access Point HNW150AP Configuring WPA2 (AES) Passphrase security The example set in this section is for WPA2 (AES) Passphrase encryption. 1. From the Encryption drop-down list, select WPA2 (AES) setting. 2. From the Pre-Shared Key Format drop-down list, select Passphrase setting. 3.
- Page 50 Wireless Access Point HNW150AP Configuring WPA2 (AES) HEX (64 characters) security The example set in this section is for WPA2 (AES) HEX (64 characters) encryption. 1. From the Encryption drop-down list, select WPA2 (AES) setting. 2. From the Pre-Shared Key Format drop-down list, select HEX (64 characters) setting. 3.
- Page 51 Wireless Access Point HNW150AP Configuring WPA2 (Mixed) Passphrase security The example set in this section is for WPA2 (Mixed) Passphrase encryption. The WPA2 (Mixed) Passphrase encryption supports both WPA (TKIP) and WPA2 (AES). 1. From the Encryption drop-down list, select WPA2 (Mixed) setting. 2.
- Page 52 Wireless Access Point HNW150AP Configuring WPA2 (Mixed) HEX (64 characters) security The example set in this section is for WPA2 (Mixed) HEX (64 characters) encryption. The WPA2 (Mixed) HEX (64 characters) encryption supports both WPA (TKIP) and WPA2 (AES). 1. From the Encryption drop-down list, select WPA2 (Mixed) setting. 2.
-
Page 53: Operation Mode
Wireless Access Point HNW150AP 9. Operation Mode This chapter describes how to configure the way that your device connects to the Internet. There are three options of Operation Mode: Gateway, Bridge and Wireless ISP. 9.1 Setting Operation Mode To change the Operation Mode: 1. -
Page 54: Wireless Network
Wireless Access Point HNW150AP 10. Wireless Network This chapter assumes that you have already set up your Wireless PCs and installed a compatible Wireless card on your device. See Configuring Wireless PCs. 10.1 Basic Settings The Wireless Network page allows you to configure the Wireless features of your device. To access the Wireless Network Basic Settings page: From the left-hand Wireless menu, click on Basic Settings. - Page 55 Wireless Access Point HNW150AP Field Description Disable Enable/Disable the Wireless LAN Interface. Wireless LAN Default: Disable Interface Band Specify the WLAN Mode to 802.11b/g Mixed mode, 802.11b mode or 802.11g mode Mode Configure the Wireless LAN Interface to AP, Client, WDS, AP + WDS, MESH or AP + MESH mode Network Type Configure the Network Type to Infrastructure or Ad hoc.
-
Page 56: Advanced Settings
Wireless Access Point HNW150AP 10.2 Advanced Settings These settings are only for more technically advanced users who have a sufficient knowledge about wireless LAN. These settings should not be changed unless you know what effect the changes will have on your Access Point. -
Page 57: Security
Wireless Access Point HNW150AP 10.3 Security This page allows you setup the wireless security. Turn on WEP or WPA by using Encryption Keys could prevent any unauthorized access to your wireless network. To access the Wireless Network Security page: From the left-hand Wireless menu, click on Security. The following page is displayed: Field Description Select SSID... - Page 58 Wireless Access Point HNW150AP Field Description WPA2 Cipher Configure the WPA2 Cipher Suite to TKIP and/or AES Suite Pre-Shared Key Configure the Pre-Shared Key Format to Passphrase or HEX (64 Format characters) Pre-Shared Key Type the Pre-Shared Key Enable According to some of the preferred embodiments, a method for Pre-Authentication proactively establishing a security association between a mobile node in a visiting network and an authentication agent in another network to...
- Page 59 Wireless Access Point HNW150AP WEP + Encryption Key WEP aims to provide security by encrypting data over radio waves so that it is protected as it is transmitted from one end point to another. However, it has been found that WEP is not as secure as once believed. 1.
- Page 60 Wireless Access Point HNW150AP WEP + Use 802.1x Authentication WEP aims to provide security by encrypting data over radio waves so that it is protected as it is transmitted from one end point to another. However, it has been found that WEP is not as secure as once believed. 1.
- Page 61 Wireless Access Point HNW150AP WPA/WPA2/WPA2 Mixed + Personal (Pre-Shared Key) Wi-Fi Protected Access (WPA and WPA2) is a class of systems to secure wireless (Wi-Fi) computer networks. WPA is designed to work with all wireless network interface cards, but not necessarily with first generation wireless access points.
- Page 62 Wireless Access Point HNW150AP WPA/WPA2/WPA2 Mixed + Enterprise (RADIUS) Wi-Fi Protected Access (WPA and WPA2) is a class of systems to secure wireless (Wi-Fi) computer networks. WPA is designed to work with all wireless network interface cards, but not necessarily with first generation wireless access points.
-
Page 63: Access Control
Wireless Access Point HNW150AP 10.4 Access Control For security reason, using MAC ACL's (MAC Address Access List) creates another level of difficulty to hacking a network. A MAC ACL is created and distributed to AP so that only authorized NICs can connect to the network. - Page 64 Wireless Access Point HNW150AP Allow Listed If you choose 'Allowed Listed', only those clients whose wireless MAC addresses are in the access control list will be able to connect to your Access Point. 1. From the Wireless Access Control Mode drop-down list, select Allowed Listed setting. 2.
- Page 65 Wireless Access Point HNW150AP Deny Listed When 'Deny Listed' is selected, these wireless clients on the list will not be able to connect the Access Point. 1. From the Wireless Access Control Mode drop-down list, select Deny Listed setting. 2. Enter the MAC Address. 3.
-
Page 66: Wds Settings
Wireless Access Point HNW150AP 10.5 WDS settings Wireless Distribution System uses wireless media to communicate with other APs, like the Ethernet does. To do this, you must set these APs in the same channel and set MAC address of other APs which you want to communicate with in the table and then enable the WDS. - Page 67 Wireless Access Point HNW150AP Configure WDS (Wireless Distribution System) only 1. From the left-hand Wireless menu, click on Basic Settings. 2. From the Mode drop-down list, select WDS. 3. From the Channel Number drop-down list, select a Channel. 4. Click Apply Changes button. 7.
- Page 68 Wireless Access Point HNW150AP 13. This page allows you setup the wireless security for WDS. When enabled, you must make sure each WDS device has adopted the same encryption algorithm and Key. 14. Configure each field with the Encryption that you selected. 15.
- Page 69 Wireless Access Point HNW150AP 18. Click Apply Changes button. 19. Change setting successfully! Click on OK button to confirm and return. 20. The MAC Address that you created has been added in the Current Access Control List. User Manual...
- Page 70 Wireless Access Point HNW150AP Configure AP (Access Point) + WDS (Wireless Distribution System) 1. From the left-hand Wireless menu, click on Basic Settings. 2. From the Mode drop-down list, select AP+WDS. 3. Enter SSID for example 11n_AP_Router. 4. From the Channel Number drop-down list, select a Channel. 5.
- Page 71 Wireless Access Point HNW150AP 7. From the left-hand Wireless menu, click on WDS settings. 8. Check on the option Enable WDS. 9. Enter the MAC Address. 10. Enter the Comment. 11. Click the Set Security. 12. This page allows you setup the wireless security for WDS. When enabled, you must make sure each WDS device has adopted the same encryption algorithm and Key.
- Page 72 Wireless Access Point HNW150AP 15. Change setting successfully! Click on OK button to confirm and return. 16. Click Close button to close and exit the WDS Security Setup. 17. Click Apply Changes button. User Manual...
- Page 73 Wireless Access Point HNW150AP 18. Change setting successfully! Click on OK button to confirm and return. 19. The MAC Address that you created has been added in the Current Access Control List. User Manual...
-
Page 74: Mesh Settings
Wireless Access Point HNW150AP 10.6 Mesh settings Mesh network uses wireless media to communicate with other APs, like the Ethernet does. To do this, you must set these APs in the same channel with the same Mesh ID. The APs should be under AP+MESH/MESH mode. - Page 75 Wireless Access Point HNW150AP Configure Mesh settings only 1. From the left-hand Wireless menu, click on Basic Settings. 2. From the Mode drop-down list, select MESH. 3. From the Channel Number drop-down list, select a Channel. 4. Click Apply Changes button. 5.
- Page 76 Wireless Access Point HNW150AP 7. Check on the option Enable Mesh. 8. Enter the Mesh ID. 9. From the Encryption drop-down list, select the one and configure related settings. 10. Click the Apply Changes. 11. Change setting successfully! Click on Reboot Now button to confirm take effect. User Manual...
- Page 77 Wireless Access Point HNW150AP Configure AP (Access Point) + MESH 1. From the left-hand Wireless menu, click on Basic Settings. 2. From the Mode drop-down list, select AP+MESH. 3. Enter SSID for example 11n_AP_Router. 4. From the Channel Number drop-down list, select a Channel. 5.
- Page 78 Wireless Access Point HNW150AP 7. From the left-hand Wireless menu, click on Mesh settings. 8. Check on the option Enable Mesh. 9. Enter the Mesh ID. 10. From the Encryption drop-down list, select the one and configure related settings. 11. Click the Apply Changes. 12.
- Page 79 Wireless Access Point HNW150AP Site Survey This page provides tool to scan the wireless network. If any Access Point or IBSS is found, you could choose to connect it manually when client mode is enabled. To access the Wireless Network WDS settings page: From the left-hand Wireless menu, click on Site Survey.
- Page 80 Wireless Access Point HNW150AP Configure Wireless ISP + Wireless client + Site Survey 1. From the left-hand Operation Mode menu, click on Wireless ISP Settings. 2. Click Apply Changes button. 3. Change setting successfully! Click on OK button to confirm and return. 4.
- Page 81 Wireless Access Point HNW150AP 7. Click Apply Changes button. 8. Change setting successfully! Click on OK button to confirm and return. 9. From the left-hand Wireless menu, click on Site Survey. User Manual...
- Page 82 Wireless Access Point HNW150AP 10. Click Refresh button. 11. Now you could see the APs that scanned by the Wireless Gateway were listed below. 12. Click on the ratio of AP’s SSID under the item Select that you want the Wireless Gateway to connect to. 13.
-
Page 83: Wps
Wireless Access Point HNW150AP 10.7 WPS This page allows you to change the setting for WPS (Wi-Fi Protected Setup). Using this feature could let your wireless client automatically syncronize its setting and connect to the Access Point in a minute without any hassle. - Page 84 Wireless Access Point HNW150AP Field Description Push Button Clicking this button will invoke the PBC method of WPS. It is only Configuration used when AP acts as a registrar. Apply Changes Whenever users want to enable/disable WPS or change AP’s PIN, they need to apply this button to commit changes.
- Page 85 Wireless Access Point HNW150AP AP mode For AP mode, Wireless Gateway supports three roles, registrar, proxy, and enrollee in registration protocol. At different scenarios, Wireless Gateway will automatically switch to an appropriate role depending on the other device’s role or a specific configuration. AP as Enrollee If users know AP’s PIN and enter it into external registrar, the external registrar will configure AP with a new wireless profile such as new SSID and new security settings.
- Page 86 Wireless Access Point HNW150AP Wireless Advanced Settings page Users need to make sure the “Broadcast SSID” file is set to “Enabled”. Otherwise, it might prevent WPS from working properly. User Manual...
-
Page 87: Operations Of Ap - Ap Being An Enrollee
Wireless Access Point HNW150AP 10.8 Operations of AP - AP being an enrollee In this case, AP will be configured by any registrar either through in-band EAP or UPnP. Here, users do not need to do any action on AP side. They just need AP’s device PIN and enter it into registrar. An example from Vista WCN will be given. - Page 88 Wireless Access Point HNW150AP 5. If the previous steps are done, open Windows Explorer. Go to the Network section. 6. Click on “Network discovery and file sharing are turned off. Network computers and devices are not visible. Click to Change…“ User Manual...
- Page 89 Wireless Access Point HNW150AP 7. Click on “Turn on network discovery and file sharing“ 8. Click on “No, make the network that I am connected to a private network“ User Manual...
- Page 90 Wireless Access Point HNW150AP 9. AP’s icon will show up. Double click on it. 10. Users could also Click “Add a wireless device” if the icon is not there. Click “next”. User Manual...
- Page 91 Wireless Access Point HNW150AP 11. Enter AP’s Self-PIN Number and click “”Next”. 12. Choose a name that people who connect to your network will recognize. User Manual...
- Page 92 Wireless Access Point HNW150AP 13. Enter the Passphrase and then click “Next”. 14. A User Account Control screen pops up, click Continue. 15. AP is successfully configured by WCN. User Manual...
- Page 93 Wireless Access Point HNW150AP 16. Finally, AP will become configured (see WPS Status). The authentication algorithm, encryption algorithm, and key assigned by WCN will be displayed below “Current Key Info”. User Manual...
- Page 94 Wireless Access Point HNW150AP 17. The SSID field of Wireless Basic Settings page will also be modified with the value assigned by WCN. 18. The security settings on the Wireless Security Page will be modified by WCN, too. The warning message will show up if users try to modify the security settings.
- Page 95 Wireless Access Point HNW150AP User Manual...
-
Page 96: Operations Of Ap - Ap Being A Registrar
Wireless Access Point HNW150AP 10.9 Operations of AP - AP being a registrar AP mode Whenever users enter station’s PIN into AP’s Wi-Fi Protected Setup page and click “Start PIN”, AP will become a registrar. Users must start the PIN method on the station side within two minutes. 1. - Page 97 Wireless Access Point HNW150AP 7. If the device PIN is correct and the WPS handshake is successfully done on the station side, User’s Wi-Fi Protected status will be shown as below. 8. If the device PIN is correct and the WPS handshake is successfully done, AP’s Wi-Fi Protected Setup page will be shown as below.
- Page 98 Wireless Access Point HNW150AP Push Button method Wireless Gateway supports a virtual button “Start PBC” on the Wi-Fi Protected Setup page for Push Button method. If users push a virtual button “Start PBC”, AP will initiate a WPS session and wait for any station to join.
- Page 99 Wireless Access Point HNW150AP 6. If the device PBC and the WPS handshake are successfully done on the station side, User’s Wi-Fi Protected status will be shown as below. 7. If the device PIN is correct and the WPS handshake is successfully done, AP’s Wi-Fi Protected Setup page will be shown as below.
-
Page 100: Wireless Schedule
Wireless Access Point HNW150AP 10.10 Wireless Schedule This page allows you setup the wireless schedule rule. Please do not forget to configure system time before enable this feature. To access the Wireless Schedule page: From the left-hand Wireless menu, click on Wireless Schedule. The following page is displayed: User Manual... -
Page 101: Lan Interface
Wireless Access Point HNW150AP 11. LAN Interface This chapter is to configure the parameters for local area network which connects to the LAN port of your Access Point. Here you may change the setting for IP address, subnet mask, DHCP, etc... Note: You should only change the addressing details if your ISP asks you to, or if you are familiar with network configuration. - Page 102 Wireless Access Point HNW150AP Field Description IP Address The LAN IP address Default: 192.168.1.254 Subnet Mask The LAN netmask Default: 255.255.255.0 Default Gateway The LAN Gateway Default: 0.0.0.0 DHCP DHCP Type: Disable, DHCP Client or Server Default: DHCP Server DHCP Client Range Specify the starting/ending IP address of the IP address pool.
-
Page 103: Changing The Lan Ip Address And Subnet Mask
Wireless Access Point HNW150AP 11.2 Changing the LAN IP address and subnet mask To check the configuration of LAN Interface: 1. From the left-hand Network Settings -> LAN Interface menu. The following page is displayed: 2. Type IP Address and Change default LAN port IP address. 3. - Page 104 Wireless Access Point HNW150AP 6. The primary IP address is being changed to 192.168.2.2 netmask 255.255.255.0. Please go to http://192.168.2.2 to continue. Your browser communicates with the web server via the LAN connection, and changing the IP address may disrupt this. You may also need to renew your DHCP lease: Windows 95/98 a.
-
Page 105: Show Client
Wireless Access Point HNW150AP 11.3 Show Client To the IP Address, MAC Address, and Expired Time of the DHCP lease for each client computer/device: 1. From the left-hand Network Settings -> LAN Interface menu. The following page is displayed: 2. Click on Show Client button. The following page is displayed: User Manual... -
Page 106: Wan Interface
Wireless Access Point HNW150AP 12. WAN Interface This chapter describes how to configure the way that your device connects to the Internet. Your ISP determines what type of Internet access you should use and provides you with any information that you need in order to configure the Internet access to your device. - Page 107 Wireless Access Point HNW150AP Option Description Static IP Choose this option if you are a leased line user with a fixed IP address. Access DHCP Client Choose this option if you are connected to the Internet Type through a Cable modem line. PPPoE Choose this option if you are connected to the Internet through a DSL line...
- Page 108 Wireless Access Point HNW150AP Option Description Clone MAC Address Clone MAC lets the device identify itself as another computer or device Enable uPNP Enable or Disable uPNP Enable IGMP Proxy Enable or Disable IGMP Proxy Enable Ping Access on WAN Enable or Disable Ping Access on WAN Enable Web Server Access on Enable or Disable Web Server Access on WAN...
-
Page 109: Configuring Static Ip Connection
Wireless Access Point HNW150AP 12.1 Configuring Static IP connection If you are a leased line user with a fixed IP address, enter in the IP address, subnet mask, gateway address, and DNS (domain name server) address(es) provided to you by your ISP. If your ISP wants you to connect to the Internet using Static IP, follow the instructions below. - Page 110 Wireless Access Point HNW150AP 6. From the left-hand Management -> Status menu. The following page is displayed: 7. If you could see the Attain IP Protocol is shown Fixed IP, you can have the Internet Access right now. User Manual...
-
Page 111: Configuring Dhcp Client Connection
Wireless Access Point HNW150AP 12.2 Configuring DHCP Client connection Dynamic Host Configuration Protocol (DHCP), Dynamic IP (Get WAN IP Address automatically). If you are connected to the Internet through a Cable modem line, then a dynamic IP will be assigned. If your ISP wants you to connect to the Internet using DHCP Client, follow the instructions below. - Page 112 Wireless Access Point HNW150AP 5. From the left-hand Management -> Status menu. The following page is displayed: 6. If you could see the Attain IP Protocol is shown DHCP, you can have the Internet Access right now. User Manual...
-
Page 113: Configuring Pppoe Connection
Wireless Access Point HNW150AP 12.3 Configuring PPPoE connection If your ISP’s Internet service uses PPPoE you need to set up a PPP login account. The first time that you login to the Internet, your ISP will ask you to enter a username and password so they can check that you are a legitimate, registered Internet service user. - Page 114 Wireless Access Point HNW150AP 6. From the left-hand Management -> Status menu. The following page is displayed: 7. If you could see the Attain IP Protocol is shown PPPoE Connected, you can have the Internet Access right now. User Manual...
-
Page 115: Configuring Pptp Connection
Wireless Access Point HNW150AP 12.4 Configuring PPTP connection If your ISP/Network Administrator wants you to connect to the Internet using PPTP, follow the instructions below. 1. From the left-hand Network Settings -> WAN Interface menu. The following page is displayed: 2. - Page 116 Wireless Access Point HNW150AP 5. Click OK. User Manual...
-
Page 117: Configuring L2Tp Connection
Wireless Access Point HNW150AP 12.5 Configuring L2TP connection If your ISP/Network Administrator wants you to connect to the Internet using L2TP, follow the instructions below. 1. From the left-hand Network Settings -> WAN Interface menu. The following page is displayed: 2. -
Page 118: Clone Mac Address
Wireless Access Point HNW150AP 12.6 Clone MAC Address Some particularly ISPs do not want you to have a home network and have a DSL/Cable modem that allows only 1 MAC to talk on the internet. If you change network cards, you have to call them up to change the MAC. - Page 119 Wireless Access Point HNW150AP 6. From the left-hand Management -> Status menu. The following page is displayed: 7. If you could see the WAN Configuration -> MAC Address is changed to the one that you configured. User Manual...
-
Page 120: Port Filtering
Wireless Access Point HNW150AP 13. Port Filtering Entries in Current Filter Table are used to restrict certain ports and types of data packets from your local network to Internet through the Gateway. Use of such filters can be helpful in securing or restricting your local network. -
Page 121: Port Filtering For Tcp Port 80
Wireless Access Point HNW150AP 13.1 Port filtering for TCP port 80 Please follow example below to deny the TCP port 80 for both Outbound and Inbound packet. 1. From the left-hand Firewall -> Port Filtering menu. The following page is displayed: 2. - Page 122 Wireless Access Point HNW150AP 13.2 Port filtering for UDP port 53 Please follow example below to deny the UDP port 53 for both Outbound and Inbound packet. 1. From the left-hand Firewall -> Port Filtering menu. The following page is displayed: 2.
- Page 123 Wireless Access Point HNW150AP 14. IP Filtering Entries in this table are used to restrict certain types of data packets from your local network to Internet through the Gateway. Use of such filters can be helpful in securing or restricting your local network. The IP filter feature enables you to create rules that control the forwarding of incoming and outgoing data between the LAN and WAN side.
- Page 124 Wireless Access Point HNW150AP 14.1 IP filtering for TCP with specified IP Please follow example below to deny the TCP protocol for specified IP. 1. From the left-hand Firewall -> IP Filtering menu. The following page is displayed: 2. Check the option Enable IP Filtering to enable the IP Filtering. 3.
- Page 125 Wireless Access Point HNW150AP 14.2 IP filtering for UDP with specified IP Please follow example below to deny the UDP protocol for specified IP. 1. From the left-hand Firewall -> IP Filtering menu. The following page is displayed: 2. Check the option Enable IP Filtering to enable the IP Filtering. 3.
- Page 126 Wireless Access Point HNW150AP 14.3 IP filtering for both TCP and UDP with specified IP Please follow example below to deny the both TCP and UDP protocol for specified IP. 1. From the left-hand Firewall -> IP Filtering menu. The following page is displayed: 2.
- Page 127 Wireless Access Point HNW150AP 15. MAC Filtering Entries in this table are used to restrict certain types of data packets from your local network to Internet through the Wireless Gateway. Use of such filters can be helpful in securing or restricting your local network.
- Page 128 Wireless Access Point HNW150AP 15.1 MAC filtering for specified MAC Address Please follow example below to deny the specified MAC Address has the Internet Access. 1. From the left-hand Firewall -> MAC Filtering menu. The following page is displayed: 2. Check the option Enable MAC Filtering to enable the MAC Filtering. 3.
- Page 129 Wireless Access Point HNW150AP 16. Port Forwarding Entries in this table allow you to automatically redirect common network services to a specific machine behind the NAT firewall. These settings are only necessary if you wish to host some sort of server like a web server or mail server on the private local network behind your Gateway's NAT firewall.
- Page 130 Wireless Access Point HNW150AP 16.1 Port Forwarding for TCP with specified IP Please follow example below to configure the Port Forwarding to Specified IP with TCP. 1. From the left-hand Firewall -> Port Forwarding menu. The following page is displayed: 2.
- Page 131 Wireless Access Point HNW150AP 16.2 Port Forwarding for UDP with specified IP Please follow example below to configure the Port Forwarding to Specified IP with UDP. 1. From the left-hand Firewall -> Port Forwarding menu. The following page is displayed: 2.
- Page 132 Wireless Access Point HNW150AP 17. URL Filtering URL filter is used to deny LAN users from accessing the internet. Block those URLs which contain keywords listed below. 1. From the left-hand Firewall -> URL Filtering menu. The following page is displayed: User Manual...
- Page 133 Wireless Access Point HNW150AP 17.1 URL filtering for specified URL Address Please follow example below to deny LAN users from accessing the Internet. 1. From the left-hand Firewall -> URL Filtering menu. The following page is displayed: 2. Check the option Enable URL Filtering to enable the URL Filtering. 3.
- Page 134 Wireless Access Point HNW150AP 18. DMZ A Demilitarized Zone is used to provide Internet services without sacrificing unauthorized access to its local private network. Typically, the DMZ host contains devices accessible to Internet traffic, such as Web (HTTP) servers, FTP servers, SMTP (e-mail) servers and DNS servers. 1.
- Page 135 Wireless Access Point HNW150AP 18.1 DMZ Host IP Address Please follow example below to configure the DMZ to Host IP Address. 1. From the left-hand Firewall -> DMZ menu. The following page is displayed: 2. Check the option Enable DMZ to enable the Enable DMZ. 3.
- Page 136 Wireless Access Point HNW150AP 19. VLAN Entries in below table are used to config VLAN settings. VLANs are created to provide the segmentation services traditionally provided by routers. VLANs address issues such as scalability, security, and network management. 1. From the left-hand Firewall -> VLAN menu. The following page is displayed: User Manual...
- Page 137 Wireless Access Point HNW150AP 20. QoS Entries in this table improve your online gaming experience by ensuring that your game traffic is prioritized over other network traffic, such as FTP or Web. 1. From the left-hand Firewall -> QoS menu. The following page is displayed: User Manual...
- Page 138 Wireless Access Point HNW150AP 21. Status This page displays the current information for the device. It will display the LAN, WAN, and system firmware information. This page will display different information, according to WAN setting (Static IP, DHCP, or PPPoE). 1.
- Page 139 Wireless Access Point HNW150AP 22. Statistics This page shows the packet counters for transmission and reception regarding to wireless and Ethernet networks. 1. From the left-hand Management -> Statistics menu. The following page is displayed: User Manual...
- Page 140 Wireless Access Point HNW150AP 23. Dynamic DNS When you want your internal server to be accessed by using DNS name rather than using the dynamic IP address, you can use the DDNS service. The DDNS server allows to alias a dynamic IP address to a static hostname.
- Page 141 Wireless Access Point HNW150AP Configuring IP Interfaces You need to create a Dynamic DNS interface per IP interface and can only create one Dynamic DNS interface service on one IP interface. For more information on creating IP interfaces,refer to section Creating IP interfaces.
- Page 142 Wireless Access Point HNW150AP 23.1 Configure DynDNS 1. From the left-hand Management -> DDNS menu. The following page is displayed: 2. Click on Enable DDNS 3. Select the DynDNS from the Service Provider drop-down list. 4. Type your own unique User Name, Password and Domain Name which you applied from www.dyndns.com in the relevant boxes.
- Page 143 Wireless Access Point HNW150AP 23.2 Configure TZO 1. From the left-hand Management -> DDNS menu. The following page is displayed: 2. Click on Enable DDNS 3. Select the TZO from the Service Provider drop-down list. 4. Type your own unique Email, Key and Domain Name which you applied from http://www.tzo.com/MainPageWebClient/clientsignup.html in the relevant boxes.
- Page 144 Wireless Access Point HNW150AP 24. Time Zone Setting Certain systems may not have a date or time mechanism or may be using inaccurate time/day information. the Simple Network Time Protocol feature provides a way to synchronize the device’s own time of day setting with a remote time server as described in RFC 2030 (SNTP) and RFC 1305 (NTP).
- Page 145 Wireless Access Point HNW150AP 25. Denial-of-Service A "denial-of-service" (DoS) attack is characterized by an explicit attempt by hackers to prevent legitimate users of a service from using that service. 1. From the left-hand Management menu, click on Denial-of-Service. The following page is displayed: User Manual...
- Page 146 Wireless Access Point HNW150AP 2. Check the option Enable NTP client update. 3. Check the option of each Service. 4. Check the option Enable Source IP Blocking. 5. Click Apply Changes. 6. Click OK. User Manual...
- Page 147 Wireless Access Point HNW150AP 26. Log This page can be used to set remote log server and show the system log. System Log 1. From the left-hand Management menu, click on Log. The following page is displayed: Option Description Enable Log Enable/Disable the feature.
- Page 148 Wireless Access Point HNW150AP 4. Check the option Enable Remote Log. 5. Enter the IP Address in the Log Server IP Address field. 6. Click Apply Changes. 7. Click OK. User Manual...
- Page 149 Wireless Access Point HNW150AP 27. Firmware Update 27.1 About firmware versions Firmware is a software program. It is stored as read-only memory on your device. Hamletcom is continually improving this firmware by adding new features to it and these features are saved in later versions of the firmware.
- Page 150 Wireless Access Point HNW150AP 28. Save/Reload Settings This page allows you save current settings to a file or reload the settings from the file which was saved previously. Besides, you could reset the current configuration to factory default. If you do make changes to the default configuration but then wish to revert back to the original factory configuration, you can do so by resetting the device to factory defaults.
- Page 151 Wireless Access Point HNW150AP 2. Click on Save…. 3. If you are happy with this, click OK and then browse to where the file to be saved. Or click Cancel to cancel it. User Manual...
- Page 152 Wireless Access Point HNW150AP 28.2 Load Settings from File It allows you to reload the settings from the file which was saved previously. 1. From the left-hand Management menu, click on Reset factory default. The following page is displayed: Figure 5: Reset to Defaults page 2.
- Page 153 Wireless Access Point HNW150AP 28.3 Resetting to Defaults If you do make changes to the default configuration but then wish to revert back to the original factory configuration, you can do so by resetting the device to factory defaults. Note: If you reset your device to factory defaults, all previous configuration changes that you have made are overwritten by the factory default configuration Software Reset: 1.
- Page 154 Wireless Access Point HNW150AP 5. Once it finished resetting to factory, it’ll show the Status page. User Manual...
- Page 155 They can be any combination of letters or numbers with a maximum of 30 characters. The default setting uses admin for the username and hamlet for password. 3. If you are happy with these settings, click Apply. You will see following page that the new user has been displayed on the Currently Defined Users.
- Page 156 Wireless Access Point HNW150AP Figure 8: Administration Password 4. Click OK. 5. Enter new User name and Password. 6. Click Apply. Figure 9: Login page User Manual...
- Page 157 Wireless Access Point HNW150AP 30. Logout To logout: 1. From the left-hand menu, click on Logout. The following page is displayed: 2. Click Apply Change. Figure 10: Logout page User Manual...
- Page 158 Wireless Access Point HNW150AP Configuring your Computers This appendix provides instructions for configuring the Internet settings on your computers to work with the Wireless Gateway. Configuring Ethernet PCs Before you begin By default, the Wireless Gateway automatically assigns the required Internet settings to your PCs. You need to configure the PCs to accept this information when it is assigned.
- Page 159 Wireless Access Point HNW150AP IP Addresses, Network Masks, and Subnets IP Addresses Note: This section refers only to IP addresses for IPv4 (version 4 of the Internet Protocol). IPv6 addresses are not covered. This section assumes basic knowledge of binary numbers, bits, and bytes IP addresses, the Internet's version of telephone numbers, are used to identify individual nodes (computers or devices) on the Internet.
- Page 160 Wireless Access Point HNW150AP Class B networks are smaller but still quite large, each able to hold over 65,000 hosts. There can be up to 16,384 class B networks in existence. A class B network might be appropriate for a large organization such as a business or government agency.
- Page 161 Wireless Access Point HNW150AP UPnP Control Point Software on Windows XP This appendix provides instructions for configuring the UPnP on your computers to work with the Wireless Gateway. UPnP is an architecture for pervasive peer-to-peer network connectivity of intelligent appliances, Wireless devices, and PCs of all form factors.
- Page 162 Wireless Access Point HNW150AP 2. In the "Add or Remove Programs" dialog box, click the "Add / Remove Windows Components" button. 3. In the "Windows Component Wizard" dialog box, scroll down the list to display the "Networking Services" entry. Highlight (select) the entry, and click on the "Details" button. 4.
- Page 163 Wireless Access Point HNW150AP User Manual...
- Page 164 If you have not changed the password from the default, try using password. “admin” the user ID and “hamlet“ as password. Otherwise, you can reset the device to the default configuration by pressing the Reset Default button on the Rare panel of the device (see Rare Panel).
- Page 165 Wireless Access Point HNW150AP Diagnosing Problem using IP Utilities ping Ping is a command you can use to check whether your PC can recognize other computers on your network and the Internet. A ping command sends a message to the computer you specify. If the computer receives the message, it sends messages in reply.
- Page 166 Wireless Access Point HNW150AP Figure 12: Using the nslookup Utility There may be several addresses associated with an Internet name. This is common for web sites that receive heavy traffic; they use multiple, redundant servers to carry the same information. To exit from the nslookup utility, type exit and press [Enter] at the command prompt.
- Page 167 Wireless Access Point HNW150AP Glossary 10BASE-T A designation for the type of wiring used by Ethernet networks with a data rate of 10 Mbps. Also known as Category 3 (CAT 3) wiring. See data rate, Ethernet. 100BASE-T A designation for the type of wiring used by Ethernet networks with a data rate of 100 Mbps.
- Page 168 Wireless Access Point HNW150AP computers that request IP addresses and the DHCP server that assigns the addresses. Each of the Wireless Gateway's interfaces can be configured as a DHCP relay. See DHCP. DHCP server Dynamic Host Configuration Protocol server A DHCP server is a computer that is responsible for assigning IP addresses to the computers on a LAN.
- Page 169 Wireless Access Point HNW150AP Internet The global collection of interconnected networks used for both private and business communications. intranet A private, company-internal network that looks like part of the Internet (users access information using web browsers), but is accessible only by employees.
- Page 170 Wireless Access Point HNW150AP as where it came from (source address) and where it should go (destination address). ping Packet Internet (or Inter-Network) Groper A program used to verify whether the host associated with an IP address is online. It can also be used to reveal the IP address for a given domain name.
- Page 171 Wireless Access Point HNW150AP TCP/IP Transmission Control Protocol/Internet Protocol The basic protocols used on the Internet. TCP is responsible for dividing data up into packets for delivery and reassembling them at the destination, while IP is responsible for delivering the packets from source to destination.
- Page 172 Wireless Access Point HNW150AP identifies a VC. Your ISP will tell you the VPI for each VC they provide. See VC. Wide Area Network Any network spread over a large geographical area, such as a country or continent. With respect to the Wireless Gateway, WAN refers to the Internet.
Need help?
Do you have a question about the Wireless Access Point 150 and is the answer not in the manual?
Questions and answers