Table of Contents
Advertisement
Original Instruction Manual
WG200 Wet Stone Sharpening System
Version 3.1
September 2016
It is important to register your product as soon as possible in order to receive efficient after sales
support and be entitled to the full 5 year guarantee. Your statutory rights are not affected.
Kg
Always wear safety glasses when
using woodworking equipment.
To register this product please visit
www.recordpower.info
Please see back cover for contact details.
Important
i
For your safety read instructions carefully before
assembling or using this product.
Always read the instructions
provided before using
Save this manual for future reference.
woodworking equipment.
1
Advertisement
Table of Contents

Related Manuals for Record Power WG200


Summary of Contents for Record Power WG200
- Page 1 Original Instruction Manual WG200 Wet Stone Sharpening System Version 3.1 September 2016 To register this product please visit www.recordpower.info It is important to register your product as soon as possible in order to receive efficient after sales support and be entitled to the full 5 year guarantee. Your statutory rights are not affected.
-
Page 2: Table Of Contents
6 Contents of the Package 7 Getting to Know Your Machine 8 Assembly 9 Operation 10 Optional Jigs for the WG200 Wet Stone Sharpener 10.1 WG250/A Gouge Jig 10.2 WG250/B Short Tool Jig 10.3 WG250/C Straight Edge Jig 10.4 WG250/D Plane Camber Jig 10.5 WG250/E Scissor Jig... -
Page 3: Explanation Of Symbols
1. Explanation of Symbols The symbols and their meanings shown below may be used throughout this manual. Please ensure that you take the appropriate action wherever the warnings are used. Mandatory Instructions Read and fully understand the instruction manual before attempting to use the machine. -
Page 4: General Health And Safety Guidance
2. General Health and Safety Guidance Ensure that you carefully read and fully understand the any vehicles or manual handling equipment used for transportation are of instructions in this manual before assembly, installation and use adequate specification. of this product. Keep these instructions in a safe place for 6. - Page 5 2. General Health and Safety Guidance cable (if used) and keep visitors away from the work area. should have a minimum length of 400 mm. If the push stick becomes damaged, replace it immediately. • Never leave the machine running unattended. Turn the power supply off •...
- Page 6 2. General Health and Safety Guidance the machine from the power supply. 31. Warning! • The use of any accessory or attachment, other than those recommended in 30. Check for damaged parts this instruction manual, or recommended by our Company may present a •...
-
Page 7: Additional Health And Safety Guidance For Wet Stone Sharpeners
3. Additional Health and Safety Guidance for Wet Stone Sharpeners Safe Operation • Check that the speed control is set to correspond with the diameter of the • The wet stone sharpener should be level and stable at all times. sharpening stone mounted on the machine. -
Page 8: Record Power Guarantee
Guarantee should be made directly to Record Power or its Authorised Distributor Record Power guarantees that for a period of 5 years from the date of (for details of the Authorised Distributor in your country please see purchase the components of qualifying Products (see clauses 1.2.1 to your Product manual or check www.recordpower.info for details). -
Page 9: Specifications
Honing wheel bore: 12 mm Speeds: 120 - 250 rpm / 1.25 - 2.6 M/second Weight: 8.5 kg 6. Contents of the Package WG200 Wet Stone Sharpener WG250/C Straight Edge Jig WG250/K Diamond Trueing Tool WG250/R Stone Grader WG250/T Angle Setting Gauge... -
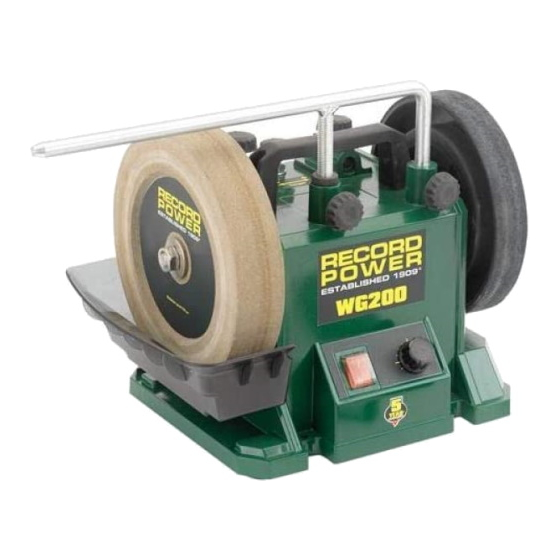
Page 10: Getting To Know Your Machine
7. Getting to Know Your Machine Speed control knob On / off switch Water trough 200 mm (8”) sharpening stone Support arm Torque control knob Support arm micro adjustment collar Carrying handle Leather honing wheel... -
Page 11: Assembly
8. Assembly The WG200 features 2 sets of brackets for installing the support arm - The Fig 8.1 upper brackets as shown in Fig 8.1 and the side brackets as shown in Fig Upper 8.2. brackets When using the WG250/C Straight Edge Jig and the WG250/K Diamond Trueing tool, the upper brackets must be used. - Page 12 8. Assembly Assembly of the Optional WG250/N Profiled Leather Fig 8.5 Honing Wheel The profiled honing wheel is supplied with a shaft extension and 2 washers as shown in Fig 8.5. Remove the knob that holds the honing wheel to the machine as shown in Fig 8.6.
-
Page 13: Operation
Place the guide bar on the support arm with the trueing bar beneath it as shown in Fig 9.5. The guide bar must be facing towards the front of the machine and the tip of the tool facing towards the rear of the machine as shown. Fig 9.5 Rear of WG200 Guide Trueing... - Page 14 9. Operation To position the support arm, loosen the upper bracket locking knobs, Fig 9.6 Locking Fig 9.6, move the arm into position and re-tighten the knobs. The micro knobs Micro adjustment collar can be used if necessary for fine adjustment. adjustment collar For best results position the guide bar so that when the trueing bar is in...
- Page 15 9. Operation Finding the Existing Angle of the Tool to be Sharpened Fig 9.11 Use the angle finder as shown in Fig 9.11 to find the angle of the edge to be sharpened. The angle shown is 25º. Setting the Angle Setting Gauge Loosen the diameter and pointer knobs, Fig 9.12.
- Page 16 9. Operation Adjusting the Torque Fig 9.16 The torque of the friction drive can be increased if required to cope with greater application of pressure during sharpening, see Fig 9.16. Honing the Tool After sharpening the tool on the stone it can be honed if required to increase its sharpness.
- Page 17 9. Operation Place the straight edge jig onto the support arm and position it so that the Fig 9.21 tool edge is parallel with the honing wheel as shown in Fig 9.21. Turn the wheel by hand as shown in Fig 9.22. If the black ink is removed evenly across the tool’s edge then the angle is correct.
-
Page 18: Optional Jigs For The Wg200 Wet Stone Sharpener
10. Optional Jigs for the WG200 Wet Stone Sharpener To complement the WG200 Wet stone Sharpener Record Power offers an For further information on the Record Power jig range or to purchase please extensive range of jigs to allow the sharpening of a wide range of tools. -
Page 19: Wg250/A Gouge Jig
10.1 WG250/A Gouge Jig Use to sharpen: • Bowl gouges • Spindle gouges • V-tools The gouge jig attaches to the support arm of the wet stone sharpener. A Knob screw B Tool holder C Shaft D Support arm mount E Elbow joint Using the Gouge Jig Fig 10.1.1... -
Page 20: Wg250/B Short Tool Jig
10.1 WG250/A Gouge Jig Carefully apply the tool to the wheel, see Fig 10.1.5, ensuring contact is Fig 10.1.5 kept whilst pivoting the shaft to sharpen all the way round the edge. See Fig 10.1.6. Fig 10.1.6 10.2. WG250/B Short Tool Jig Use to sharpen: •... -
Page 21: Wg250/C Straight Edge Jig
10.3. WG250/C Straight Edge Jig Use to sharpen: • Plane irons • Bevel edge chisels The straight edge jig slides onto the support arm of the wet stone sharpener. A Registration bar B Clamp C Lock knobs Fig 10.3.1 Registration Using the Straight Edge Jig Mount the support arm in the upper position. -
Page 22: Wg250/D Plane Camber Jig
10.4. WG250/D Plane Camber Jig Use to sharpen camber plane blades up to 76 mm (3” wide). The plane camber jig slides on the support arm of the wet stone sharpener. A Camber lock knob B Camber setting screw and lock C Fence D Blade lock knob E Rocker pad... - Page 23 10.4. WG250/D Plane Camber Jig Pass the blade back across the stone from right to left whilst holding down Fig 10.4.5 the right hand rocker pad as shown in Fig 10.4.5. Sharpening the blade in this manner will give a cambered edge to the blade as shown in Fig 10.4.6.
-
Page 24: Wg250/E Scissor Jig
10.5. WG250/E Scissor Jig Use to sharpen: • Scissors • Garden shears The scissor jig mounts on to the support arm of the wet stone sharpener. A Clamp B Clamp knob C Scissor holder D Support plate E Depth screw Using the Scissor Jig Adjust the depth screw to allow the scissor blade to be placed in the clamp Fig 10.5.1... -
Page 25: Wg250/F Side Wheel Sharpening Jig
10.5. WG250/E Scissor Jig Pass the blade across the stone to sharpen the bevelled edge, tilting the jig if Fig 10.5.5 necessary to follow the curve of the blade, Fig 10.5.5. Carry out the above procedure for both blades of the scissors. Both clamps may need to be used for holding longer blades such as garden shears. -
Page 26: Wg250/G Short Knife Jig
10.7. WG250/G Short Knife Jig Use to sharpen: • Knives up to 100 mm (4”) in length • Pocket knives • Small cutlery knives A Clamp B Depth screw C Locking knob D Stop E Fine adjustment knob 45 mm Using the Short Knife Jig Fig 10.7.1 Place the support arm in the upper position. -
Page 27: Wg250/H Long Knife Jig
10.8. WG250/H Long Knife Jig Use to sharpen: • Knives over 100 mm (4”) in length • Large cutlery knives • Draw knives A Clamp B Depth screw C Locking knob D Stop E Fine adjustment knob 100 mm Using the Long Knife Jig Fig 10.8.1 Place the support arm in the upper position. -
Page 28: Wg250/I Tool Rest Jig
10.9. WG250/I Tool Rest Jig Use to sharpen: • Woodturning scraper chisels • Screwdrivers • Cabinet scrapers • Hollowing tools • Spoke shave blades The tool rest jig mounts onto the support arm of the wet stone sharpener in either the upper or lower position. A Lock knob B Face Using the Tool Rest Jig... -
Page 29: Wg250/J Axe Jig
10.10. WG250/J Axe Jig Use to sharpen: • Carving axes • Carpenter’s axes The axe jig slides onto the support arm of the wet stone sharpener. Using the Axe Jig Fig 10.10.1 Mount the support arm in the upper position and slide the axe jig onto it as shown in Fig 10.10.1. -
Page 30: Wg250/O Support Arm Extension Kit
10.11. WG250/O Support Arm Extension Kit The extension arm mounts on the support arm and allow the user to sharpen and hone without having to reposition the support arm and reset the angle of the jig. A Lock knob B Extension arm holder C Extension arm Using the Extension Arm Fig 10.11.1... -
Page 31: Maintenance
When the sharpening stone has worn to a diameter of approximately 100 Fig 11.3 mm (4”) it must be replaced. Disconnect the WG200 from the power source. Loosen the nut and remove the stone. Please note: The lock nut has a left hand thread and must be turned clockwise to loosen. -
Page 32: Troubleshooting
12. Troubleshooting Problem Possible cause Suggested corrective action Motor does not start. 1. Power cable defective. 1. Replace the power cable. 2. Connections on the motor or 2. Have the machine inspected by a qualified electrician. switch defective. 3. Carbon brushes worn. 3. -
Page 33: Electrical Connection And Wiring Diagram
13. Electrical Connection and Wiring Diagram Machines supplied for use in the UK are fitted with a 3 pin plug conforming fitted with a fuse conforming to BS1362 appropriate to the rating of the to BS1363, fitted with a fuse conforming to BS1362 and appropriate to the machine. -
Page 34: Parts Lists And Diagrams
14. Parts Lists and Diagrams QT9800-A QT9800-C QT9800-B QT9800-F QT9800-D QT9800-E QT9800 Explode Drawing Part No. Description Quantity QT9800-A Machine body assembly QT9800-B Motor assembly QT9800-C Arm support assembly QT9800-D Switch box assembly QT9800-E Drive assembly QT9800-F Water tank assembly... - Page 35 14. Parts Lists and Diagrams QT9800-A (A-01) A-01 A-02 A-10 A-03 (A-04) A-04 A-15 A-05 A-11 A-09 (A-06) A-12 A-06 A-08 A-13 (A-04) (A-04) A-14 A-07 (A-13) (A-07) (A-07) (A-07) QT9800-A Machine Body Assembly Part No. Description Quantity A-01 Self-tapping screw ST5 x 20 A-02 Handle A-03...
- Page 36 14. Parts Lists and Diagrams QT9800-C C-01 C-02 QT9800-C Support Arm Assembly Part No. Description Quantity C-01 Support arm C-02 Micro adjustment nut QT9800-B (B-11) B-12 B-11 B-10 B-05 B-07 B-16 B-08 B-15 B-04 B-09 (B-13) B-03 B-14 B-13 B-02 B-06 (A-08) (B-07)
- Page 37 14. Parts Lists and Diagrams D-02 (B-02) C-07 C-06 D-01 C-08 C-04 C-03 (A-08) (A-08) C-05 QT9800-D Power Switch Assembly Part No. Name Description Quantity Part No. Name Description Quantity A-08 Self-tapping screw ST4 x 14 D-04 Power switch B-02 Cable retainer D-05 Indicator knob...
- Page 38 EU Declaration of Conformity Cert No: EU / WG200 / 1 RECORD POWER LIMITED, Centenary House, 11 Midland Way, Barlborough Links, Chesterfield, Derbyshire S43 4XA declares that the machinery described:- 1. Type: Wet Stone Sharpener 2. Model No: WG200 3. Serial No .................
- Page 40 Woodworking Machinery and Accessories Record Power Ltd, Centenary House, 11 Midland Way, Barlborough Links, Chesterfield, Derbyshire S43 4XA Tel: +44 (0) 1246 571 020 Fax: +44 (0) 1246 571 030 www.recordpower.co.uk To register a product and find your local stockist visit recordpower.info...
Need help?
Do you have a question about the WG200 and is the answer not in the manual?
Questions and answers