Advertisement
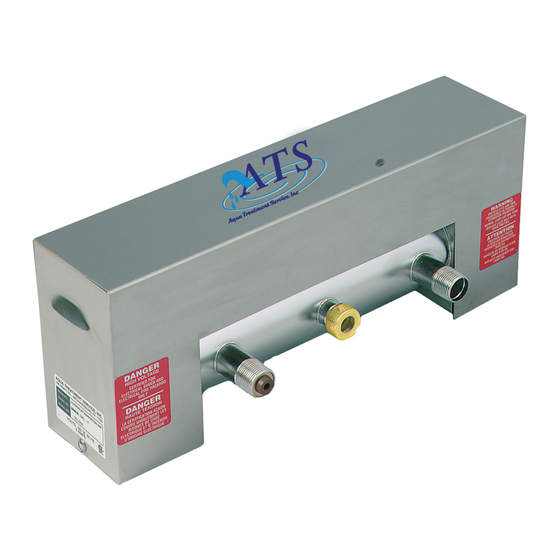
DWS/SE/DWSW
Series
U.V. Disinfection
INSTALLATION & OPERATION MANUAL
This manual covers installation, operation and maintenance
requirements for DWS/SE/DWSW U.V. Disinfection Units.
Models DWS-7, 15, and SE-7, 15, and DWSW-8, 15
(SE Units: During normal operation, the Green LED will flash every 5 - 10 seconds.)
It is important that those responsible for the installation of this
equipment, as well as the owner / operator, read this manual
and carefully follow the instructions and guidelines.
AQUA TREATMENT SERVICE, INC.
194 HEMPT ROAD
MECHANICSBURG, PA 17050
ph: (717) 697 - 4998
fax: (717) 697 - 5035
EPA PRODUCT REGISTRATION #
062333-PA-001
Revised: 9/14
Advertisement
Table of Contents

Related Manuals for ATS DWS Series


Summary of Contents for ATS DWS Series
- Page 1 DWS/SE/DWSW Series U.V. Disinfection INSTALLATION & OPERATION MANUAL This manual covers installation, operation and maintenance requirements for DWS/SE/DWSW U.V. Disinfection Units. Models DWS-7, 15, and SE-7, 15, and DWSW-8, 15 (SE Units: During normal operation, the Green LED will flash every 5 - 10 seconds.) It is important that those responsible for the installation of this equipment, as well as the owner / operator, read this manual and carefully follow the instructions and guidelines.
- Page 2 SAFETY INSTRUCTIONS WARNING - to guard against injury, basic safety precautions should be observed, including the following: 1. READ AND FOLLOW ALL SAFETY INSTRUCTIONS. 2. DANGER - To avoid possible electric shock, special care should be taken since water is present near electrical equipment.
-
Page 3: Description Of Equipment
FUNCTION: The function of this ultraviolet disinfection unit is to provide in excess of 99% reduction of all water borne pathogenic (disease causing) bacteria. Model DWS/SE/DWSW series have a number code designation correspondent to the maximum gpm (gallons per minute) flow rate of the unit. I.E.- DWS-7 has a maximum flow capacity of 7 gpm. Applications: Ultraviolet Germicidal Disinfection A.T.S. -
Page 4: Installation
GENERAL CONSIDERATIONS FOR ALL DISINFECTION UNITS: When installing the equipment, it is necessary that the unit be isolated from vibration, heavy equipment, and poorly connected piping. Incoming water temperature to the unit should not exceed 35 ° minimum to110 ° maximum degrees Fahrenheit. -
Page 5: General Installation Diagram
STEP BY STEP INSTALLATION: 1. Turn off the water before cutting into the water line. 2. Assess the installation (i.e. type of pipe, size of lines, etc.) and obtain necessary plumbing fittings for installation. Inlets and outlets on 8 gpm units are 3/4" MNPT. Use Teflon tape on all threaded connections and avoid over tightening. - Page 6 RESET BUTTON MOUNTED UNDER TOP PLATE) ATS-280CB LAMP MAINS OUTLET BALLAST...
- Page 7 OPERATING INSTRUCTIONS Your ATS UV System is equipped with the ATS-280CB UV Lamp Detector and Timer circuit board which is designed to provide a continuous monitoring system of the UV lamp operational status. This solid state electronic circuit board provides the latest in UV lamp monitoring technology.
- Page 8 To Find out how many Months are left on the Lamp Timer - Push the reset button for 1-2 seconds then release. After an initial sound there will be a pause followed by beeping and a flashing LED. The number of beeps corresponds to the number of months left on the lamp life. To Reset 1 Year Lamp Timer –...
-
Page 9: Quartz Sleeve
QUARTZ SLEEVE: Installation of the Quartz Sleeve: Always handle quartz sleeves carefully to prevent breaking or chipping. The quartz sleeves are to be clean and free of fingerprints before installing. Remove the compression nut. Install the quartz sleeve through the stainless steel threaded nipple allowing an equal amount to extend beyond each nipple. - Page 10 U.V. LAMPS: INSTALLATION OF THE ULTRAVIOLET LAMPS: **DO NOT PUT POWER ON AT THIS TIME!** CAUTION: Never look directly at a operating U.V. lamp operate a U.V. lamp outside the disinfection chamber. Make sure unit is unplugged when installing or servicing ultraviolet lamp. Remove any paper tabs on the U.V.
-
Page 11: Disinfection Procedure
SANITATION PROCEDURE FOR INSTALLATION AND BULB REPLACEMENT: HOW TO DISINFECT A WATER SYSTEM: Every new well, or existing water supply system that has been disrupted for service or repair, should be disinfected before it is returned to use. Water in the well and storage tank should be treated with a strong chlorine solution to destroy disease organisms. - Page 12 LARGE DIAMETER WELLS: Dug or bored wells should be disinfected in the same way as a drilled one. Lower the water level as much as possible, remove the sand, silt and debris, and then treat with the chlorine solution. Mix thoroughly by circulating the water back into the well and use the hose to rinse the interior lining of the well.
- Page 13 REMEMBER - To make your water supply safe: - Locate your well properly. - Protect it from surface contamination. - Test water periodically for coliform bacteria. (Home-yearly, Farm-2X yearly) - Chlorinate, or filter and disinfect the water if necessary. When installing an ultraviolet disinfection system, a prefilter with sump may serve as a source to sanitize the water lines only.
- Page 14 DRILLED WELLS: 1. Remove the cap or seal from the casing and measure the depth of the water in the well, then refer to Table 1 to determine how many chlorine pellets should be used. In some instances removing the seal to measure the water can be a difficult task, and it is easier to estimate well and water depth from well log or other records.
-
Page 15: Troubleshooting Guide
TROUBLESHOOTING GUIDE PROBLEM CAUSE CORRECTION U.V. lamp will not light Check input voltage if below Install a voltage regulator or above 120 volts Line cord disconnected Check, replace or outlet defective Defective U.V. lamp Replace Defective lamp ballast Check output voltage Replace ballast Loose open-circuit wire Trace out and repair... -
Page 16: Limited Warranty
LIMITED WARRANTY All parts of the disinfection unit, with the exception of the U.V. lamp, are guaranteed for one (1) year against defective parts and workmanship. The stainless steel disinfection chamber on the DWS/SE/DWSW series is guaranteed for ten (10) years. component which fails to operate satisfactorily within their time period will be replaced free of charge under the following conditions: NOTIFY YOUR LOCAL DEALER OR DISTRIBUTOR OF ANY PARTS... -
Page 17: Specifications
(WETTED PARTS) CABINET HOUSING 304 SS 304 SS 304 SS 304 SS MATERIAL #4 POLISH #4 POLISH #4 POLISH #4 POLISH ATS-254M MONITOR N / A OPTIONAL OPTIONAL OPTIONAL U.V. DOSAGE > 30,000 > 30,000 > 30,000 > 30,000 µw sec./cm µw sec./cm... - Page 18 SUGGESTED PROCEDURE FOR OBTAINING STERILE WATER SAMPLES: Prior to taking the water sample, be sure to have on hand an adequate supply of sterile bottles. These sterile bottles should be obtained from a reputable laboratory and should have been autoclaved and contained within a plastic outer wrapping.
-
Page 20: Wiring Diagram
WIRING DIAGRAM... - Page 22 ATS1-421-CCASE WH-3C...
- Page 27 DRAWING AND PART NUMBERS...
- Page 28 DWS-7 Explosion...
- Page 29 DWS-7 Parts List CODE PART# DESCRIPTION QTY. ATS-5100 Chamber ATS-5173 Site Port O-Ring ATS-5172 Site Port Lens ATS-5171 Site Port Nut ATS8-544 End Nut O-Ring (seal quartz sleeve) ATS5-411 Brass End Nut ATS8-546 O-Ring (for shroud on end nut) ATS-4010...
- Page 30 DWS-15 Explosion...
- Page 31 DWS-15 Parts List CODE PART# DESCRIPTION QTY. ATS-5200 Chamber ATS-5173 Site Port O-Ring ATS-5172 Site Port Lens ATS-5171 Site Port Nut ATS8-544 End Nut O-Ring (seal quartz sleeve) ATS5-411 Brass End Nut ATS8-546 O-Ring (for shroud on end nut) ATS-4010...
- Page 32 SE-7 Explosion...
- Page 33 SE-7 Parts List CODE PART# DESCRIPTION QTY. ATS-5100 Chamber ATS-5173 Site Port O-Ring ATS-5172 Site Port Lens ATS-5171 Site Port Nut ATS8-544 End Nut O-Ring (seal quartz sleeve) ATS5-411 Brass End Nut ATS8-546 O-Ring (for shroud on end nut) ATS-4010...
- Page 34 SE-15 Explosion...
- Page 35 SE-15 Parts List CODE PART# DESCRIPTION QTY. ATS-5200 Chamber ATS-5173 Site Port O-Ring ATS-5172 Site Port Lens ATS-5171 Site Port Nut ATS8-544 End Nut O-Ring (seal quartz sleeve) ATS5-411 Brass End Nut ATS8-546 O-Ring (for shroud on end nut) ATS-4010...
- Page 36 DWSW-8 Explosion...
- Page 37 DWSW-8 Parts List CODE PART# DESCRIPTION QTY. ATS-5227 Chamber ATS-5173 Site Port O-Ring ATS-5172 Site Port Lens ATS-5171 Site Port Nut ATS8-544 End Nut O-Ring (Seal Quartz Sleeve) ATS5-411 Brass End Nut ATS8-546 O-Ring (for shroud on end nut) 03-09-2022...
- Page 38 DWSW-15 Explosion...
- Page 39 DWSW-15 Parts List CODE PART# DESCRIPTION QTY. ATS-5182 Chamber ATS-5173 Site Port O-Ring ATS-5172 Site Port Lens ATS-5171 Site Port Nut ATS8-544 End Nut O-Ring (seal quartz sleeve) ATS5-411 Brass End Nut ATS8-546 O-Ring (for shroud on end nut) ATS-4010...
Need help?
Do you have a question about the DWS Series and is the answer not in the manual?
Questions and answers