Table of Contents
Advertisement
Advertisement
Table of Contents

Related Manuals for IRadimed 3880 MRI


Summary of Contents for IRadimed 3880 MRI
- Page 1 3880 MRI Patient Monitor System Reference Guide www.IRadimed.com...
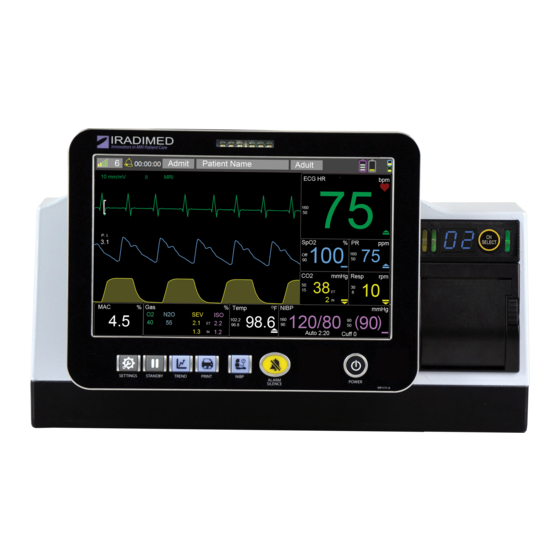
- Page 2 3880 System Overview 3880 System Overview 3880 Monitor PODs, Tablet, and Base Station Monitor Right Monitor Front Monitor Left Base Station Removable Tablet Power ON Button Settings Power Button Power OFF Button Standby Channel Channel Select Button Trend Channel Select Button Settings Connection Indicator Port...
- Page 3 Wireless Channel Number Screen Overview Screen Overview Monitor’s Clock Alarm Indicators Battery Statuses Admit/Discharge Patient Type Signal Indicator On Screen Alarms ECG Heart Rate Alarm Priority Physiological Alarms Technical Alarms ECG Waveform Dynamic Trends SpO2 Readings Pulse Rate Readings SpO2 Waveform EtCO2 Readings Respertory Rate Readings CO2 Waveform...
- Page 4 Initial Setup Initial Setup 1.1| Power and Charging the Monitor 1.2 | Power and Charging the Base Station and Tablet a. Ensure the Base Station is plugged into a power source. Toggle the switch up on the reverse side of the Base Station to power it ON.
- Page 5 Initial Setup Initial Setup 1.3 | Powering and Charging the PODs 1.4 | Powering the 3886 Multi-Gas Module a. Ensure the Multi-Gas Module is plugged into a power source. a. Remove the selected POD from the charging dock on either the side of the Monitor or the Base Station’s dock. Green b.
- Page 6 Wireless Channel Conectivity Wireless Channel Connectivity 2.1 | Changing Wireless Channels on the 3880 System 2.2 | Changing Wireless Channels on the Wireless PODs a. To place the POD into channel select mode, press the yellow yellow CH Select Button a.
- Page 7 Electrocardiogram (ECG) Electrocardiogram (ECG) 3.1 | Patient Preperation and Electrode Application 3.2 | Connecting Electrodes on Patients a. Connect the leadwires to its matching colored coded a. Select an application site and remove any hair from indicator on the ePOD. Ensure the wire connectors are flush with the ePOD. the area if necessary.
- Page 8 Electrocardiogram (ECG) Electrocardiogram (ECG) 3.3 | Leadwire Management 3.4 | ECG for Neonatal Applications Head Coil Example a. Do NOT over abrade the patient’s skin as neonatal skin is very sensitive. b. It is NOT required to seperate the electrodes. c.
- Page 9 Pulse Oxymetry oPOD Pulse Oxymetry oPOD 4.1 | SpO Adult Application 4.2 | SpO Neonatal Application a. Select the correct SpO applicator for the patient. Insert the fiber-optic cable emitting the red light into the opening on the grips marked by a star or number. Secure grips to the patient by align the a.
- Page 10 Respiration Capnography Temperature 5.1 | EtCO Application 6.1 | Fiber-Optic Thermometer Application a. Turn the Agents parameter OFF. a. Remove any dustcaps from the fiber-optic themometer and its port on the Monitor. b. Attach the Disk Filter to the CO port on the monitor, and connect an 1841 sample line to the disk filter.
- Page 11 Noninvasive Blood Pressure Invasive Blood Pressure ipPOD 7.1| NIBP Clinical Application 8.1| Invasive Blood Pressure Application a. Connect the NIBP Hose to the 3880 Monitor a. Turn on the IBP1 and/or IBP2 with the toggle button in the Parameter Setup Menu. b.
- Page 12 3886 Multi-Gas Module 3886 Multi-Gas Module Be aware, the 3886 Multi-Gas Module is MR Conditional 9.1| Configuring the 3880 Monitor for the 3886 Multi-Gas Module 9.2 | 3886 Multi-Gas Module Application a. Once connected, insert the nomoline into the 3886 Multi-Gas Module. a.
- Page 13 Scan For Information subject to change. ©IRadimed Corporation 2020 - All rights reserved * Items number 3883-1, 3883-2, 3883-3 ship from Iradimed as a complete ipPOD. Each connector has its own item number, 1861, 1862, and 1863 respectively. Training Videos 1025 Willa Springs Drive, Winter Springs, FL 32708 | (407) 677-8022 1194_REV B.
Need help?
Do you have a question about the 3880 MRI and is the answer not in the manual?
Questions and answers