Table of Contents
Advertisement
Quick Links
OPERATOR'S MANUAL
GRIDIRON
™
STG1050
LP GAS CYLINDER SOLD
SEPARATELY
FOR OUTDOOR USE ONLY
DANGER:
You WILL be KILLED or SERIOUSLY HURT if you do not follow the
instructions in this operator's manual.
NOTE TO INSTALLER/ASSEMBLER: Give this Operator's Manual to the consumer so the consumer may retain it for future
reference.
SAVE THIS MANUAL FOR FUTURE REFERENCE
GRILL
Visit the ST
K
website at: www.stokgrills.com
Ō
®
Advertisement
Table of Contents

Related Manuals for STOK GRIDIRON STG1050


Summary of Contents for STOK GRIDIRON STG1050
- Page 1 OPERATOR’S MANUAL GRIDIRON GRILL ™ STG1050 LP GAS CYLINDER SOLD SEPARATELY FOR OUTDOOR USE ONLY Visit the ST website at: www.stokgrills.com Ō ® DANGER: You WILL be KILLED or SERIOUSLY HURT if you do not follow the instructions in this operator’s manual. NOTE TO INSTALLER/ASSEMBLER: Give this Operator’s Manual to the consumer so the consumer may retain it for future reference.
-
Page 2: Table Of Contents
TABLE OF CONTENTS Introduction ..................................2 General Safety Rules ..............................3-4 Specific Safety Rules ................................4 Symbols ....................................5 Features ....................................6 Loose Parts ..................................7 Tools Needed ..................................7 Assembly ..................................8-12 Operation .................................. 13-15 Maintenance ................................16-17 ... -
Page 3: General Safety Rules
GENERAL SAFETY RULES The grill shall not be used under overhead combustible construction. WARNING: Keep area around this appliance free of combustible Read and understand all instructions. Failure to follow materials, gasoline, and all other flammable vapors and all instructions listed below, may result in electric shock, liquids. -
Page 4: Specific Safety Rules
GENERAL SAFETY RULES If a leak is detected at any time, get away from the LP Stay alert and exercise control. Watch what you are doing gas cylinder and call the fire department. and use common sense. Do not operate a grill when you are tired. -
Page 5: Symbols
SYMBOLS The following signal words and meanings are intended to explain the levels of risk associated with this product. SYMBOL SIGNAL MEANING Indicates an imminently hazardous situation, which, if not avoided, will result DANGER: in death or serious injury. Indicates a potentially hazardous situation, which, if not avoided, could result WARNING: in death or serious injury. -
Page 6: Features
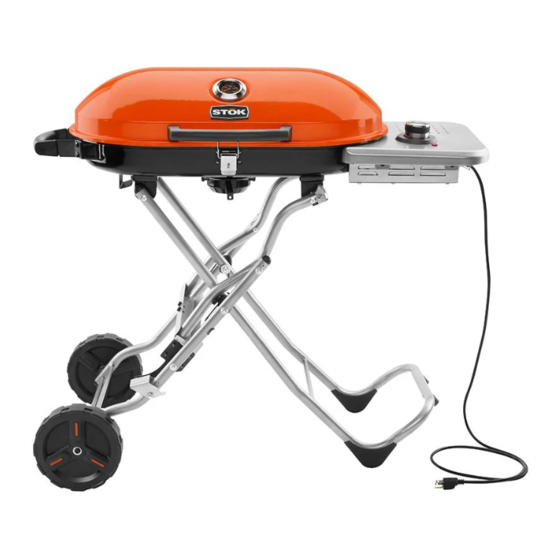
FEATURES PRODUCT SPECIFICATIONS Fuel source ........Propane (not included) BTU rating ............... 15,000 Natural gas convertible ..........No Total grill surface ..........338 sq. in. Grilling surface height ..........31 in. CONTROL KNOB TEMPERATURE GAUGE STAND FIREBOX FRONT HOOD HANDLE FIREBOX MATCH HOLDER FIREBOX... -
Page 7: Loose Parts
LOOSE PARTS Fig. 3 A - Firebox handle ............1 HARDWARE BLISTER PACK B - Grease cup ............... 1 AA - Wing nut ..............2 C - Grate insert ............... 1 BB - Screw (wheel) ............2 D - Grate ................. 1 CC - AAA Battery ............1 E - Wheel ................ -
Page 8: Assembly
ASSEMBLY UNPACKING STEP 2: ATTACHING THE STAND FRONT HANDLE This product requires assembly. See Figure 7. Carefully lift grill from the carton and place it on a level Locate the handle mounts on the firebox. work surface. Align holes in stand front handle (F) with holes in mounts. ... - Page 9 ASSEMBLY STEP 3: OPENING THE STAND See Figure 8 - 10. Grasp the stand front handle and raise the stand until it rests on the wheels and frame support. WARNING: Use the stand front handle to raise the stand. Do not raise by any part of the grill that is attached to the stand.
- Page 10 ASSEMBLY STEP 4: ATTACHING FIREBOX HANDLE See Figures 11 - 12. FIREBOX Raise and open the stand. FIREBOX HOOD HANDLE Lift the hood latch then raise firebox hood. Insert studs in firebox handle (A) through holes in firebox hood.
- Page 11 ASSEMBLY STEP 8: TESTING VALVES AND REGULATOR STEP 6: INSTALLING BATTERY IN IGNITOR FOR LEAKS See Figure 14. See Figure 16. Turn the ignitor cap counterclockwise and lift cap from the control panel. Connections on the valve were tested at the factory to ensure no gas leaks were present.
- Page 12 ASSEMBLY “Growing” bubbles indicate a leak. Remove the LP gas STAND cylinder and recap the bottle. FRONT NOTE: If leaks cannot be stopped, do not try to repair. HANDLE Call for replacement parts. STEP 9: CLOSING STAND AND TRANSPORT- ING THE GRILL See Figures 17 - 18.
-
Page 13: Operation
OPERATION COOKING/GRILLING TIPS WARNING: The best oils to use when grilling meats are high-temper- ature oils (i.e., peanut, canola, safflower, and cottonseed Do not allow familiarity with grill to make you careless. oils). Remember that a careless fraction of a second is sufficient to inflict severe injury. - Page 14 OPERATION IGNITING THE BURNER To ignite burner using match lighting: See Figures 19 - 20. Open the firebox hood. NOTE: Never lean over the grill while lighting burner. Turn control knob to OFF ( O ). The first time you use your newly purchased grill, it is NOTE: To lock the control knob in the off position, turn recommended the grill run on the highest setting for the control knob to LOCK (...
- Page 15 OPERATION NOTE: When grilling fish, the meat is typically done when it flakes easily with a fork. If any part of the meat is glossy WARNING: in appearance, it is not done. Never use an accessory if the porcelain coating is ...
-
Page 16: Maintenance
MAINTENANCE PORT SHIELD WARNING: When servicing, use only identical replacement parts. Use of any other parts could create a hazard or cause BURNER product damage. GENERAL MAINTENANCE FIREBOX When cleaning the inside of the firebox hood and grill bottom, use a strong solution of detergent and water with a scrub brush to clean. - Page 17 1/2 in. in height. Store in dry location. If storing outside, cover grill with one of the variety of grill covers offered by STOK or other If only a low flame is seen, you may need to reset grill cover manufacturers.
-
Page 18: Troubleshooting
TROUBLESHOOTING PROBLEM CAUSE SOLUTION Smell of gas Regulator, or valve leaking. Remove LP cylinder immediately and check for damaged regulator or valve. Perform leak test, see Testing Valves and Regulator for Leaks in the Assembly section. Flame flashback beneath control panel Fire in burner tube due to blockage. See Cleaning Burner Assembly and Checking Venturi for Insects in the Maintenance section. -
Page 19: Warranty
WARRANTY GAS GRILL LIMITED WARRANTY ® Ō Thank you for purchasing a STŌK brand grill. Below is our limited gas grill product warranty. Before submitting a warranty ® claim, we suggest you read the Operator’s Manual that came with your grill. You may discover an easy and simple solution to your problem. - Page 20 OPERATOR’S MANUAL GRIDIRON GRILL ™ STG1050 Customer Service Information: For parts or service, please call 1-800-847-5993 or visit us online at www.stokgrills.com. The model number and serial number of this grill is found on a label located on the leg stand. Please record the serial number in the space provided below.
Need help?
Do you have a question about the GRIDIRON STG1050 and is the answer not in the manual?
Questions and answers