Table of Contents
Advertisement
Available languages
Available languages
Quick Links
Advertisement
Table of Contents

Related Manuals for Steren HER-400


Summary of Contents for Steren HER-400
-
Page 2: Security Information
Before using your new Decibel Meter for Measurement of Before using your new Decibel Meter for Measurement of Sound Intensity, please read this instruction manual to Sound Intensity, please read this instruction manual to prevent any damage. Put it away in a safe place for future prevent any damage. - Page 3 11 Calibration Use this control in order to make adjustments to the decibel-meter. In order to make these adjustments, refers to a Steren authorized technician. 1 AC Adaptor Allows you to connect a 9V power adaptor to the device (adaptor...
- Page 4 ENGLISH-4...
-
Page 5: Screen Description
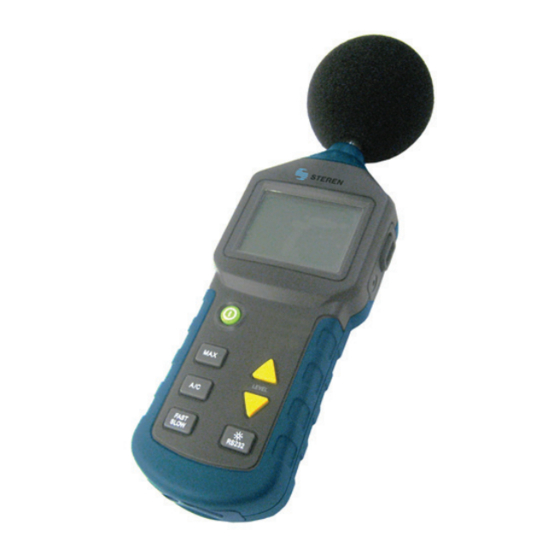
SCREEN DESCRIPTION FAST SLOW UNDER OVER 14:13:08 TIME 888.8 3. Rapid Response 4. Slow Response 5. Current Time 6. Measurement Type 7. Registered Sound Reading 9. Maximum Level Indicator 1 Battery Indicator 11 Analog Indicator 1 Insuffi cient Range Indicator 1 Over Range Indicator ENGLISH-5... -
Page 6: Preparation Of Measurement
PREPARATION OF MEASUREMENT 1. Use a screwdriver in order to remove the cover from the battery compartment. 2. Insert 6 AAA batteries. Make sure to respect the polarity of the batteries as signaled in the battery compartment. 3. When the batteries’ power level is below the minimum operating level, a icon will appear on the LCD screen and will begin to blink. -
Page 7: Operating Precautions
OPERATING PRECAUTIONS • The blowing wind through the microphone may cause additional noise. When using this device in the wind, it is necessary for you to use the fi lter to make sure that the wind does not affect your measurement. •... -
Page 8: Specifications
SPECIFICATIONS Measurement Range: 30-130 dB Exactitude: +- 2dB Resolution: 0.1 dB Screen: 3 ½ digits Sample Relation: 2 times per second Frequency Range: 30 Hz – 8 kHz Over Range Indicator: “High” and “Low” Auxiliary Output: 0.707 V rms in AC at complete range for each level 600 ohms impedance10mV/ dB in DC100 ohms impedance Input:... -
Page 9: Warranty
Part number: HER-400 Brand: Steren WARRANTY This Steren product is warranted under normal usage against defects in workmanship and materials to the original purchaser for one year from the date of purchase. CONDITIONS 1.- This warranty card with all the required information, invoice or purchase ticket, product box or package, and product, must be presented when warranty service is required. -
Page 11: Símbolos De Seguridad
Antes de utilizar su nuevo Decibelímetro lea este instructivo Antes de utilizar su nuevo Decibelímetro lea este instructivo para evitar cualquier mal funcionamiento. Guárdelo para futuras para evitar cualquier mal funcionamiento. Guárdelo para futuras referencias. referencias. INFORMACIÓN DE SEGURIDAD Lea esta información cuidadosamente antes de intentar operar o dar servicio al equipo. - Page 12 Presione una vez para iluminar la pantalla de fondo 1 Calibración Utilice este control para realizar ajustes al decibelímetro, para realizar los ajustes, acuda con personal autorizado de Steren 1 Adaptador de corriente Permite conectar un adaptador de corriente de 9V (adaptador no...
- Page 13 ESPAÑOL-4...
-
Page 14: Descripción De La Pantalla
DESCRIPCIÓN DE LA PANTALLA 3- Respuesta rápida 4- Respuesta lenta 5- Hora actual 6- Tipo de medición 7- Lectura de sonido registrado 9- Indicador de nivel máximo 1. Indicador de batería 1- Indicador Analógico 1- Indicador de rango insufi ciente 1 Indicador de sobre rango FAST SLOW UNDER... -
Page 15: Ajuste De La Hora Y Fecha
3.- Cuando la energía de las baterías está por debajo del nivel mínimo para operar, un icono aparecerá en la pantalla y parpadeará. Reemplace las baterías. 4.- Si desea utilizar un adaptador de corriente (adaptador no incluido), conéctelo en la entrada correspondiente (DC9V). AJUSTE DE LA HORA Y FECHA 1.- Con el decibelímetro apagado, presione el botón MAX. -
Page 16: Especificaciones
2.- Si en pantalla aparece la palabra UNDER u OVER, indican que el nivel de sonido es menor y mayor al rango de 40 – 90dB, por lo que la medición es inválida. Necesita ajustar el rango de medición a una posición que sea correcta. 3.- Ajuste el rango. - Page 17 1.- Para hacer efectiva la garantía, presente ésta póliza y el producto, en donde fue adquirido o en Electrónica Steren S.A. de C.V. 2.- Electrónica Steren S.A de C.V. se compromete a reparar el producto en caso de estar defectuoso sin ningún cargo al consumidor. Los gastos de transportación serán cubiertos por el proveedor.
Need help?
Do you have a question about the HER-400 and is the answer not in the manual?
Questions and answers