Advertisement
Quick Links
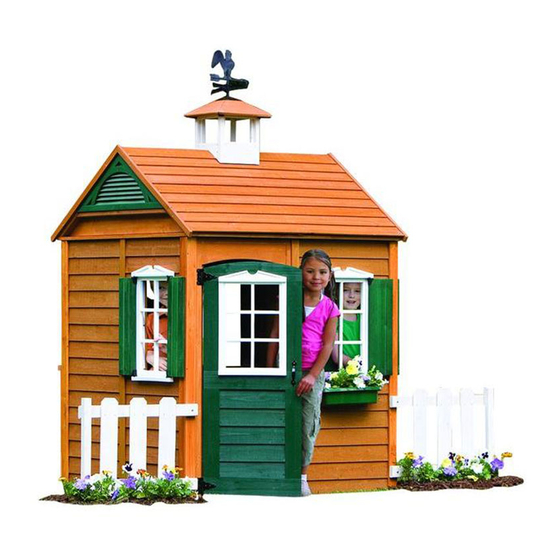
BAYBERRY PLAY HOUSE - P280050X
INSTALLATION AND OPERATING INSTRUCTIONS
18' 8" (5.7 m)
7'8"
TO BE ASSEMBLED
BY AN ADULT
8 - 10 Hrs
Two person
assembly
3400050X
WARNING
often and give them to any future owner of this play system. Manufacturer contact information provided below.
4'2"
CAPACITY - 3 Users Maximum, Ages 2 and up.
RESIDENTIAL HOME USE ONLY. Not intended for public areas such as schools, churches, nurseries,
day cares or parks
Solowave Design
375 Sligo Rd. West, PO Box 10
Mount Forest, ON Canada N0G 2L1
General Inquiries:
8:00am - 4:30pm EST
Toll Free: 1-877-966-3738
support@solowavedesign.com
To reduce the risk of serious injury or death, you must read and
follow these instructions. Keep and refer to these instructions
Ages 2 to 10
Table of Contents
Warnings and Safe Play Instructions . . . . . . . . . . pg. 2
Protective Surfacing Guidelines . . . . . . . . . . . . . . pg. 3
Instructions for Proper Maintenance . . . . . . . . . . pg. 4
About Our Wood - Limited Warranty . . . . . . . . . . pg. 5
Keys to Assembly Success . . . . . . . . . . . . . . . . . . pg. 6
Part ID . . . . . . . . . . . . . . . . . . . . . . . . . . . . . . . . . . pg. 7
Installation of I.D./Warning Plaque . . . . . . . . Final Step
Rev -Feb 27-13
Advertisement

Related Manuals for Solowave Big Backyard BAYBERRY PLAY HOUSE


Summary of Contents for Solowave Big Backyard BAYBERRY PLAY HOUSE
-
Page 1: Table Of Contents
BY AN ADULT 8 - 10 Hrs Two person assembly Solowave Design Table of Contents 375 Sligo Rd. West, PO Box 10 Warnings and Safe Play Instructions ..pg. 2 Mount Forest, ON Canada N0G 2L1 Protective Surfacing Guidelines . -
Page 2: Warnings And Safe Play Instructions
Warnings and Safe Play Instructions CONTINUOUS ADULT SUPERVISION REQUIRED. Most serious injuries and deaths on playground equipment have occurred while children were unsupervised! Our products are designed to meet mandatory and voluntary safety standards. Complying with all warnings and recommendations in these instructions will reduce the risk of serious or fatal injury to children using this play system. -
Page 3: Protective Surfacing Guidelines
Protective Surfacing - Reducing Risk of Serious Head Injury From Falls. One of the most important things you can do to reduce the likelihood of serious head injuries is to install shock-absorbing protective surfacing under and around your play equipment. The protective surfacing should be applied to a depth that is suitable for the equipment height in accordance with ASTM F1292. -
Page 4: Instructions For Proper Maintenance
Instructions for Proper Maintenance Your Big Backyard Play System is designed and constructed of quality materials with your child’s safety in mind. As with all outdoor products used by children, it will weather and wear. To maximize the enjoyment, safety and life of your Play Set, it is important that you, the owner, properly maintain it. -
Page 5: About Our Wood - Limited Warranty
About Our Wood Solowave Design™ uses only premium playset lumber, ensuring the safest product for your children’s use. Although great care has been taken in selecting the best quality lumber available, wood is a product of nature and susceptible to weathering (changes in the aesthetics of the wood). -
Page 6: Keys To Assembly Success
Keys to Assembly Success Tools Required Shovel Measuring Drill (1/8” Safety Hammer Ratchet 1/2”, Level #2 & #3 Phillips Square Step Tape 3/16” Bit) Glasses 7/16” & 9/16” or Robertson Ruler Ladder Part Identification Key 2X A1 Post 2 x 4 x 83” On each page, you will find the parts and quantities required to complete the assembly step illustrated on that page. -
Page 7: Part Id
Part Identification (Reduced Size Drawings) Window Wall (3) Door Frame (1) Wall Assembly (2) (38018036) (38018836) (38018136) Door Window Shutter (6) w/ Screws (1) Large Window A 15 x 138 x 461 (3320594) w/ Screws (3) [9/16 x 5-7/16 x 18-1/8"] (3320593) (3633460) Door Panel... - Page 8 Part Identification (Reduced Size Drawings) Rafter Extender (4) 15 x 30 x 765 [5/8 x 1-1/8 x 30-1/8"] (38013936) Long Wall Connector (2) 21 x 30 x 1160 [13/16 x 1-1/8 x 45-5/8"] (38029636) Long Rafter Tie (2) 38.1 x 38.1 x 816 [1-1/2 x 1-1/2 x 32-1/8"] (38022336) Short Rafter Tie (1) 38.1 x 38.1 x 457 [1-1/2 x 1-1/2 x 18"] (38022236) Roof Rafter (6) 38.1 x 38.1 x 736.6 [1-1/2 x 1-1/2 x 29"] (38022136) Short Wall Connector (2) 21 x 30 x 610 [13/16 x 1-1/8 x 24"] (38013436)
- Page 10 Hardware Identification (Actual Size Drawing) Pan Quadrex #8 x 2" (34) (9224520) Wood Screw #8 x 1-1/2" (89) (9260512) Trim Screw #6 x 30mm (58) (9224911) Wood Screw #8 x 1-1/8" (24) (9290514) Truss Screw #8 x 7/8" (54) (9229505) Door Latch w/ Screws (1) (9201621) Door Handle w/ Screws (2)
- Page 11 STOP • FILL THIS OUT BEFORE YOU DISCARD YOUR CARTONS • THE CARTON I.D. STAMP IS LOCATED ON THE END OF EACH CARTON • YOU WILL NEED THIS INFORMATION IF YOU CALL CONSUMER RELATIONS DEPARTMENT PRODUCT NUMBER: P280050X CARTON I.D. STAMP: __ __ __ __ __ 14459 ___ (Box 1) CARTON I.D.
- Page 12 Pre-Drill Window Wall for Step 1 Use 1/8" Drill Bit to drill at the 3 points as shown Drill at angle to clear this edge Please Note: Wall Panels are permanently assembled and 100% inspected at the factory. With rough handling and movement during transit, the assembly may shift causing an occasional sharp staple point or crown to protrude.
- Page 13 Step 1 Front Wall Assembly Lay Walls on ground for easy assembly Drive this screw by hand Power-Drive these screws Pre-Drilled Window Wall To prevent splitting wood, drill 1/8" pilot holes using predrilled holes as a guide for all S2 screws...
- Page 14 Step 2 Side Wall Assembly Lay Walls on ground for easy assembly Drill 1/8" Pilot Hole Angle drill as needed X6 (3 per wall) Left Side Wall Assembly Right Side Wall Assembly To prevent splitting wood, drill 1/8" pilot holes using predrilled holes as a guide for all S2 screws X8 (4 per wall) Right Side Wall Assembly...
- Page 15 Wall Alignment Diagram for Step 3 Side wall edge flush with siding Side wall edge flush with siding Right Wall Assembly Half Wall Assembly Front Wall Assembly Left Wall Assembly Side wall edge flush with siding Side wall edge flush with Door Frame TOP VIEW...
- Page 16 Step 3 Wall Assembly: Make sure ground is level and playhouse walls are square X6 (3 per wall joint) Left Wall Assembly Front Wall Assembly Right Wall Assembly 1" Drill approx. 1" from top of siding for each screw X4 (2 per wall joint)
- Page 17 Step 4 Back Wall Assembly Back View Inside View Sunburst Bracket w/ hardware Corner Brace w/ hardware...
- Page 18 Step 5 Soffit Assembly: Make sure walls are square before fastening Soffits To prevent splitting wood, drill 1/8" pilot holes using predrilled holes as a guide for all S2 screws X12 (6 per Soffit) Hole not used Soffit flush with in this step 2 Places Connector...
- Page 19 Step 6 Truss Assembly Drill 1/8" pilot hole End-Truss Assembly X2 (1 per Truss) Gable Vent Screws (4) Gable Vent Gable Vent Screws (2) X4 (2 per Truss) 1221.3 [48-1/16"] Repeat above steps to create 2 End-Truss Assemblies Drill 1/8" pilot hole Mid-Truss Assembly 1221.3 [48-1/16"]...
- Page 20 Step 7 Attach Truss Assemblies: Make sure walls are square before fastening Trusses Truss Alignment Diagram TOP VIEW Slight overhang to be equal Slight overhang to be equal Slight overhang to be equal X6 (2 per Truss) Mid-Truss Assembly End-Truss Assembly End-Truss Assembly When attaching Mid-Truss Assembly, push L in, to locate hole.
- Page 21 Step 8 Roof Assembly Drill 1" above hole on last board (3 holes per side)
- Page 22 Step 8 Roof Assembly (continued) Attach Gable Support from inside Drill straight to avoid splitting X12 (6 per side) SECTION VIEW INSIDE VIEW Repeat this step on left side Rafter Extender Assembly Drill 1/8" Pilot Hole 6 Places Align vertical edge X12 (6 per side) with Gable Vent seam Repeat this step on left side...
- Page 23 Step 9 Joint Trim Assembly Joint Strip to be tight to bottom of Soffit Front / Right Side Note: Orient Y and YY so that holes are closer to corner Back / Left Side...
- Page 24 Step 10 Corner Trim Assembly Note: Orient Y so that X6 (3 per side) hole is closer to corner 3 holes Corner Trim to be tight to bottom of Soffit Trim edge flush with end of Wall X12 (6 per side) 6 Holes Trim surfaces flush...
- Page 26 Step 12 Window & Flower Box Assembly Window Assembly Shutter Assembly G Large Window A Shutter Assemblies Shutter Pivots E Shutter Shutter Screws Shutter Screws Keep inner frame closed while fastening screws Window Screw 24 Places 6 per Window Flower Box Screw 2 Places Flower Box Window Assemblies...
- Page 28 Step 14 Assemble Cupola Roof Assembly 1 Roof Assembly 3 Weather Vane Base Align notch to ensure proper North-East-West-South Alignment Roof Mount Weather Vane Parts Roof Mount Screws Roof Assembly 2 Cupola Roof Weather Vane Base Roof Mount Screws Tape Roof sections Roof Mount Screws together with tape 4 Places...
- Page 29 Step 15 Attach Cupola Assembly Weather Vane Screws Cupola Roof Assembly Cupola Box Assembly Screws Cupola Bracket 2 Places (also install on other side)
- Page 30 NOTES...
- Page 31 NOTES...
- Page 32 Would you recommend the purchase of our products to friends and family? Comments: MAIL TO: Fill out your registration card online at Solowave Design www.bigbackyard.com/ownerslounge 375 Sligo Road W. Mount Forest, Ontario, Canada Big Backyard would like to say Thank You for N0G 2L1 your time and feedback.
Need help?
Do you have a question about the Big Backyard BAYBERRY PLAY HOUSE and is the answer not in the manual?
Questions and answers
How do you stabilize the house to the ground
To stabilize the Solowave Big Backyard Bayberry Play House to the ground, check the ground stakes (anchors) for looseness, damage, or deterioration. The unit must be firmly anchored to the ground during use. Re-secure or replace the anchors if necessary.
This answer is automatically generated