Table of Contents
Advertisement
Quick Links
Advertisement
Table of Contents

Summary of Contents for Movie Cube N120
- Page 1 Home Multimedia Center Movie Cube N120 User’s Manual (Version 1.0.0)
-
Page 2: Table Of Contents
Table of Contents 1. Introduction.......................... 3 1.1 Preface......................... 3 1.2 Packing List........................3 1.3 Caution......................... 3 1.4 Connection ........................5 1.5 First Time Usage ......................7 2. About the Player ........................8 2.1 Remote Control ......................8 2.2 Front Panel........................9 2.3 Rear Panel ........................ -
Page 3: Introduction
1. Introduction 1.1 Preface Dear Customer, Thank you very much for purchasing the product. In the digital era, this product is a great home entertainment partner. With the outstanding design, you can enjoy movies and music, and view photos of precious moments. This product can directly playback files from U disk and portable HDD with its high-speed USB 2.0. - Page 4 1.3.1 Usage cautions User should not modify this player. The environmental temperature should be within +5℃ ~ +35℃. 1.3.2 Power The player’s power voltage: DC 5V. When using this player, please connect the supplied AC adapter or AC adapter cable to the player’s power jack.
-
Page 5: Connection
1.4 Connection 1.4.1 USB Mass Storage Device (like USB Pen Drive, MP3, USB HDD, etc.) Connection (1) Make sure the player is powered on; (2) Plug in the USB Pen Drive or USB HDD or other USB device to the USB HOST port of this player. - Page 6 1.4.3 TV connection 1.4.3.1 A/V OUT (1) Follow the picture and plug in the connector to the player’s A/V OUT jack; (2) Follow the picture and plug in the 3 color connector to the TV’s A/V IN jack. (3) Select the appropriate input source. In this way, you can enjoy the content in the player on TV or other display devices.
-
Page 7: First Time Usage
1.5 First Time Usage 1. Power on Plug in the power cord to DC IN jack on the player, and the POWER indicator on the front panel will turn blue. 2. Power off In playback and other interface, press the POWER button on the remote control, the player will enter standby mode, and the POWER indicator will turn red. -
Page 8: About The Player
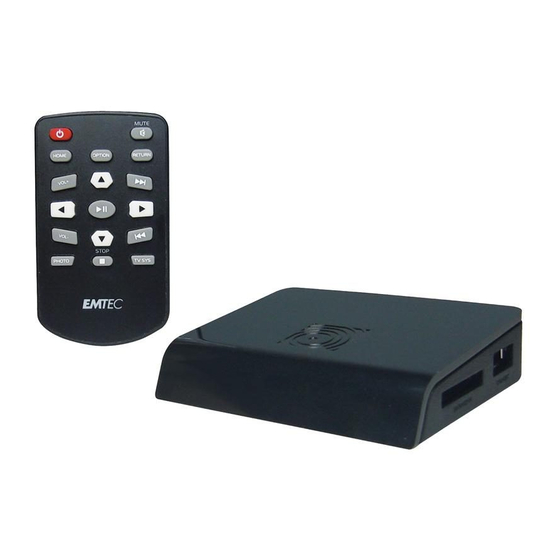
2. About the Player 2.1 Remote Control All procedures in this manual can be carried out using the remote control. See the following for details on each button and its function: 1. POWER 2. HOME 3. OPTION 4. VOL + 5. -
Page 9: Front Panel
PHOTO Press to activate photo slideshow with background music. Press to stop playback. STOP TV SYS. Press to switch video output modes. Press to go to previous chapter / file, or page up on list. PREV NEXT Press to go to next chapter / file, or page down on list. RIGHT Press to move the highlight right when navigating menus;... -
Page 10: Side Panel
2.4 Side Panel 1. Card slot 2. USB HOST port (B-Type) 10 / 21 ... -
Page 11: Setup Menu
3. Setup Menu The Setup Menu allows you to configure video, audio, photo and system settings. Select Setup icon in the main interface to enter this Menu. 3.1 General Setup This section allows you to setup OSD Language and other system settings. To select and change the system language. -
Page 12: Video Setup
3.2 Video Setup This section allows you to configure the video settings. TV Type To set the TV system To set the video output mode: 480i/576i, 480p/576p, 720p, 1080i Resolution Divx Subtitle You can turn subtitle on/off Subtitle Color You can select the color of the subtitle, You can select the color of the subtitle background Subtitle Backgroud Main Page... -
Page 13: Photo Setup
3.4 Photo Setup This section allows you to configure the photo settings. Interval Time To set the interval time of photo slide show: 1S, 3S, 5S, or 10S. To set the transition effect of photo slide show. Transition Mode Main Page Back to the main setup menu. -
Page 14: Media Playback
4. Media Playback Main Interface In the main interface, use the direction keys to select and enter different mode. The main interface contains: Setup, Device, Photo, Music, Video, and File. Select the device Select the Device icon on the main interface to enter this menu, then you can select the device or partition you wish to browse. -
Page 15: Music List
Press the UP / DOWN button to select a video file you wish to play, and press the PLAY / PAUSE button to begin the playback. You can access the following functions during playback: OPTION: Press to activate/hide the tool bar during playback. PREV/NEXT: Press to go to previous/next file. -
Page 16: Photo List
Press the UP / DOWN button to select a music track you wish to play. In music list, press the LEFT button to enable the buttons in the tool bar. 4.3 Photo List Select the Photo icon on the main interface to enter this menu, and all of the supported pictures stored on the device will be displayed. -
Page 17: Slide Show
You can access the following functions during playback: OPTION: Press to activate/hide the tool bar during playback. PREV/NEXT: Press to go to previous/next file. STOP: Press to stop the playback. 4.4 Slide Show In photo list or music list, press PHOTO button in the remote control, or press the slideshow button in the tool bar to activate the photo slide show with background music. - Page 18 Press the navigational buttons to select options while navigating the DVD root menu. You can access the following functions during playback: HOME: Press to return to the root menu during playback. OPTION: Press to activate/hide the tool bar during playback. PREV/NEXT: Press to go to previous/next chapter.
-
Page 19: Upgrading The Firmware
5. Upgrading the Firmware The firmware is the operating system (OS) installed on the device. Firmware upgrades can bring new features, improvements and bug fixes. Download the latest firmware from our official website. The following shows the necessary steps for upgrading the firmware. 1. -
Page 20: Appendixes
6. Appendixes 6.1 Specifications Format: AVI, VOB, MPG, MP4, DAT Codec: MPEG-1, MPEG-2, MPEG-4 ASP Video Resolution: Up to 720x576 (PAL), 720x480 (NTSC) Subtitle: SRT, SSA, SMI, SUB Format: MP3, WMA (DRM, Pro and Advanced Profile not supported) Audio Codec: MP2, MP3, PCM, LPCM Compression rate: MP3: 32 Kbps~320 Kbps;... -
Page 21: Copyrights And Trademarks
Question 4. How can I format a portable HDD (above 32 GB) into a FAT32 partition? Answer: Windows 2000/XP can view a FAT32 partition within the capacity of more than 32GB, but the format tool in Windows 2000/XP can only format FAT32 partition within the capacity of 32GB. If you need to format any FAT32 partition beyond the capacity of 32GB, please use other third party format tools, like Norton Partition Magic 8.0®.
Need help?
Do you have a question about the N120 and is the answer not in the manual?
Questions and answers