Bticino Classe 300 EOS KIT Installation Manual
Hide thumbs
Also See for Classe 300 EOS KIT:
- User and installation manual (116 pages) ,
- User manual (64 pages) ,
- Installation manual (84 pages)
Advertisement
Quick Links
Advertisement

Related Manuals for Bticino Classe 300 EOS KIT


Summary of Contents for Bticino Classe 300 EOS KIT
- Page 1 363915 Classe 300 EOS KIT Manuale installatore • Installation manual...
- Page 2 Attenzione: le operazioni di installazione, configurazione, messa in servizio e manutenzione devono essere effettuate da personale qualificato. • Caution: installation, configuration, starting-up and maintenance must be performed by qualified personnel. • Attention: les opérations d’installation, de configuration, de mise en service et d’ e ntretien doivent être confiées à un personnel qualifié. •...
- Page 3 Classe 300 EOS KIT • Cavi e distanze • Kabelquerschnitte und • Kabels en afstanden • Cables and distances Leitungslängen • Cabos e distâncias • Câbles et distances • Cables y distancias • Przekrój przewodu a odległość BTicino BTicino BTicino...
- Page 4 • Schema monofamiliare • Schema Einfamilienhaus • Esquema monofamiliar • One-family diagram • Esquema monofamiliar • Schemat dla domu • Schéma mono-familial • Schema eensgezins jednorodzinnego (OFF) 2-1 (ON) = – (ON) (OFF) = – 230 Vac (OFF) (ON) MASTER = –...
- Page 5 Classe 300 EOS KIT • Opzione serratura a relè • Anschluss Türöffner-Relais • Opção trinco de relê • Relay door lock option • Opción cerradura de relé • Opcja z przekaźnikiem dla • Option serrure à relais • Optie relaisslot zamka P = –...
- Page 6 • Dati dimensionali • Maße • Dados dimensionais • Dimensional data • Datos dimensionales • Dane wymiarowe • Données dimensionnelles • Formaatgegevens 32 mm 121 mm 100 mm 26 mm • Altezza consigliata salvo diversa normativa vigente. • Recommended height, unless different regulations are specified. •...
- Page 7 Classe 300 EOS KIT • Posto esterno • Poste extérieur • Placa exterior • Unidade externa • Entrance panel • Türstation • Externe plaats • Panel zewnętrzny 1 - Telecamera 2 - LED illuminazione campo di ripresa 3 - Morsetti di collegamento...
- Page 8 1 - Kamera 2 - LED Beleuchtung des Aufnahmefelds 3 - Anschlussklemmen 4 - Ruftasten 5 - Position der Antenne Badge-Lesegerät 6 - LED Verbindung aktiv 7 - LED Anzeige Tür offen 8 - Mikrophon 9 - Einstellung des Mikrophons 10 - Einstellung des Lautsprechers 11 - Switch Ein-/Zweifamilienhaus 12 - Programmierungstaste Badge/Reset...
- Page 9 Classe 300 EOS KIT 1 - Câmara de vídeo 1 - Kamera 2 - LED de iluminação do campo de filmagem 2 - LED oświetlenia pola widzenia kamery 3 - Bornes de conexão 3 - Zaciski przyłączeniowe 4 - Botões de chamada 4 - Przyciski wywołania...
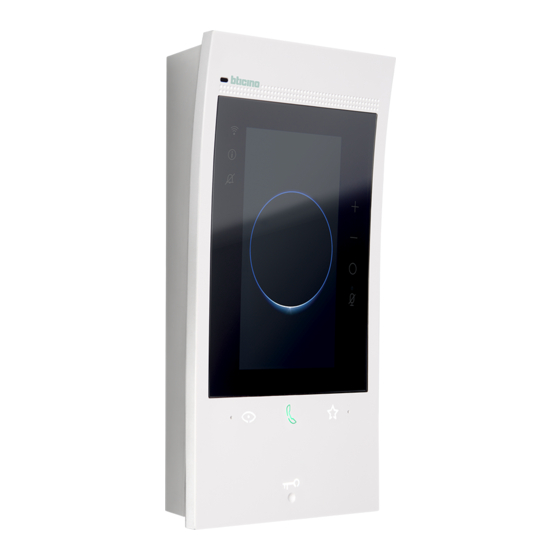
- Page 10 • Posto interno • Poste interne • Unidad interior • Unidade interna • Handset • Hausstation • Intern punt • Aparat wewnętrzny Display touch screen verticale da 5” Tasto a sfioramento "Preferiti" Microfono Tasto a sfioramento per risposta Tasto a sfioramento per attivazione posto esterno /ciclamento Tasto per apertura porta LED di segnalazione esclusione suoneria...
- Page 11 Classe 300 EOS KIT 5” vertical touch screen display Door release key “Favourites” touch key Bell exclusion notification LED Microphone Notification LED Touch key for answer Wi-Fi signal notification LED Entrance panel / scrolling activation touch key Proximity sensor LED table Flashing: ringtone excluded.
- Page 12 Vertikaler 5-Zoll-Touchscreen Berührungstaste „Favoriten“ Mikrophon Berührungstaste für Antworten Berührungstaste zum Aktivieren der Türstation und Taktierena Taste Türöffnung LED- Meldung Läutwerk ausgeschlossen LED zur Meldung von Benachrichtigungen LED-Anzeige des WI- FI-Signals Näherungssensor LED-Tabelle Blinkend: eintreffen eines Anrufs. Leuchtet fest: Gespräch im Gang. Blinkt 2 Sekunden lang: Funktion „Sicheres Schloss“...
- Page 13 Classe 300 EOS KIT Pantalla táctil vertical de 5” Tecla apertura puerta Botón de membrana «Favoritos» LED de señalización de exclusión timbre Micrófono LED de señalización de notificaciones Botón de membrana para respuesta LED de indicación de la señal WI-FI Botón de membrana para activación placa de...
- Page 14 Ecrã touch screen vertical de 5” Tecla de toque „Favoritos“ Microfone Tecla de toque para resposta Tecla de toque para ativação unidade externa / ativação cíclica Botão de abertura da porta LED de sinalização de exclusão da campainha LED de sinalização notificações LED indicação sinal WI- FI Sensor de proximidade Tabela dos LEDs...
- Page 15 Classe 300 EOS KIT 5-calowy pionowy ekran dotykowy Klawisz otwierania drzwi Przycisk dotykowy „Ulubione” LED sygnalizacja wyłączenie dzwonka Mikrofon Sygnalizacyjna dioda LED powiadomień Dotykowy klawisz odpowiedzi: LED wskaźnik sygnału WI-FI Przycisk dotykowy do aktywacji panelu Czujnik zbliżeniowy zewnętrznego/ przełączania Tabela LED Migająca: wyłączenie dźwięku.
- Page 16 BUS-MH (OFF) 2-1 (ON) BTICINO V.le Borri, 231 (ON) (OFF) 21100 (VA) ITALY (OFF) MASTER (ON) Made in Italy (OFF) (ON) BUS-AV Altoparlante. Altoparlante. Microinterruttore funzione "Master" *. Microinterruttore funzione "Master" *. Morsetti per il collegamento al BUS MH Morsetti per il collegamento al BUS MH Microinterruttore di terminazione di tratta *.
- Page 17 Classe 300 EOS KIT Speaker. Line termination micro-switch *. Clamps for connection to the BUS MH (MyHOME) - LAN connector. For connection using RJ45 cable, (future application). use accessory 344844 (not supplied). Additional bell connection clamps (5M – 1). Clamps for connection to the AV BUS (audio video).
- Page 18 BUS-MH (OFF) 2-1 (ON) BTICINO V.le Borri, 231 (ON) (OFF) 21100 (VA) ITALY (OFF) MASTER (ON) Made in Italy (OFF) (ON) BUS-AV Altavoz. Microinterruptor función «Master» *. Bornes para la conexión al BUS MH (MyHOME) - Microinterruptor final de tramo *.
- Page 19 Classe 300 EOS KIT Luidspreker. Microschakelaar voor de afsluiting van het traject *. Aansluitklemmen voor de verbinding met de BUS LAN-connector. Gebruik het accessoire 344844 MH (MyHOME) - (later gebruik). (niet geleverd) voor de verbinding met RJ45-kabel. Aansluitklemmen (5M – 1) voor de verbinding van Aansluitklemmen voor de verbinding met de BUS een extra beltoon.
- Page 20 • Installazione posto esterno • Installation der Türstation • Instalação da unidade externa • Entrance panel installation • Instalación de la placa exterior • Instalacja panelu zewnętrznego • Installation du poste extérieur • Installatie externe plaats • * Per garantire l’impermeabilità montare le guarnizioni a corredo. •...
- Page 21 Classe 300 EOS KIT • La telecamera non deve essere installata di fronte a grandi sorgenti luminose, oppure in luoghi dove il soggetto ripreso rimanga molto in controluce. Le telecamere a colori presentano, in condizioni di scarsa luminosità, una sensibilità inferiore rispetto alle telecamere in bianco/nero.
- Page 22 • Se si manifestasse il disturbo del fischio, (effetto Larsen), ridurre prima la potenza del microfono , agendo con un cacciavite sul potenziometro corrispondente, fino ad un livello accettabile. Qualora il fenomeno persista, agire sul potenziometro dell’altoparlante in modo da eliminare l’inconveniente. Se il volume è troppo basso, aumentare prima il volume dell’altoparlante ed eventualmente anche quello del microfono, tenendo presente che è...
- Page 23 Classe 300 EOS KIT • Smontaggio • Démontage • Desmontaje • Desmontagem • Disassembling • Demontage • Demontage • Demontaż...
- Page 24 • Configurazione posto esterno • Konfiguration Türstation • Configuração unidade externa • Entrance panel configuration • Configuración placa exterior • Konfiguracja panelu • Configuration poste extérieur • Configuratie externe plaats zewnętrznego P - Possono non essere configurati. - They do not need to be configured. - Ils peuvent ne pas être configurés.
- Page 25 Classe 300 EOS KIT • Programmazione Badge • Badge programmieren • Programação do Crachá • Badge programming • Programación de credenciales • Programowanie breloków • Programmation des badges • Badge Programmeren zbliżeniowych • Nuovo badge gestore impianto Per motivi di sicurezza è previsto un badge “Gestore“ programmato direttamente dall’installatore. Per accedere alla programmazione di un badge “RESIDENTE”...
- Page 26 Door de presentatie van een badge die niet herkend wordt of een programmeringsfout wordt de procedure onderbroken. Dit wordt aangegeven door een lange pieptoon en het oplichten van de leds verbinding en slot. Opmerking: de badge van de installatiebeheerder bedient het slot niet maar activeert uitsluitend de programmering van de inwonersbadges.
- Page 27 Classe 300 EOS KIT 2 beep 2 bip • Avvicinare al lettore il badge gestore impianto da memorizzare e attendere l’accensione del LED Serratura e doppio tono di conferma. 2 beep 2 beep • Move the system manager badge reader to save close and wait for the...
- Page 28 • Cancellazione badge gestore impianto • Cancelación de una credencial maestra de administrador • Deleting the manager master badge • Master beheerder badge wissen • Élimination badge master de gestion • Cancelamento de crachá master gestor • Master-Verwaltungs-Badge löschen • Skasowanie breloka administratora 1 beep 1 bip •...
- Page 29 Classe 300 EOS KIT • Programmazione badge residente • Programación de la credencial del residente • System management key card programming • Programmering inwonersbadge • Programmation badge résident • Programação de crachá residente • Programmierung des Badges Bewohner • Programowanie breloka mieszkańca...
- Page 30 Acerque al lector la credencial residente que desea memorizar hasta que parpadea el LED de la Cerradura y se produzca el tono de confirmación. Para programar otras credenciales residentes, es preciso acercarlas al lector antes de 30 segundos de la anterior. Para confirmar que se ha terminado la programación, acerque la credencial de administrador del sistema o espere 30 segundos.
- Page 31 Classe 300 EOS KIT • Cancellazione di tutti i badge residenti in memoria memorizadas • Cancellation of all the residents badges saved in the memory • Alle inwonerbadges uit het geheugen wissen • Effacement de tous les badges résidents mémorisés •...
- Page 32 • Reset • Reset Nel caso si avesse la necessità di cancellare tutti i En caso de que fuera necesario cancelar todas las badge (gestore impianto e residenti) precedentemente credenciales memorizadas(administrador del sistema y memorizzati è possibile resettare il posto esterno. residentes), es posible restablecer la placa exterior.
- Page 33 Classe 300 EOS KIT • Installazione del posto interno • Installation der Hausstation • Instalação da unidade interna • Handset installation • Instalación de la unidad interior • Instalacja aparatu wewnętrznego • Installation du poste interne • Installatie van het intern punt...
- Page 35 Classe 300 EOS KIT • Smontaggio • Démontage • Desmontaje • Desmontagem • Disassembling • Demontage • Demontage • Demontaż • Dati tecnici • Données techniques • Datos técnicos • Dados técnicos • Technical data • Technische Daten • Technische specificaties •...
- Page 36 • Configurazione posto interno • Configuración de la unidad interior • Internal unit configuration • Het interne punt configureren • Configuration poste interne • Configuração da unidade interna • Konfiguration der Hausstation • Konfiguracja aparatu wewnętrznego • E' consigliabile configurare il dispositivo tramite apposito menù (vedi paragrafo successivo "Prima accensione").
- Page 37 Classe 300 EOS KIT • Configurazione fisica • Physische Konfiguration • Configuração física • Physical configuration • Configuración física • Konfiguracja fizyczna • Configuration physique • Fysieke configuratie • Le funzioni che puoi attribuire al tasto Preferiti ( ) in modo fisico, tramite configuratore inserito nella sede MM-(unità), sono le seguenti:...
- Page 38 346210 346210 MOD= 9 MOD= 9 • Autoaccensione diretta del P+2 • Autoencendido directo del P+2 • P+2 direct auto-switching on • Directe automatische P+2 MM = 346210 346210 • Auto-allumage direct du P+2 • Autoacendimento direto do P+2 • Aktivierung Türstation/Aktivator mit P+2 •...
- Page 39 Classe 300 EOS KIT IT - Legenda EN - Legend FR - Légende DE - Erläuterung Attivazione del PE Aktivierung der Türstati- Activating the EP Activation du PE (con fi- (configurato con P+1) on (mit P+1 konfiguriert) (configured with P+1) guré...
- Page 40 ES - Leyenda NL - Legende PT - Legenda PL - Legenda Aktywacja PZ (skonfiguro- Activación del PE (con- Rechtstreekse activering van Ligação da UE (con figurada wanego z P+1) bezpośred- figurado con P+1) en het deur station (als P+1 ge- com P+1) de maneira direc- modo directo sin lla ma da nio bez wywołania lub...
- Page 41 Classe 300 EOS KIT Intercom all’interno dell’appartamento Cercapersone, effettua Intercom tra apparta- Intercom su se stesso, in impianti con interfaccia di appar- una intercom generale, menti in impianti con invia la chiamata a tamento 346850; oppure intercom invia una chiamata a...
- Page 42 MOD = MM 346210 346210 MOD= 9 MOD= 9 346210 346210 MOD= 9 MOD= 9 346210 346210 346210 346210 346210 MOD= 5 MOD= 5 MOD= 9 346210 346210 MOD= 9 MOD= 9 MOD= 5 MOD= 5 346210 346210 346210 346210 346210 346210 346210...
- Page 43 Classe 300 EOS KIT MOD = MM 346210 346210 MOD= 5 MOD= 9 346210 346210 346210 MOD= 9 MOD= 5 MOD= 5 346210 346210 346210 346210 MOD= 9 MOD= 5 MOD= 5 MOD= 5 346210 346210 346210 MOD= 5 MOD= 5...
- Page 44 346210 MOD= 5 346210 MOD= 5 MOD = MM 346210 346210 MOD= 5 MOD= 5 346210 346210 MOD= 5 MOD= 5 346210 MOD= 5 346210 MOD= 5 • Prima accensione • Erstmaliges Einschalten • Primeira ligação • First switching on •...
-
Page 45: Device Setup
Classe 300 EOS KIT • Após ter conectado e ligado o dispositivo, realizar as personalizações através do menu. Aguardar até que os LEDs parem de piscar e tocar no ecrã a fim de ligá-lo. • Po podłączeniu i włączeniu urządzenia możesz dokonać personalizacji za pomocą menu. -
Page 46: Date And Time
DATE AND TIME DATE AND TIME Set date and time Set date and time automatically from network automatically from network Time will be set automatically once the device Time will be set automatically once the device is connected to internet is connected to internet Timezone Rome (GMT +01) - Page 47 Classe 300 EOS KIT TIMEZONE DATE AND TIME Choose a timezoone Set date and time automatically from network GMT 00 London, Lisbon, Dublin Time will be set automatically once the device is connected to internet GMT +1 Rome, Paris, Berlin...
- Page 48 DATE AND TIME DATE AND TIME Set date and time Set date and time automatically from network automatically from network Time will be set automatically once the device Time will be set automatically once the device is connected to internet is connected to internet Timezone Rome (GMT +01)
-
Page 49: Main Unit
Classe 300 EOS KIT DATE AND TIME MAIN UNIT Set date and time automatically from network Time will be set automatically once the device is connected to internet Timezone Rome (GMT +01) 16 / 06 / 2021 Is this device the main unit? - Page 50 (compétence Classe300EOS) Sprachsteuerung (Skill Classe300EOS) (*) Serrures/Lumières escaliers (*) Schlösser/Treppenlicht mit Videosprech- vidéophoniques avec commande vocale funktionen und Sprachsteuerung (compétence Legrand Netatmo BTicino) (Skill Legrand Netatmo BTicino) Association avec appli Home+Security Verbindung mit Home+Security-App NEIN Visualisation caméras Netatmo Anzeige von Netatmo-Kameras NEIN (*) Note : Serrures/Lumières escaliers : pour pouvoir être commandées...
- Page 51 Classe 300 EOS KIT Diferencias entre dispositivo Principal y Secundario Verschillen tussen primair en secundair apparaat FUNCIÓN PRINCIPAL SECUNDARIO FUNCTIE PRIMAIR SECUNDAIR Funciones de videoportero con comando de Beeldhuistelefoonfuncties met SÍ voz (skill Classe300EOS) spraakbediening (skill Classe300EOS) (*) Cerraduras/Luces escaleras de...
-
Page 52: Door Entry
DOOR ENTRY Door entry parameters Choose value N address P address Professional studio When enabled by user, professional studio auto opens door lock each time someone rings Intercom Camera Entrance Panel Activation Lock CONTINUE • 13. Tocca per impostare l’indirizzo del dispositivo •... - Page 53 Classe 300 EOS KIT DOOR ENTRY Door entry parameters Choose value N address P address Professional studio When enabled by user, professional studio auto opens door lock each time someone rings Intercom Camera Entrance Panel Activation Lock CONTINUE • 16. Tocca per impostare l’Indirizzo del PE del quale •...
- Page 54 DOOR ENTRY Choose value Door entry parameters N address P address Professional studio When enabled by user, professional studio auto opens door lock each time someone rings Intercom Camera Activation CONTINUE • 18. Tocca per confermare. • 18. Toque para confirmar. Configurando l’indirizzo del Posto Esterno principale Al configurar la dirección de la placa exterior principal (P), vengono inseriti in automatico gli oggetti:...
- Page 55 Classe 300 EOS KIT DOOR ENTRY INTERCOM Door entry parameters Choose the type N address Inside P address Outside Professional studio Pager When enabled by user, professional studio auto opens door lock each time someone rings General Intercom Camera Activation CONTINUE •...
- Page 56 INTERCOM INTERCOM Enter name Choose value inside 1 • 23. Inserisci un nome. • 23. Escriba un nombre. 24. Tocca per confermare. 24. Toque para confirmar. 25. Tocca per inserire l’indirizzo. 25. Toque para introducir la dirección. 26. Tocca per confermare. 26.
- Page 57 Classe 300 EOS KIT DOOR ENTRY • 27. Tocca per continuare. Ripeti la stessa procedura per inserire Telecamere e Attivazioni. Door entry parameters • 27. Touch to continue. Repeat the same procedure to enter Cameras and When enabled by user, professional studio auto opens door lock each time someone rings Activations.
- Page 58 COMPLETE • 28. Tocca per terminare la procedura di personalizzazione. • 28. Touch to end the customisation procedure. • 28. Toucher pour terminer la procédure de personnalisation. • 28. Berühren, um die Änderungsprozedur zu beenden. • 28. Toque para acabar el procedimiento de personalización.
- Page 59 Classe 300 EOS KIT • Au terme de la procédure, s’affichent les pages qui permettent d’associer le Classe 300 EOS à l’appli Home + Security et d’activer le contrôle vocal d’Alexa. Amazon Alexa pourrait ne pas être disponible dans tous les pays ou bien les fonctions décrites pourraient varier.
- Page 60 Download the Home + Security App www.homesystems-legrandgroup.com help.bticino.com/classe300EOS • Nota: questo dispositivo include il software Open Source. Per informazioni su licenze e software, collega il tuo PC Windows/Linux al dispositivo tramite la porta mini-USB. • Note: this device includes the Open Source software. For license and software information, connect your Windows/Linus PC to the device through the mini-USB port.
- Page 61 Classe 300 EOS KIT...
- Page 62 ISP (Internet Service Provider) e rimane a suo carico. • The Customer must install the App on his smartphone so that he can use some services which BTicino supplies as extras to the normal basic functions of the Classe 300EOS with Netatmo.
- Page 63 Classe 300 EOS KIT We would like to inform you that the service provided by BTicino by means of remote use via the APP involves the use of data. The cost linked to data usage depends on the type of contract which the customer has with his ISP (Internet Service Provider) and is solely the customer’s responsibility.
- Page 64 • Para utilizar alguns serviços, fornecidos por BTicino como adicionais às normais funções básicas do Classe 300EOS with Netatmo, o cliente deverá instalar o aplicativo (APP) no próprio smartphone. Os serviços oferecidos por meio do aplicativo (APP) preveem que se possa interagir com o Classe 300EOS with Netatmo de forma remota e através da rede Internet.
- Page 65 Classe 300 EOS KIT 19:32 SETTINGS No new notifications Global General Door entry Network Display User Amazon Alexa My app Help Voice mail Ringtone Other • 1. Tocca per aprire la sezione Impostazioni. • 1. Toque para abrir la sección Ajustes.
- Page 66 NETWORK NETWORK Parameters Parameters Connection type Ethernet DHCP Automatic configuration of network parameters LAN Home IP address 192.168.2.102 Subnet mask 255.255.255.0 Gateway 192.168.2.1 Serial number 00:03:50:c0:00:33 • 3. Tocca per modificare i parametri. • 3. Toque para modificar los parámetros. 4.
- Page 67 Classe 300 EOS KIT • 5. Tocca per modificare manualmente i parametri di rete. Indirizzo IP, maschera di rete : parametri tipici delle reti con protocollo TCP/ ETHERNET IP, necessari all’individuazione del dispositivo all’interno della rete locale. Gateway: indirizzo IP del router/access point.
- Page 68 IP ADDRESS ETHERNET Tap the values that you want to edit Parameters 192 . 168 . 178 . 143 DHCP Automatic configuration of network parameters IP address 192.168.2.102 Subnet mask 255.255.255.0 Gateway 192.168.2.1 Serial number 00:03:50:c0:00:33 • 6. Tocca per modificare l’indirizzo. •...
-
Page 69: Connection Type
Classe 300 EOS KIT • In alternativa per connetterti alla rete dati puoi utilizzare la Datennetz zu verbinden. connessione WI-FI. • Como alternativa para conectarse a la red de datos, puede utilizar la • Otherwise, connection to the network is possible through the Wi-Fi conexión WI-FI. - Page 70 NETWORK NETWORK Enter password Parameters 123456– Connection type Wi-Fi Wi-Fi Select network 5GHz Wi-Fi networks are not supported. My HOME CONNECT Wi-Fi 01 Wi-Fi 02 Wi-Fi 03 Wi-Fi 04 • 12. Seleziona la tua rete di casa. • 12. Seleccione su red de casa. 13.
- Page 71 Classe 300 EOS KIT HOME Connection type Wi-Fi Select network 5GHz Wi-Fi networks are not supported. HOME Wi-Fi 01 Wi-Fi 02 • 15. Tocca per terminare. • 15. Touch to end. Wi-Fi 03 • 15. Toucher pour terminer. Wi-Fi 04 •...
- Page 72 19:32 19:32 No new notifications No new notifications Answer calls when you’re away, Answer calls when you’re away, connect Home + Security app connect Home + Security app START CONFIGURATION START CONFIGURATION DISMISS DISMISS Voice mail Ringtone Voice mail Ringtone •...
- Page 73 Classe 300 EOS KIT • Funzione Stato porta • Türöffnerstatus • Função Estado porta • Door state function • Función Estado puerta • Funkcja Stan Zamka • Fonction État porte • Staat deur • Questa funzione segnala lo stato della serratura (solo se l’impianto è predisposto mediante apposito attuatore).
- Page 74 • Funzione Studio Professionale • Funktion Büro • Função Escritório profissional • Office function • Función Oficina Profesional • Funkcja Pracownia / Gabinet • Fonction Bureau • Functie professionele studio Zawodowy • La funzione Studio Professionale ti permette di impostare l’apertura automatica della serratura in caso di chiamata dal Posto Esterno, non puoi attivarla contemporaneamente alla funzione Stato Porta.
- Page 75 Classe 300 EOS KIT • Funzione Cerca persone • Funktion Personensuche • Função de procura pessoas • Paging function • Función buscapersonas • Funkcja Pager (wywoływanie) • Fonction cherche-personnes • Functie buzzer • Questa funzione ti permette di diffondere un messaggio vocale, dettato al microfono del dispositivo, tramite gli altoparlanti dell’impianto Diffusione sonora.
- Page 76 • Comando luci scale • Treppenlichtsteuerung • Comando das luzes da escada • Staircase light control • Mando luces escaleras • Sterowanie oświetleniem na • Commande lumières escaliers • Bediening lichten trapzaal klatce schodowej (OFF) 2-1 (ON) = – = – (ON) (OFF) = –...
- Page 77 Classe 300 EOS KIT • Suoneria supplementare • Zusätzliche Läutwerk • Toque suplementar • Additional bell • Timbre adicional • Dodatkowy dzwonek • Sonnerie supplémentaire • Supplementaire beltoon (OFF) 2-1 (ON) = – (ON) (OFF) = – = – = –...
- Page 78 • Avvertenze e diritti del consumatore • Advertencias y derechos del consumidor • Warnings and consumer rights • Waarschuwingen en rechten van de consument • Avertissements et droits du consommateur • Advertências e direitos do consumidor • Hinweise und Rechte der Verbraucher •...
- Page 79 Classe 300 EOS KIT Lire attentivement avant toute utilisation et installation de nos produits et conserver pour toute consultation en cas de besoin. Interdiction de toucher les unités avec les mains mouillées. Interdiction d’utiliser des produits de nettoyage liquides ou des aérosols.
- Page 80 Lea detenidamente antes del uso y conserve la documentación para consultas futuras. Se prohíbe tocar las unidades con las manos mojadas. Se prohíbe el uso de limpiadores líquidos o aerosoles. Se prohíbe tapar las aperturas de ventilación. Se prohíbe modificar los dispositivos. Se prohíbe desmontar las partes de protección de los dispositivos.
- Page 81 Classe 300 EOS KIT Note Ler atentamente antes do uso e guardar para qualquer futura referência. Proibição de tocar as unidades com as mãos molhadas. Proibição da utilização de produtos de limpeza líquidos ou aerossóis. Proibição de obstruir as aberturas de ventilação.
- Page 82 • Il fabbricante BTicino S.p.A., dichiara che il tipo di apparecchiatura radio 363915 (kit Classe 300EOS with Netatmo + Linea 3000 Black) è conforme alla direttiva 2014/53/UE. Il testo completo della dichiarazione di conformità UE è disponibile al seguente indirizzo Internet: www.bticino.it/red...
- Page 83 Classe 300 EOS KIT...
- Page 84 BTicino SpA si riserva il diritto di variare in qualsiasi momento i contenuti illustrati nel presente stampato e di comunicare, in qualsiasi forma e modalità, i cambiamenti apportati. BTicino SpA reserves at any time the right to modify the contents of this booklet and to comunicate in any form and modality, the charges brought to the same.
Need help?
Do you have a question about the Classe 300 EOS KIT and is the answer not in the manual?
Questions and answers