
Related Manuals for Novasina LabMaster-aw

Summary of Contents for Novasina LabMaster-aw
- Page 1 aw-Messgerät / aw measuring instrument / Appareil de mesure aw & LabPartner-aw Operating Instructions World leading thanks INNOVATION solution and sensor technology...
- Page 2 © Novasina AG, Printed at 2007 in Switzerland Technische Änderungen vorbehalten Technical data subject to modification Sous réserve de modifications techniques...
- Page 3 INDEX Introduction ........................4 1.1. Starting Out ..........................4 1.2. Important Notes ........................4 General Product Description ..................5 2.1. System Overview ........................5 2.2. System Architecture ......................... 6 2.3. Instrument Overview ........................ 7 2.4. Standard Delivery ........................8 2.5. Optional Accessories ......................9 Putting Into Operation ......................
-
Page 4: Starting Out
(water activity) measuring. To get the most out of all the possibilities of your Novasina LabMASTER- aw or LabPARTNER-aw, and to guarantee safe, reliable operation, please read these operating instructions before setting the unit into operation carefully. - Page 5 40 years. The intelligent,resistive, electrolytic sensor integrated into the LabMASTER or PARTNER-aw is based on the latest Novasina „Novalyte Technology“, with which one can guarantee such precision and reproducibility. Thanks this technology an aw-meter as has never been attained before.
-
Page 6: System Architecture
2.2. System Architecture A LabMASTER-aw can be operated either alone or as controlling unit in a network. The connection between this main unit and up to nine LabPARTNER-aw network components is established over a special communication circuit. The LabMASTER-aw is normally powered from a mains socket. -
Page 7: Instrument Overview
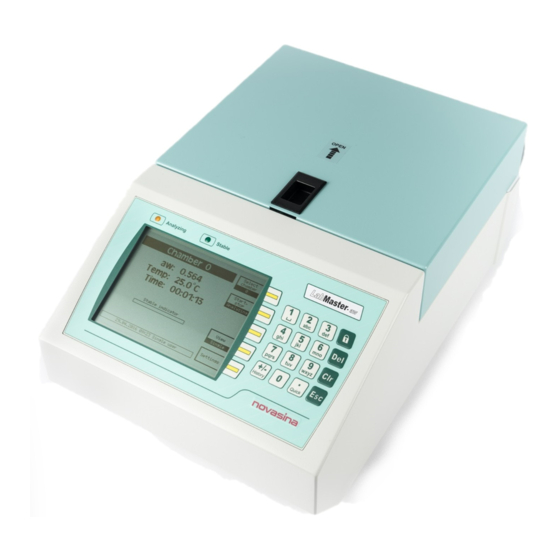
2.3. Instrument Overview Cover with sensor unit Probe measurement and pre-conditioning chamber LED light "Analyse" LED light "Stable" Fix-Functions keyboard Standard keyboard Functions buttons LCD screen Main switch Mains outlet to the next- LabPARTNER-aw System bus linet to the next LabPARTNER-aw USB output to a PC RS-232 output to a PC... -
Page 8: Standard Delivery
2.4. Standard Delivery LabMASTER-aw BASIC Novasina „ “: AW measuring instrument with precise, temperature - stabilised sample chamber and additional preconditioning chamber, basis software without user administration/management and without samples database system. This instrument can only be operated as a stand-alone system. No analysis programs for PC (Novalog MC) and no cable are included. -
Page 9: Optional Accessories
Novasina offers various protective filter systems for this purpose. Please consult the corresponding datasheets for Novasina protective filter systems or contact your Novasina sales partner. Using filter systems can prolong the service life of the measuring cell considerably. Should you implement such filter systems, please see to it that they are tested and changed at regular intervals. -
Page 10: Putting Into Operation
• Insert the power cable into the instrument socket and plug it into the mains. Switch the mains power on if necessary. • Switch on the LabMASTER-aw by the power switch on the front of the instrument (lower right corner). The display will light up. - Page 11 Note: The connector cable, with 1.8 m cable and corresponding plugs, comes with every LabPARTNER-aw. Make sure the cables are plugged into the correct place on the back of the LabMASTER-aw and LabPARTNER-aw. • Switch ON the LabMASTER-aw unit. The LabMASTER-aw and...
-
Page 12: Quick Start
An additional LabPARTNER-aw instrument may be placed directly beside Fault the LabMASTER-aw unit or up to the distance of the cables (1.8m) around it, wherever there is space available. Special systems with up to 9 additional channels may be distributed over different rack levels. - Page 13 A sample or a SAL-T can be inside but the speed of changing will be slower. Please wait during the temperature stabilisation process. Note : If you are using a multi-channel system (LabMASTER-aw and at least one LabPARTNER-aw), select the chamber number before changing the settings ! 3.4.5.
- Page 14 It will be possible to update an "BASIC" or "STANDARD" to the next possible version or directly to a "ADVANCED" version of a LabMASTER-aw. The way is very simple and code driven. A new code can be ordered through your local Novasina representative.
- Page 15 The system runs a comprehensive function control of all internal modules and important software components when starting up. After this, the LabMASTER-aw tries to establish a connection to any connected LabPARTNER-aw units. Any errors in the LabMASTER/ PARTNER-aw hardware or software are then shown in an information window on the LabMASTER-aw.
- Page 16 Elements of the configuration menu: You open the main menu by pushing the „Settings“ soft key. Selecting a further menu point (e.g. „3“) and then pressing the „ENTER“ (5) soft key brings you to the submenu and the corresponding display window. Pressing the „Previous screen“ soft key (6) brings you back one menu level.
- Page 17 (recalibration with SAL-T standards) With this function, every LabMASTER/PARTNER-aw can be periodically checked and, if necessary, recalibrated using the Novasina humidity standard, SAL-T, at various measuring points. For this purpose, a special box set with 6 SAL-T humidity standards is included with every LabMaster.
- Page 18 Display all actual calibration points: Reference and „status of cal.“ Clear one or all calibration points if necessary. Calibrate one point (see chapter 6.4.) Protect the calibration with a „sensor password“ Please refer to chapter 6.2. for further Information. 6 : Info (System- and chamber information) Under this menu point, system information on the LabMASTER/PARTNER- aw (depending on selected chamber), and sensor information can be...
-
Page 19: General System Settings
(a link to the sample data exists) 4.3.3. Printer functions for external printer From the software version V.1.05 C003 all LabMaster-aw system have the ability to print out information about measurements and calibration on a printer. The software supports the protocol standard ESC/P. - Page 20 Printing of calibration data Prerequisite : Activation of the printer function in the „System settings“ If the LabMaster-aw is configured on a printer, single or all calibration points can be printed out by selecting the printer function button under the menu point „Display cal.
-
Page 21: Printer Settings
Accessories for printer - LabMaster-aw Printer cable Novasina offers a cable set for Seiko printers, which enables to connect a LabMaster-aw to a Seiko DPU-411 or DPU-414 printer. The cable length is 1.5m. Novasina part no. : 111 7473 This cable is not included to the LabMaster-aw! The printer functions can be used on all versions „BASIC“, „STANDARD“... - Page 22 Please keep your password in a safe place. A forgotten administrator password can only be deactivated in the Novasina factory or at an authorised Novasina service centre. If this is so, then all saved parameters and data will also be irretrievably lost.
- Page 23 The administrator can see a forgotten user password in the Management system. (see „User“ -> „1: Password“) 2 : Units... (for all LabMASTER-aw versions) A LabMASTER-aw can display the measured values in various different units. The values are as follows: Humidity aw-value or relativ humidity % RH Temperature °C or °F...
-
Page 24: Reset To Factory Settings
Currently the PC and Printer devices are defined. With the PC device, LabPartner units (1..9) can be connected parallel over the LabMASTER-aw, the main unit, to a PC that is running the "NovaLog MC" analysis software and thus data transmitted online. - Page 25 Only so you can be certain that the same functions will be available after repair. A label on the LabMASTER-aw gives information on the system code of the delivered unit. Please complete this if needed.
-
Page 26: Displayed Values
(right) to reach thermal equilibrium, before closing the instrument cover. Displayed values The Novasina LabMASTER-aw continuously measures the water activity (a lected / %RH) and the temperature (°C/°F) and displays the momentary values with bigger letters on the screen. If an analysing of an probe will be finished, the Actual system will fix the result. - Page 27 Correct handling of the sensor Note : Before starting the measurement. The Novasina sensor is a highly sensitive precision device. Please observe the following rules in order to avoid measuring errors or even destruction of the sensor : •...
- Page 28 • Never open or take the measuring cell apart or clean the sensor with any chemical or mechanical parts! The sensor itself is not cleanable. All attempt will expire the warranty. • Under no circumstances connect the sensor to an Ohmmeter or such like. This may damage the sensor and will expire the warranty of the sensor! Any warranty will expire if one or more of these points counteracts !!
- Page 29 The temperature stability observation time may also be changed from the factor „5“ set by Novasina to a higher factor for products with a temperature greatly different from that of the chamber (e.g. chilled samples).
- Page 30 The "Sorptions isotherm" chart gives the depending of both factors. Such chart are valid and unique only for one type of probe. Novasina has created a special "SI" set. For such purposes using this set in combination with a LabMASTER / PARTNER-aw, you can record such "Sorpitons isotherm"...
- Page 31 Recording a Sorption Isotherm curve Setup the LabMASTER/PARTNER-aw The lower part of the probe chamber of a LabMASTER/PARTNER-aw must be prepared first. Change the standard steerage to the special steerage for SI set. Take a screwdriver No. 2 and replace the steerage (see pictures below).
- Page 32 Desorption curve This is in princple the inverse part of an adsorption curve. The substance must be more humid when starting to weigh (to be safely on the desorption curve to avoid SI-hysteresis mistakes), so the first salt to use is SAL-T97. Upon reaching a value well above 0.9, SAL-T90 can be placed in.
- Page 33 SAL-T into the measurement chamber Example of doing a Sorption Isotherm curve (adsorption) with a biscuit: • Selected temperature of Novasina instrument: 25.0°C. • The totally desiccated sample has a net weight of 0.485g. • SAL-T 11% was placed together with the sample in the chamber.
- Page 34 QC manual, or fix shorter recalibration periods according to personal standards. An other good way is, to test one point with a Novasina SAL-T standard that fit near to the last measurement point of the last few probes at the end of a day.
-
Page 35: Calibration Procedure
6.3. Display Sensor Calibration Points Information about each calibration point can be seen in this menu. Each calibration point is stored directly on the intelligent sensor. Information like calibration date, time and user, who performed the are accessible. Go to menu "Settings" -> "Chamber settings" -> "Select chamber" number (only if you have 2 or more chambers activated), then press "0 : display calibration points"... - Page 36 SAL-T 75% standard first. After calibrating this first point, all other desired points can be calibrated in any order. Type of Novasina EU Toxic Color Chem. % relative humidity in relation Literature Hum.check...
- Page 37 6.6. Interfaces RS-232 and USB The Novasina LabMASTER-aw can be connected to a PC via the USB or the RS232 interface (9-pin D-sub plug). Please do not connect both interface to a PC at the same time. This will not work and maybe it can damage the system! The software „Novalog MC“...
- Page 38 Please use ordinary USB cables that are available in computer stores. The USB interface uses the USB 1.1 standard. As soon as you connect a LabMASTER-aw with a USB cable to a Windows PC, Windows will ask you to install two new drivers for the USB as well for a virtual RS-232 interface to the "NovaLog MC"...
- Page 39 • when the instrument was not used over a period of time. Novasina developed a simple method for checking the sensors with humidity standards. The humidity standards are saturated aqueous salt solutions consisting of pure chemical salts and distilled water. If the humidity standard is in thermal and humidity equilibrium with the sensor, it can be seen, if the displayed value is within the user’s...
- Page 40 Novasina offers the following protecion filters for the LabMASTER/ PARTNER-aw. • Redox filter Chemical filter: protects against all kinds of alcohols, aromas, fragrances. • eVC-21 chemical filter Chemical filter: protects against hydrogen peroxide, acid gases, diluted acetic and formic acid, sulfur dioxide, chlorine.
-
Page 41: Replacing A Cm-2 Sensor Unit
7.4. Replacing a CM-2 Sensor Unit • Switch off the instrument and disconnect the mains from the system. • Remove the 3 screws (tool is inside the SAL-T set), carefully pull out the • measuring block (NEVER let drop this unit on the instrument table). •... - Page 42 7.5. Replacing an Instrument Fuse The LabMASTER-aw can be connected directly to your local power line of 90...260V AC. A main fuse protects the power supply against overload. The fuse is integrated directly inside the mains connector. Please follow the instructions to replace it with a same type of fuse (1 spare fuse included in drawer above mains connector).
-
Page 43: Technical Specifications
Technical specifications General Mains supply 90…260V, 50/60Hz LabMASTER-aw Fuse: 6.3 A FST (slow blow), 1 spare fuse LabPARTNER-aw Fuse: 6.3 A FST (slow blow), 1 spare fuse Power consumption max. 65 W per instrument (after temperature equilibrium 15 W) Permissible ambient Temperature range 5…45°C... - Page 44 2. If you are a system administrator, you have to reset the system to the factory status or send the instrument to the next Novasina service station. 3. Reload the software via RS-232 or USB on the LabMASTER -> You loose all personal settings of the system!
-
Page 45: Error Message Screens
9.2. Error message screens If any error message appears on the LabMaster-aw screen, please proceed as follows: Please write down the error message carefully. Switch the instrument off and restart. If the error message recur, please follow the instructions on the table and/or contact your Novasina representative (www.novasina.com) -
Page 46: Fatal Error
! sticker on the bottom of the in- strument. This point does not apply for the LabMaster-aw "BASIC"-version. 3) set all settings new (date, ti- met, "user" account, ...) Fatal Error error description... - Page 47 10. Short Menu overview...
- Page 48 In case of any further questions, Novasina and its agencies will be happy to advise you at any time. Your Novasina...
Need help?
Do you have a question about the LabMaster-aw and is the answer not in the manual?
Questions and answers